MSI X99S SLI PLUS User Manual - Page 105
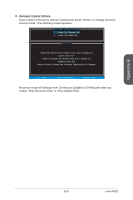
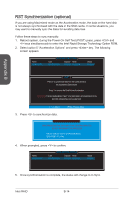
Exit Intel RAID Option ROM, and then reboot to Windows system.
 |
View all MSI X99S SLI PLUS manuals
Add to My Manuals
Save this manual to your list of manuals |
Page 105 highlights
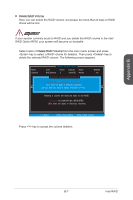
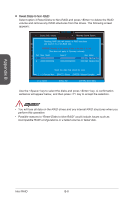
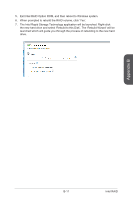
5. Exit Intel RAID Option ROM, and then reboot to Windows system. 6. When prompted to rebuild the RAID volume, click 'Yes'. 7. The Intel Rapid Storage Technology application will be launched. Right-click the new hard drive and select 'Rebuild to this Disk'. The 'Rebuild Wizard' will be launched which will guide you through the process of rebuilding to the new hard drive. Appendix B B-11 Intel RAID
-
 1
1 -
2
-
3
-
4
-
5
-
6
-
7
-
8
-
9
-
10
-
11
-
12
-
13
-
14
-
15
-
16
-
17
-
18
-
19
-
20
-
21
-
22
-
23
-
24
-
25
-
26
-
27
-
28
-
29
-
30
-
31
-
32
-
33
-
34
-
35
-
36
-
37
-
38
-
39
-
40
-
41
-
42
-
43
-
44
-
45
-
46
-
47
-
48
-
49
-
50
-
51
-
52
-
53
-
54
-
55
-
56
-
57
-
58
-
59
-
60
-
61
-
62
-
63
-
64
-
65
-
66
-
67
-
68
-
69
-
70
-
71
-
72
-
73
-
74
-
75
-
76
-
77
-
78
-
79
-
80
-
81
-
82
-
83
-
84
-
85
-
86
-
87
-
88
-
89
-
90
-
91
-
92
-
93
-
94
-
95
-
96
-
97
-
98
-
99
-
 100
100 -
 101
101 -
 102
102 -
 103
103 -
 104
104 -
 105
105 -
 106
106 -
 107
107 -
 108
108
 |
 |

Appendix B
B-11
Intel RAID
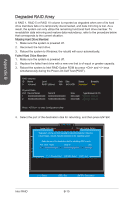
5.
Exit Intel RAID Option ROM, and then reboot to Windows system.
6.
When prompted to rebuild the RAID volume, click ‘Yes’.
7.
The Intel Rapid Storage Technology application will be launched. Right-click
the new hard drive and select ‘Rebuild to this Disk’. The ‘Rebuild Wizard’ will be
launched which will guide you through the process of rebuilding to the new hard
drive.