MSI X99S SLI PLUS User Manual - Page 28
Alignment Key
 |
View all MSI X99S SLI PLUS manuals
Add to My Manuals
Save this manual to your list of manuals |
Page 28 highlights
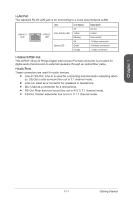
Chapter 1 5. Line up the CPU to fit the CPU socket. Be sure to hold the CPU by the base with the metal contacts facing downward. The alignment keys on the CPU will line up with the edges of the CPU socket to ensure a correct fit. 6. Carefully close the load plate and remove the plastic protective cap. Alignment Key 7. Close the active lever with a smooth uniform motion and latch to the socket. 8. Close the hinge lever with a smooth uniform motion and latch to the socket. Getting Started 1-14
-
 1
1 -
2
-
3
-
4
-
5
-
6
-
7
-
8
-
9
-
10
-
11
-
12
-
13
-
14
-
15
-
16
-
17
-
18
-
19
-
20
-
21
-
22
-
 23
23 -
 24
24 -
 25
25 -
 26
26 -
 27
27 -
 28
28 -
 29
29 -
 30
30 -
 31
31 -
 32
32 -
 33
33 -
34
-
35
-
36
-
37
-
38
-
39
-
40
-
41
-
42
-
43
-
44
-
45
-
46
-
47
-
48
-
49
-
50
-
51
-
52
-
53
-
54
-
55
-
56
-
57
-
58
-
59
-
60
-
61
-
62
-
63
-
64
-
65
-
66
-
67
-
68
-
69
-
70
-
71
-
72
-
73
-
74
-
75
-
76
-
77
-
78
-
79
-
80
-
81
-
82
-
83
-
84
-
85
-
86
-
87
-
88
-
89
-
90
-
91
-
92
-
93
-
94
-
95
-
96
-
97
-
98
-
99
-
100
-
101
-
102
-
103
-
104
-
105
-
106
-
107
-
108
 |
 |

Chapter 1
1-14
Getting Started
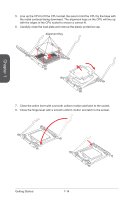
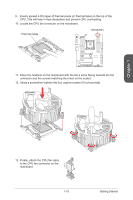
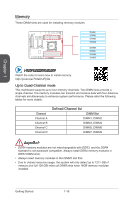
7.
Close the active lever with a smooth uniform motion and latch to the socket.
8.
Close the hinge lever with a smooth uniform motion and latch to the socket.
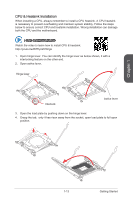
5.
Line up the CPU to fit the CPU socket. Be sure to hold the CPU by the base with
the metal contacts facing downward. The alignment keys on the CPU will line up
with the edges of the CPU socket to ensure a correct fit.
6.
Carefully close the load plate and remove the plastic protective cap.
Alignment Key