Mackie PPM1012 Owner's Manual - Page 23
Break Switch And Led
 |
View all Mackie PPM1012 manuals
Add to My Manuals
Save this manual to your list of manuals |
Page 23 highlights
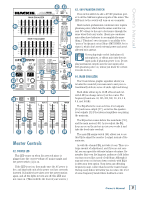
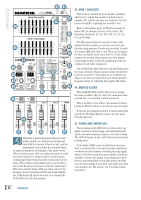
Owner's Manual 48. MAIN MIX METERS Developed from professional hamster drag-racing association (PHDRA) starting lights, these stereo meters show the level of the left and right main mix, after the main fader [59] and graphic EQ [44] sections. The top LEDs are marked OL (overload), and you should adjust the levels to avoid these coming on too often, if at all. Check the levels after changing the graphic EQ, the main fader, or any channel settings. When a channel is soloed, the left meter indicates the soloed channel level, and the 0 dB mark shows the optimum level for adjustment of the channel gain control. See page 3 for details. Please remember: Audio meter displays are just tools to help assure you that your levels are "in the ballpark." You don't have to stare at them (unless you want to). 49. RUDE SOLO LIGHT This rather impertinent LED will light whenever a solo button [41] is pressed. This acts as a reminder that one or more channels is soloed, so the headphones play one or more soloed channels, and the left meter [48] indicates the soloed level, not the main mix level. Use the nearby tape in control [52] to turn up the level of the tape input to play in your system during the break(age). 52. TAPE IN When the break switch [51] is pressed in, this knob allows you to turn up the level of the tape input. This will then play in your main system instead of the main mix. Fully down is off, U is unity gain, and fully up gives 20 dB of gain. Keep this control fully down, until a break is required, then press the break switch and carefully bring up the level, while you play the tape or CD. Any line-level source can be connected to the tape inputs [13], including iPod docks, CD/DVD players and so forth. 53. POWER AMP MODE SWITCH This three-position switch lets you choose which signal paths from the mixer section are sent to the internal power amplifiers. This allows considerable flexibility in the use of the powered mixer. For example, if you already have powered main loudspeakers, you could use the PPM1012 power amplifiers to run passive stage monitors. 50. PRECISION PASSIVE EQ If you are using Mackie passive speakers such as the C200, C300z, S215, and S225, then press this switch in for enhanced clarity and low-frequency response. If you are not using Mackie speakers, then press it and listen for any improvement. The passive EQ circuit is added just before the internal power amplifiers, so only loudspeakers connected to the rear panel speaker-level outputs [3] will be affected. 51. BREAK SWITCH and LED This important "take-a-break" switch quickly disconnects the main mix from playing in the main loudspeakers [3] and line-level outputs [16, 17], and allows the tape input [13] to play instead. For example, you could play a soothing CD to restore order while the band is hiding, and before the police arrive. As the audience is trashing the stage, there will be no upsetting microphone yells, noise, thumps or rumbles heard in the main speakers. The monitor 1 and monitor 2 outputs are not affected by the break switch, so you could turn down the monitor faders [58] if needed. Stereo Mains The output from channel A is the left side of the main mix, and the output from channel B is the right side of the main mix. Choose this position to play a straight stereo show. Mains/Monitor 1 Channel A is the mono main mix, and channel B is the monitor 1 mix. In this setup, you could run a mono PA system on one channel, and a passive stage monitor on the other. Monitor 1/Monitor 2 Channel A is the monitor 1 mix, and channel B is the monitor 2 mix. In this setup, the internal power amplifiers could power two passive stage monitors (or sets of monitors). Note: This switch does not affect any line level output, it just affects what is sent to the internal power amplifiers. The break LED will come on as a reminder that the break switch is engaged. Check this LED first, if you are not hearing any sound in your system. Owner's Manual 23
-
 1
1 -
2
-
3
-
4
-
5
-
6
-
7
-
8
-
9
-
10
-
11
-
12
-
13
-
14
-
15
-
16
-
17
-
 18
18 -
 19
19 -
 20
20 -
 21
21 -
 22
22 -
 23
23 -
 24
24 -
 25
25 -
 26
26 -
 27
27 -
 28
28 -
29
-
30
-
31
-
32
-
33
-
34
-
35
-
36
 |
 |