Magnavox 17MD255V User manual, English (US) - Page 9
Connections - ac adapter
 |
UPC - 037849959923
View all Magnavox 17MD255V manuals
Add to My Manuals
Save this manual to your list of manuals |
Page 9 highlights
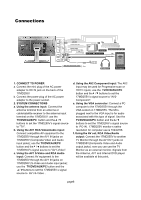
Connections AV1 IN VIDEO L AUDIO S-VIDEO R AV OUT VIDEO L AUDIO CR / PR R CB / PB L AUDIO Y R AV2 IN AUDIO VGA PHONES DC IN 1a 2c 2b 2f 2d or HDTV Receiver 2e VGA Audio Cable 1b 2a Computer 1. CONNECT TO POWER a. Connect the mini plug of the AC power adapter to DC IN jack on the back of the 17MD255V. b. Connect the power plug of the AC power adapter to the power socket. 2. SYSTEM CONNECTIONS a. Using the antenna input: Connect the antenna terminal from an antenna or cable/satellite receiver to the antenna input terminal on the 17MD255V; use the TV/DVD/AUX/PC button and the / buttons to set the 17MD255V's signal source to "TV". b. Using the AV1 RCA Video/Audio input: Connect compatible AV equipment to the 17MD255V through the AV1 IN jacks on 17MD255V (Composite Video and Audio input jacks); use the TV/DVD/AUX/PC button and the / buttons to set the 17MD255V's signal source to "AV1-Video". c. Using the AV1 S-Video and RCA Audio input: Connect AV equipment to the 17MD255V through the AV1 IN jacks on 17MD255V (S-Video and Audio input jacks); use the TV/DVD/AUX/PC button and the / buttons to set the 17MD255V s signal source to AV1-S-Video . d. Using the AV2 Component input: The AV2 input may be used for Progressive scan or HDTV inputs; use the TV/DVD/AUX/PC button and the / buttons to set the 17MD255V's signal source to "AV2Component". e. Using the VGA connector: Connect a PC computer to the 17MD255V through the VGA socket on 17MD255V. The Miniplugged next to the VGA input is for audio associated with this type of signal. Use the TV/DVD/AUX/PC button and the / buttons to set the 17MD255V s signal source to PC-IN . 17MD255V monitor s native resolution for computer use is 1024x768. f. Using the AV out, RCA Video/Audio output: Connect the 17MD255V to another TV Monitor through the AV OUT jacks on 17MD255V(Composite Video and Audio output jacks); now you can use the TV Monitor as an external monitor. Signals from the Antenna, AV1 and Internal DVD player will be available at this point. page8
-
 1
1 -
2
-
3
-
 4
4 -
 5
5 -
 6
6 -
 7
7 -
 8
8 -
 9
9 -
 10
10 -
 11
11 -
 12
12 -
 13
13 -
 14
14 -
15
-
16
-
17
-
18
-
19
-
20
-
21
-
22
-
23
-
24
-
25
-
26
-
27
-
28
-
29
-
30
-
31
-
32
-
33
-
34
-
35
-
36
-
37
-
38
-
39
-
40
-
41
-
42
 |
 |
