Maytag MER6875BAS Use and Care Guide - Page 15
Broiling
 |
UPC - 719881178646
View all Maytag MER6875BAS manuals
Add to My Manuals
Save this manual to your list of manuals |
Page 15 highlights
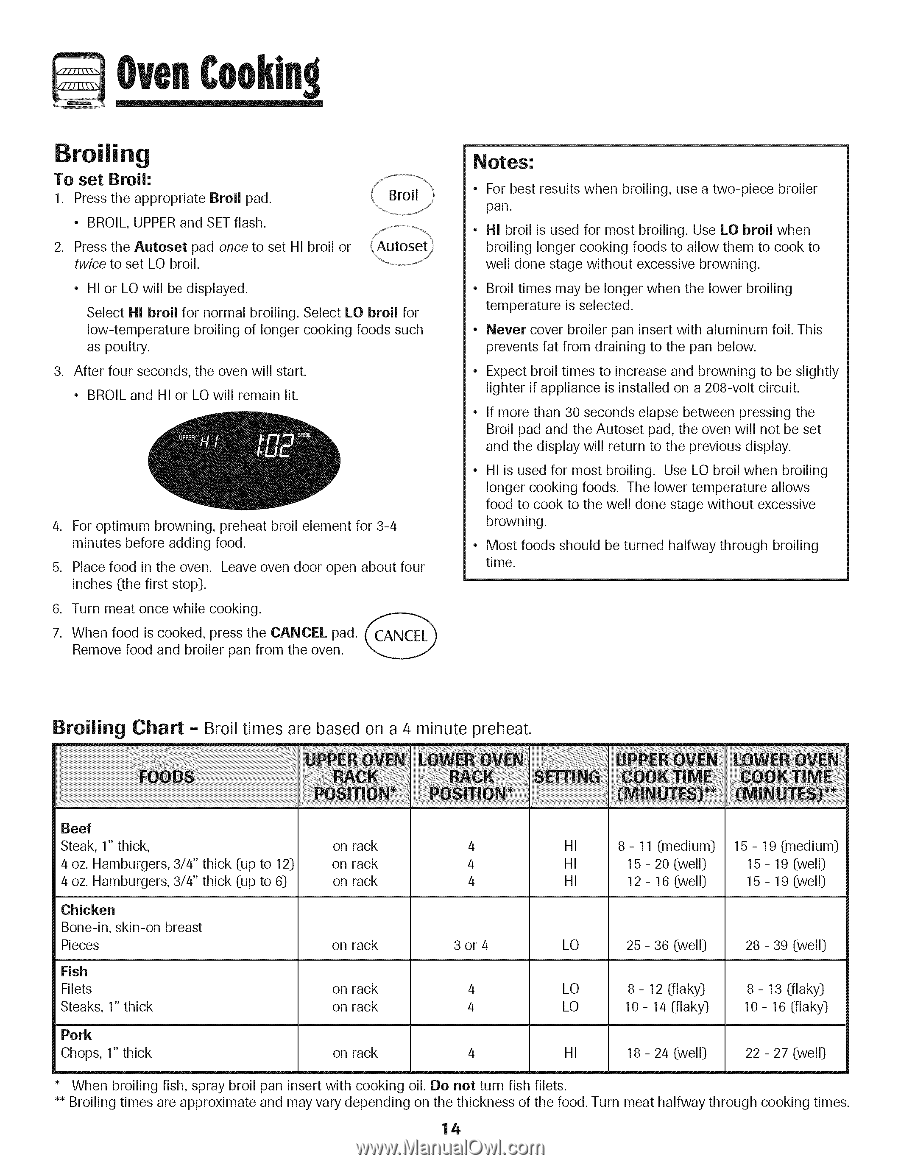
Broiling To set Broil: 1. Press the appropriate Broil pad. • BROIL, UPPERand SET flash. 2. Press the Autoset pad once to set HI broil or twice to set LO broil. • HI or LO will be displayed. Select HI broil for normal broiling. Select LO broil for low-temperature broiling of longer cooking foods such as poultry. 3. After four seconds, the oven will start. • BROIL and HI or LO will remain lit. 4. For optimum browning, preheat broil element for 3-4 minutes before adding food. 5. Place food in the oven. Leave oven door open about four inches (the first stop]. 6. Turn meat once while cooking. 7. When food is cooked, press the CANCEL pad. _CANCEL_ Remove food and broiler pan from the oven. Notes: • For best results when broiling, use a two-piece broiler pan. • HI broil is used for most broiling. Use LO broil when broiling longer cooking foods to allow them to cook to well done stage without excessive browning. • Broil times may be longer when the lower broiling temperature is selected. • Never cover broiler pan insertwith aluminum foil. This prevents fat from draining to the pan below. • Expect broil times to increaseand browning to be slightly lighter if appliance is installedon a 208-volt circuit. • If more than 30 seconds elapse between pressing the Broil pad and the Autoset pad, the oven will not be set and the display will return to the previous display. • HI is used for most broiling. Use LO broil when broiling longer cooking foods. The lower temperature allows food to cook to the well done stage without excessive browning. ° Most foods should be turned halfway through broiling time. Broiling Chart = Broil times are based on a 4 minute preheat. Beef Steak, 1" thick, on rack 4 4 oz. Hamburgers, 3/4" thick (up to 12) on rack 4 4 oz. Hamburgers, 3/4" thick (up to 6] on rack 4 Chicken Bone-in, skin-on breast Pieces on rack 3or4 Fish Filets Steaks, 1" thick on rack 4 on rack 4 Pork Chops, 1" thick on rack 4 HI 8 - 11 [medium] 15 - 19 [medium] HI 15 - 20 (well) 15 - 19 (well) HI 12 - 16 (well) 15 - 19 (well) LO 25 - 36 [well) 28 - 39 (well) LO 8 - 12 [flaky] 8 - 13 [flaky] LO 10 - 14 [flaky] 10 - 16 [flaky] HI 18 - 24 (well) 22 - 27 (well) When broiling fish, spray broil pan insert with cooking oil. Do not turn fish filets. ** Broiling times are approximate and may vary depending on the thickness of the food. Turn meat halfway through cooking times. 14
-
 1
1 -
2
-
3
-
4
-
5
-
6
-
7
-
8
-
9
-
 10
10 -
 11
11 -
 12
12 -
 13
13 -
 14
14 -
 15
15 -
 16
16 -
 17
17 -
 18
18 -
 19
19 -
 20
20 -
21
-
22
-
23
-
24
-
25
-
26
-
27
-
28
-
29
-
30
-
31
-
32
-
33
-
34
-
35
-
36
-
37
-
38
-
39
-
40
-
41
-
42
-
43
-
44
-
45
-
46
-
47
-
48
-
49
-
50
-
51
-
52
-
53
-
54
-
55
-
56
-
57
-
58
-
59
-
60
-
61
-
62
-
63
-
64
-
65
-
66
-
67
-
68
-
69
-
70
-
71
-
72
-
73
-
74
-
75
-
76
-
77
-
78
-
79
-
80
-
81
-
82
-
83
-
84
-
85
-
86
-
87
-
88
 |
 |