Meade TE923W-M User Manual - Page 15
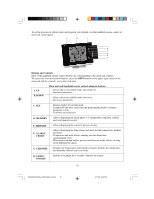
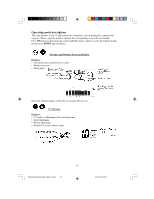
Once the main unit is powered, the display will show all available LCD segments for a moment.
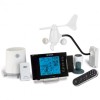 |
View all Meade TE923W-M manuals
Add to My Manuals
Save this manual to your list of manuals |
Page 15 highlights
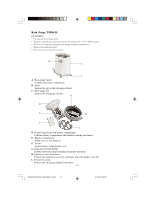
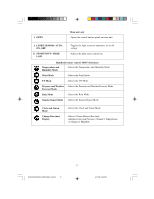
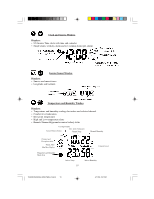
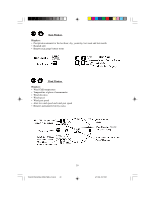
Battery installation • Open the battery compartment door on the back of the main unit. • Insert four (4) AA size batteries according to the polarities shown and replace the battery compartment door. • Connect 7.5V AC/DC adapter provided to the main display unit and plug into the wall power outlet. Note: The AC/DC adaptor connection is required for automatic backlight control and a handheld remote control functions. If the main unit operates solely on the battery power, the auto backlight control and handheld remote control functions will be disabled. • When placing the main unit on the table or other horizontal surface, unfold the table stand adjusting it to the desired viewing angle. • When mounting the main unit on the wall or vertical surface, fold the table stand back into the unit and use the mounting hardware provided. Placement tips • Make sure that the main unit is locating within the operating range of all remote weather sensors. • Ideally the remote weather sensors should be mounted within the line of sight of the main unit. • Transmission range may be affected by trees, metal structures and electronic appliances. • Test reception before permanently mounting all the remote weather sensors. Avoid placing the main unit in the following areas: • Direct sunlight and surfaces emitting and radiating heat, such as heating ducts or air conditioners. • Areas with interference from the wireless devices (such as cordless phones, radio headsets, baby listening devices) and electronic appliances. Operation Once the main unit is powered, the display will show all available LCD segments for a moment. IMPORTANT: All of the display functions will be locked, allowing setting your local altitude and pressure parameters. The locked display will show the pressure icon and abbreviation "inHg" flashing, indoor temperature and humidity readings, default time and default sunset/sunrise time. If pressure and altitude are not configured during this time, the unit will self-calibrate in a few minutes and show the default settings for the pressure and altitude (sea level) and all remote weather sensors readings. IMPORTANT: If not set during the initial setup, the altitude cannot be adjusted or set at any other time. In order to set the altitude, you will have to restart the main unit completely. 15 TE923W IM1(ENG) HONEYWELL R.pmd 15 4/11/08, 5:26 PM
-
 1
1 -
2
-
3
-
4
-
5
-
6
-
7
-
8
-
9
-
 10
10 -
 11
11 -
 12
12 -
 13
13 -
 14
14 -
 15
15 -
 16
16 -
 17
17 -
 18
18 -
 19
19 -
 20
20 -
21
-
22
-
23
-
24
-
25
-
26
-
27
-
28
-
29
-
30
-
31
-
32
-
33
-
34
-
35
-
36
-
37
-
38
-
39
-
40
-
41
-
42
-
43
-
44
 |
 |