Memorex MVDP1083 User Manual - Page 24
Component, Sharpness, Brightness, Contrast
 |
View all Memorex MVDP1083 manuals
Add to My Manuals
Save this manual to your list of manuals |
Page 24 highlights
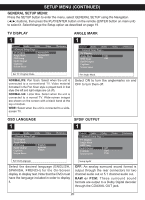
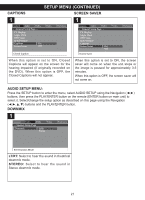
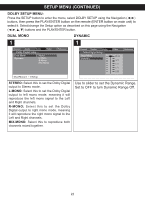
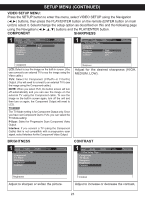
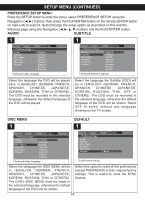
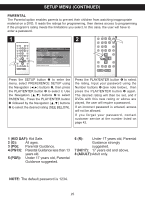
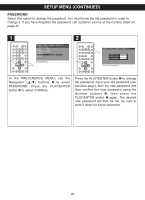
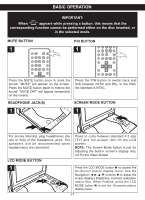
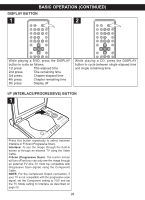
General Audio Dolby Video Preference - - VidCeoomSpeotnuepntPage - - General Audio SETUP MENU (COCoNmpTonIeNnt UED) Dolby Video Preference TV Mode VID- E- VOideSo ESeTtuUp PPagMe -E- NU: Sharpness High Component LCD Brightness Medium PreTsVs MthoedeSETUP buYtutovn to enter the menu, selecCt oVnItrDasEt O SETUP Luoswing the Navigation (√,SB®hriag)rhpbtnneuesstsstons, then press the PLAY/ENTER button on the remote (ENTER button on main unitC) otnotrsaset lect it. Select/change the setup option as described on this and the following page using the Navigation buttons and theShParLpnAeYss/ENTER button. COMPONENT SHARPNESS Component 1 General Audio Dolby - - Video Setup Page - - Video Preference 1 General Audio Dolby - - Video Setup Page - - Video Preference Component TV Mode Sharpness Brightness Contrast LCD Yuv Component TV Mode Sharpness Brightness Contrast High Medium Low Component LCD: Select to see the image on the built-in screen. (You can connect to an external TV to see the image using the VidGeeonecraalble.)Audio Dolby Video Preference YU-V- :ViSdeeoleScettufpoPr aCgeo-m- ponent (Y/PB/PR or Y/CB/CR) OutCpoumt. p(Yoonuenwt ill need to connect to an external TV to see the TimVaMgeoduesing the Component cable.) NOSThEa:rpWnhesesn you select YHUigVh, the built-in screen will turn Brightness Medium off Caountotrmasat tically and yoLuowcan see the image on the external TV using the Component cable. To see the image on the built-in screen again, turn off the unit and then tuGrenneoranl agAauidni,o the CDoolbmy poneVnidteoOutpuPtrewfeirlelnrcee set to LCSDh.ar-p-nVeidsseo Setup Page - - TV MOCTDVoEmMpoodneent The TVSMhaorpdneesssetting is for CHoigmhponent Output only. Once you Brightness havCeonstreatstComponent OMLuotewdtoiumYUV, you can select the TV Mode setting: P-Scan: Select for Progressive Scan Component Video Output. Sharpness Interlace: If you connect a TV (using the Component Cable) that is not compatible with a progressive scan signal, select Interlace for the Component Video Output. Sharpness Adjust for the desired sharpness (HIGH, MEGDenIeUralM, LAOudiWo ). Dolby Video Preference - - Video Setup Page - - Component TV Mode Sharpness Brightness Contrast Brightness General Audio Dolby - - Video Setup Page - - Component TV Mode Sharpness Brightness Contrast Video Preference Brightness BRIGHTNESS 1 General Audio Dolby Video Preference - - Video Setup Page - - Component TV Mode Sharpness Brightness Contrast General Audio Dolby Video Preference - - Video Setup Page - - Component TV Mode BrighSthnaerpssness Brightness Contrast Adjust to sharpen or soften the picture. Brightness CONTRAST 1General Audio Dolby - - Video Setup Page - - Component TV Mode Sharpness Brightness Contrast Video Preference General Audio Dolby Video Preference Contr-a-sVt ideo Setup Page - Component TV Mode Adjust Stoharipnncesrsease or decrease the contrast. Brightness Contrast 23 Contrast
-
 1
1 -
2
-
3
-
4
-
5
-
6
-
7
-
8
-
9
-
10
-
11
-
12
-
13
-
14
-
15
-
16
-
17
-
18
-
 19
19 -
 20
20 -
 21
21 -
 22
22 -
 23
23 -
 24
24 -
 25
25 -
 26
26 -
 27
27 -
 28
28 -
 29
29 -
30
-
31
-
32
-
33
-
34
-
35
-
36
-
37
-
38
-
39
-
40
-
41
-
42
-
43
-
44
-
45
-
46
 |
 |
