Metabo BS 18 LTX-3 BL I Metal Operating Instructions - Page 14
Troubleshooting
 |
View all Metabo BS 18 LTX-3 BL I Metal manuals
Add to My Manuals
Save this manual to your list of manuals |
Page 14 highlights
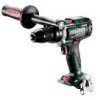
en ENGLISH The shutdown is indicated by a single red flashing of the LED light (14) and a single beep. 7.2 Battery pack, capacity and signal indicator Fig. B Charge the battery pack before use. Recharge the battery pack if performance diminishes. Instructions on charging the battery pack can be found in the operating instructions of the Metabo charger. 7.3 Removing and inserting the battery pack Fig. C 7.4 Setting the direction of rotation, engaging the transporting safety device (switch-on lock) Fig. D 7.5 Select the gear Fig. E Do not set the gear switch (4) unless the motor has stopped completely! 7.6 Set drill, hammer drill Activate slide switch (3). Fig. A 7.7 Setting torque control, maximum torque, pulse function For the protection of the user and the machine: Perform metric screw connection with M8 thread size or larger only with torque limitationon settings 1 to 5. Otherwise the machine can get damaged by the torque shock during the screwdriving process or the user can get injured by a kickback of the machine. Do not work for long periods with pulse function switched on! (The motor can overheat.) Fig. F Set the desired operating mode at the setting wheel (13): 1...10 = Torque control = maximum torque = Impulse function (for loosening jammed screws without tearing them off) 7.8 Switching On/Off, setting the speed Fig. A Switching on, speed: press the trigger switch (15). Press in the trigger switch to increase the rotational speed. Switching off: release the trigger switch (15). Note: the noise that the machine makes when it switches off is due to the design (quick stop) and has no influence on the function or the service life of the machine. 7.9 Keyless chuck Fig. G With a soft tool shank, retightening may be required after a short drilling period. Instructions for machines with the designation SB...: 1. The grating sound which may be heard after opening the chuck is functional and is stopped by turning the sleeve in the opposite direction. 2. Clamping the tool: Turn sleeve in direction "GRIP, ZU" until the noticeable mechanical resistance has been overcome. Caution! The tool is not yet clamped! Keep turning the sleeve (it must "click" when turning), until it cannot be turned any further only now is the tool securely clamped. Cleaning: from time to time, hold the machine vertically with the chuck facing downwards and turn the sleeve fully in the direction "GRIP, ZU" and then turn fully in the direction "AUF, RELEASE". The dust collected falls from the keyless chuck. Instructions for machines with the designation ...metal: If the drill chuck cannot be opened by hand use the C-wrench (16) as shown. Fig. H. Do not use the C-wrench (16) for tensioning the drill chuck. 7.10 Chuck with quick-change system Quick (for machines with the designation ...BL Q...) Fig. I. To remove: Push the interlock ring forward (a), advance and pull off the chuck (b). To fit: push the interlock ring forward and move the chuck as far as the limit stop on the drill spindle. 7.11 Fitting the belt hook (equipmentspecific) / bit depot (equipment-specific) Fig. J Fit the belt hook (8) as shown. Fit the bit depot (7) as shown. 8. Troubleshooting 8.1 Defective electronic safety shutdown Red continuous lighting of the LED lamp (14) signals a defective safety shutdown.Have the machine repaired. See chapter 10. 8.2 The machine's multifunctional monitoring system If the machine switches off automatically, the machine electronics have activated automatic protection mode. There will be a warning signal (beep). The beeping stops after a maximum of 30 seconds or when the trigger switch (15) is released. In spite of this protective function, overloading is still possible with certain applications and can result in damage to the machine. 14
-
 1
1 -
2
-
3
-
4
-
5
-
6
-
7
-
8
-
 9
9 -
 10
10 -
 11
11 -
 12
12 -
 13
13 -
 14
14 -
 15
15 -
 16
16 -
 17
17 -
 18
18 -
 19
19 -
20
-
21
-
22
-
23
-
24
-
25
-
26
-
27
-
28
-
29
-
30
-
31
-
32
-
33
-
34
-
35
-
36
-
37
-
38
-
39
-
40
-
41
-
42
-
43
-
44
-
45
-
46
-
47
-
48
-
49
-
50
-
51
-
52
-
53
-
54
-
55
-
56
-
57
-
58
-
59
-
60
-
61
-
62
-
63
-
64
-
65
-
66
-
67
-
68
-
69
-
70
-
71
-
72
-
73
-
74
-
75
-
76
-
77
-
78
-
79
-
80
-
81
-
82
-
83
-
84
-
85
-
86
-
87
-
88
 |
 |
