Motorola MOTOMING A1200 User Guide - Page 48
add new contact, view and edit contact details
 |
View all Motorola MOTOMING A1200 manuals
Add to My Manuals
Save this manual to your list of manuals |
Page 48 highlights
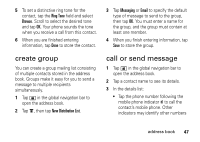
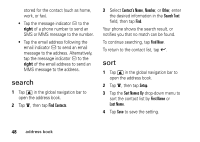
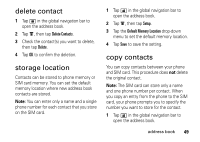
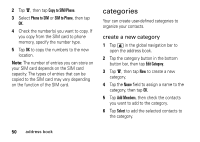
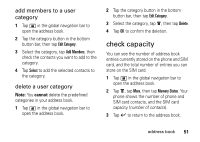
view and edit contact details 1 In the contact list, tap a contact name to see its details. 2 Tap Edit to edit the contact. Your phone shows complete contact details. 3 To edit contact information, tap the direct line in the field you want to edit. 4 When you are finished editing contact information, tap Done to store your changes and return to the contact list. add new contact Contacts can be stored to phone memory or SIM card memory. To set the default storage location, see page 49. Note: You can enter only a name and a single phone number for each contact that you store on the SIM card. 1 Tap > in the global navigation bar to open the address book. First Name: Last Name: 2 Tap é, then tap New Contact. 3 On the new contact screen (shown at right), Category: Unfiled Done tap the Photo field to assign a picture ID to the entry. Your phone shows the picture when you receive a call from this contact. 4 Tap the direct line in a field to enter contact details. Pull down the scroll bar to see additional fields. 46 address book
-
 1
1 -
2
-
3
-
4
-
5
-
6
-
7
-
8
-
9
-
10
-
11
-
12
-
13
-
14
-
15
-
16
-
17
-
18
-
19
-
20
-
21
-
22
-
23
-
24
-
25
-
26
-
27
-
28
-
29
-
30
-
31
-
32
-
33
-
34
-
35
-
36
-
37
-
38
-
39
-
40
-
41
-
42
-
 43
43 -
 44
44 -
 45
45 -
 46
46 -
 47
47 -
 48
48 -
 49
49 -
 50
50 -
 51
51 -
 52
52 -
 53
53 -
54
-
55
-
56
-
57
-
58
-
59
-
60
-
61
-
62
-
63
-
64
-
65
-
66
-
67
-
68
-
69
-
70
-
71
-
72
-
73
-
74
-
75
-
76
-
77
-
78
-
79
-
80
-
81
-
82
-
83
-
84
-
85
-
86
-
87
-
88
-
89
-
90
-
91
-
92
-
93
-
94
-
95
-
96
-
97
-
98
-
99
-
100
-
101
-
102
-
103
-
104
-
105
-
106
-
107
-
108
-
109
-
110
-
111
-
112
-
113
-
114
-
115
-
116
-
117
-
118
-
119
-
120
-
121
-
122
-
123
-
124
-
125
-
126
-
127
-
128
-
129
-
130
-
131
-
132
-
133
-
134
-
135
-
136
-
137
-
138
-
139
-
140
-
141
-
142
-
143
-
144
-
145
-
146
-
147
-
148
-
149
-
150
-
151
-
152
-
153
-
154
-
155
-
156
-
157
-
158
-
159
-
160
-
161
-
162
-
163
-
164
-
165
-
166
-
167
-
168
-
169
-
170
-
171
-
172
-
173
-
174
 |
 |
