Motorola RDU2020 User Guide - Page 31
Getting Started, Turning Radio On/off, Adjusting Volume, Selecting A Channel, Talking And Monitoring - how to program
 |
UPC - 723755539921
View all Motorola RDU2020 manuals
Add to My Manuals
Save this manual to your list of manuals |
Page 31 highlights
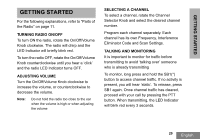
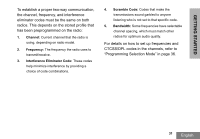
GETTING STARTED GETTING STARTED For the following explanations, refer to "Parts of the Radio" on page 11. TURNING RADIO ON/OFF To turn ON the radio, rotate the On/Off/Volume Knob clockwise. The radio will chirp and the LED Indicator will briefly blink red. To turn the radio OFF, rotate the On/Off/Volume Knob counterclockwise until you hear a 'click' and the radio LED Indicator turns OFF. ADJUSTING VOLUME Turn the On/Off/Volume Knob clockwise to increase the volume, or counterclockwise to decrease the volume. Note: Do not hold the radio too close to the ear when the volume is high or when adjusting the volume SELECTING A CHANNEL To select a channel, rotate the Channel Selector Knob and select the desired channel number. Program each channel separately. Each channel has its own Frequency, Interference Eliminator Code and Scan Settings. TALKING AND MONITORING It is important to monitor for traffic before transmitting to avoid 'talking over' someone who is already transmitting To monitor, long press and hold the SB1(*) button to access channel traffic. If no activity is present, you will hear 'static'. To release, press SB1 again. Once channel traffic has cleared, proceed with your call by pressing the PTT button. When transmitting, the LED Indicator will blink red every 3 seconds. 29 English
-
 1
1 -
2
-
3
-
4
-
5
-
6
-
7
-
8
-
9
-
10
-
11
-
12
-
13
-
14
-
15
-
16
-
17
-
18
-
19
-
20
-
21
-
22
-
23
-
24
-
25
-
 26
26 -
 27
27 -
 28
28 -
 29
29 -
 30
30 -
 31
31 -
 32
32 -
 33
33 -
 34
34 -
 35
35 -
 36
36 -
37
-
38
-
39
-
40
-
41
-
42
-
43
-
44
-
45
-
46
-
47
-
48
-
49
-
50
-
51
-
52
-
53
-
54
-
55
-
56
-
57
-
58
-
59
-
60
-
61
-
62
-
63
-
64
-
65
-
66
-
67
-
68
-
69
-
70
-
71
-
72
-
73
-
74
-
75
-
76
-
77
-
78
-
79
-
80
-
81
-
82
-
83
-
84
-
85
-
86
-
87
-
88
-
89
-
90
-
91
-
92
-
93
-
94
-
95
-
96
-
97
-
98
-
99
 |
 |