Motorola RDU2020 User Guide - Page 43
Reading Auto-Scan Values, Programming Frequencies, Codes and, Auto-Scan, increasing, Saving Settings - default frequencies
 |
UPC - 723755539921
View all Motorola RDU2020 manuals
Add to My Manuals
Save this manual to your list of manuals |
Page 43 highlights
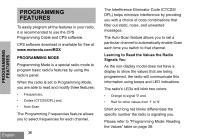
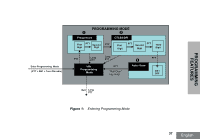
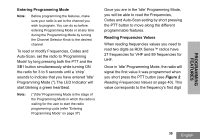
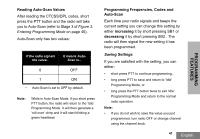
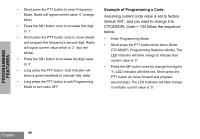
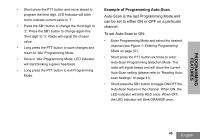
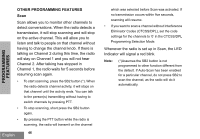
Reading Auto-Scan Values After reading the CTCSS/DPL codes, short press the PTT button and the radio will take you to Auto-Scan (refer to Stage 3 of Figure 3: Entering Programming Mode on page 40). Auto-Scan only has two values: If the radio signals the value... It means AutoScan is... 0 OFF 1 ON • Auto-Scan is set to OFF by default. Note: While in Auto-Scan Mode, if you short press PTT button, the radio will return to the 'Idle' Programming Mode. It will then generate a 'roll-over' chirp and it will start blinking a green heartbeat Programming Frequencies, Codes and Auto-Scan Each time your radio signals and beeps the current setting you can change this setting by either increasing it by short pressing SB1 or decreasing it by short pressing SB2 . The radio will then signal the new setting it has been programmed. Saving Settings If you are satisfied with the setting, you can either: • short press PTT to continue programming, • long press PTT to save and return to 'Idle' Programming Mode, or • long press the PTT button twice to exit 'Idle' Programming Mode and return to the normal radio operation. Note: • If you do not wish to save the value you just programmed, turn radio OFF or change channel using the channel knob. 41 English PROGRAMMING FEATURES
-
 1
1 -
2
-
3
-
4
-
5
-
6
-
7
-
8
-
9
-
10
-
11
-
12
-
13
-
14
-
15
-
16
-
17
-
18
-
19
-
20
-
21
-
22
-
23
-
24
-
25
-
26
-
27
-
28
-
29
-
30
-
31
-
32
-
33
-
34
-
35
-
36
-
37
-
 38
38 -
 39
39 -
 40
40 -
 41
41 -
 42
42 -
 43
43 -
 44
44 -
 45
45 -
 46
46 -
 47
47 -
 48
48 -
49
-
50
-
51
-
52
-
53
-
54
-
55
-
56
-
57
-
58
-
59
-
60
-
61
-
62
-
63
-
64
-
65
-
66
-
67
-
68
-
69
-
70
-
71
-
72
-
73
-
74
-
75
-
76
-
77
-
78
-
79
-
80
-
81
-
82
-
83
-
84
-
85
-
86
-
87
-
88
-
89
-
90
-
91
-
92
-
93
-
94
-
95
-
96
-
97
-
98
-
99
 |
 |