Motorola RDU2020 User Guide - Page 41
Entering Programming Mode, Reading Frequencies Values, Programming Mode *.The LED Indicator will - uhf
 |
UPC - 723755539921
View all Motorola RDU2020 manuals
Add to My Manuals
Save this manual to your list of manuals |
Page 41 highlights
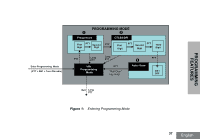
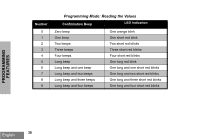
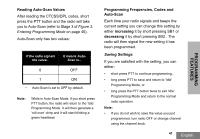
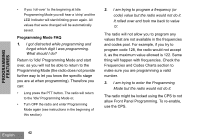
PROGRAMMING FEATURES Entering Programming Mode Note: Before programming the features, make sure your radio is set to the channel you wish to program. You can do so before entering Programming Mode or at any time during the Programming Mode by turning the Channel Selector Knob to the desired channel To read or modify Frequencies, Codes and Auto-Scan, set the radio to 'Programming Mode' by long pressing both the PTT and the SB1 button simultaneously while turning ON the radio for 3 to 5 seconds until a 'chirp' sounds to indicate that you have entered 'Idle' Programming Mode (*).The LED Indicator will start blinking a green heartbeat. Note: (*)'Idle' Programming Mode is the stage of the Programming Mode in which the radio is waiting for the user to start the radio programming cycle (refer "Entering Programming Mode" on page 37) Once you are in the 'Idle' Programming Mode, you will be able to read the Frequencies, Codes and Auto-Scan setting by short pressing the PTT button to move along the different programmable features. Reading Frequencies Values When reading frequencies values you need to read two digits as RDX Series™ radios have 27 frequencies for VHF and 89 frequencies for UHF. Once in 'Idle' Programming Mode, the radio will signal the first value it was programmed when you short press the PTT button (see Figure 2: Reading Frequencies Values on page 40). This value corresponds to the frequency's first digit 39 English
-
 1
1 -
2
-
3
-
4
-
5
-
6
-
7
-
8
-
9
-
10
-
11
-
12
-
13
-
14
-
15
-
16
-
17
-
18
-
19
-
20
-
21
-
22
-
23
-
24
-
25
-
26
-
27
-
28
-
29
-
30
-
31
-
32
-
33
-
34
-
35
-
 36
36 -
 37
37 -
 38
38 -
 39
39 -
 40
40 -
 41
41 -
 42
42 -
 43
43 -
 44
44 -
 45
45 -
 46
46 -
47
-
48
-
49
-
50
-
51
-
52
-
53
-
54
-
55
-
56
-
57
-
58
-
59
-
60
-
61
-
62
-
63
-
64
-
65
-
66
-
67
-
68
-
69
-
70
-
71
-
72
-
73
-
74
-
75
-
76
-
77
-
78
-
79
-
80
-
81
-
82
-
83
-
84
-
85
-
86
-
87
-
88
-
89
-
90
-
91
-
92
-
93
-
94
-
95
-
96
-
97
-
98
-
99
 |
 |
