Motorola RDU4160D User Guide - Page 60
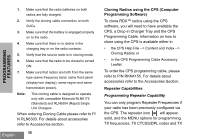
Cloning Radios using the CPS Computer, Programming Software, Repeater Capabilities
 |
UPC - 723755540309
View all Motorola RDU4160D manuals
Add to My Manuals
Save this manual to your list of manuals |
Page 60 highlights
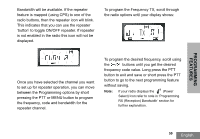
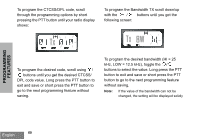
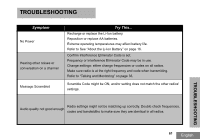
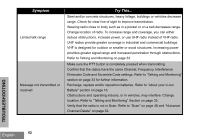
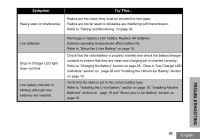
PROGRAMMING FEATURES 1. Make sure that the radio batteries on both radios are fully charged. 2. Verify the cloning cable connection on both SUCs. 3. Make sure that the battery is engaged properly on to the radio. 4. Make sure that there is no debris in the charging tray or on the radio contacts. 5. Verify that the source radio is in cloning mode. 6. Make sure that the radio to be cloned is turned ON. 7. Make sure that radios are both from the same type (same frequency band, same front panel (display/non display), same region and same transmission power). Note: This cloning cable is designed to operate only with compatible Motorola RLN6175 (Standard) and RLN6304 (Rapid) Single Unit Chargers. When ordering Cloning Cable please refer to P/ N RLN6303. For details about accessories refer to Accessories section. English 58 Cloning Radios using the CPS (Computer Programming Software) To clone RDX™ radios using the CPS software, you will need to have available the CPS, a Drop-in Charger Tray and the CPS Programming Cable. Information on how to clone using the CPS is available either in • the CPS Help File --> Content and Index --> Cloning Radios or • in the CPS Programming Cable Accessory Leaflet. To order the CPS programming cable, please refer to P/N RKN4155. For details about accessories refer to the Accessories Section. Repeater Capabilities Programming Repeater Capability You can only program Repeater Frequencies if your radio has been previously configured via the CPS. The repeater icon will appear solid, and the MENU options for programming TX frequencies, TX CTCSS/DPL codes and TX
-
 1
1 -
2
-
3
-
4
-
5
-
6
-
7
-
8
-
9
-
10
-
11
-
12
-
13
-
14
-
15
-
16
-
17
-
18
-
19
-
20
-
21
-
22
-
23
-
24
-
25
-
26
-
27
-
28
-
29
-
30
-
31
-
32
-
33
-
34
-
35
-
36
-
37
-
38
-
39
-
40
-
41
-
42
-
43
-
44
-
45
-
46
-
47
-
48
-
49
-
50
-
51
-
52
-
53
-
54
-
 55
55 -
 56
56 -
 57
57 -
 58
58 -
 59
59 -
 60
60 -
 61
61 -
 62
62 -
 63
63 -
 64
64 -
 65
65 -
66
-
67
-
68
-
69
-
70
-
71
-
72
-
73
-
74
-
75
-
76
-
77
-
78
-
79
-
80
-
81
-
82
-
83
-
84
-
85
-
86
-
87
-
88
-
89
-
90
-
91
-
92
-
93
-
94
-
95
-
96
-
97
-
98
-
99
-
100
-
101
-
102
-
103
-
104
 |
 |