NEC NP-P501X User's Manual - Page 162
Connecting HDMI Input, NOTE: The HDMI 1 IN/HDMI 2 IN connector supports Plug & Play DDC2B.
 |
View all NEC NP-P501X manuals
Add to My Manuals
Save this manual to your list of manuals |
Page 162 highlights
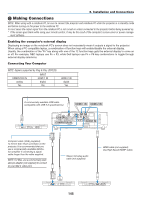
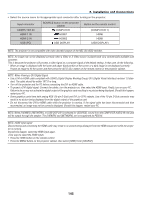
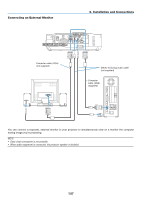
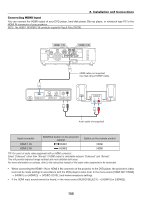
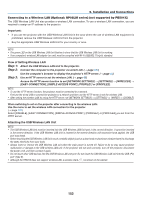
6. Installation and Connections Connecting HDMI Input You can connect the HDMI output of your DVD player, hard disk player, Blu-ray player, or notebook type PC to the HDMI IN connector of your projector. NOTE: The HDMI 1 IN/HDMI 2 IN connector supports Plug & Play (DDC2B). HDMI cable (not supplied) Use High Speed HDMI® Cable. Audio cable (not supplied) Input connector HDMI 1 IN HDMI 2 IN SOURCE button on the projector cabinet HDMI1 HDMI2 Button on the remote control HDMI HDMI TIP: For users of audio video equipment with an HDMI connector: Select "Enhanced" rather than "Normal" if HDMI output is switchable between "Enhanced" and "Normal". This will provide improved image contrast and more detailed dark areas. For more information on settings, refer to the instruction manual of the audio video equipment to be connected. • When connecting the HDMI 1 IN (or HDMI 2 IN) connector of the projector to the DVD player, the projector's video level can be made settings in accordance with the DVD player's video level. In the menu select [HDMI SETTINGS] → [HDMI1] (or [HDMI2]) → [VIDEO LEVEL] and make necessary settings. • If the HDMI input sound cannot be heard, in the menu select [AUDIO SELECT] → [HDMI1] (or [HDMI2]). 150
-
 1
1 -
2
-
3
-
4
-
5
-
6
-
7
-
8
-
9
-
10
-
11
-
12
-
13
-
14
-
15
-
16
-
17
-
18
-
19
-
20
-
21
-
22
-
23
-
24
-
25
-
26
-
27
-
28
-
29
-
30
-
31
-
32
-
33
-
34
-
35
-
36
-
37
-
38
-
39
-
40
-
41
-
42
-
43
-
44
-
45
-
46
-
47
-
48
-
49
-
50
-
51
-
52
-
53
-
54
-
55
-
56
-
57
-
58
-
59
-
60
-
61
-
62
-
63
-
64
-
65
-
66
-
67
-
68
-
69
-
70
-
71
-
72
-
73
-
74
-
75
-
76
-
77
-
78
-
79
-
80
-
81
-
82
-
83
-
84
-
85
-
86
-
87
-
88
-
89
-
90
-
91
-
92
-
93
-
94
-
95
-
96
-
97
-
98
-
99
-
100
-
101
-
102
-
103
-
104
-
105
-
106
-
107
-
108
-
109
-
110
-
111
-
112
-
113
-
114
-
115
-
116
-
117
-
118
-
119
-
120
-
121
-
122
-
123
-
124
-
125
-
126
-
127
-
128
-
129
-
130
-
131
-
132
-
133
-
134
-
135
-
136
-
137
-
138
-
139
-
140
-
141
-
142
-
143
-
144
-
145
-
146
-
147
-
148
-
149
-
150
-
151
-
152
-
153
-
154
-
155
-
156
-
 157
157 -
 158
158 -
 159
159 -
 160
160 -
 161
161 -
 162
162 -
 163
163 -
 164
164 -
 165
165 -
 166
166 -
 167
167 -
168
-
169
-
170
-
171
-
172
-
173
-
174
-
175
-
176
-
177
-
178
-
179
-
180
-
181
-
182
-
183
-
184
-
185
-
186
-
187
-
188
-
189
-
190
-
191
-
192
-
193
-
194
-
195
-
196
-
197
-
198
-
199
-
200
-
201
-
202
-
203
-
204
-
205
-
206
-
207
-
208
-
209
-
210
-
211
-
212
-
213
-
214
-
215
-
216
-
217
-
218
-
219
-
220
-
221
-
222
-
223
-
224
-
225
-
226
-
227
-
228
-
229
-
230
-
231
 |
 |
