NEC NP-P501X User's Manual - Page 57
Convenient Features, NETWORK SETTINGS, Setting for WIRED LAN
 |
View all NEC NP-P501X manuals
Add to My Manuals
Save this manual to your list of manuals |
Page 57 highlights
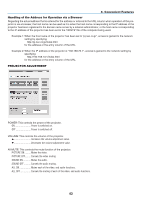
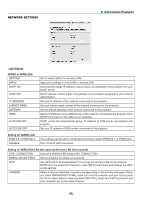
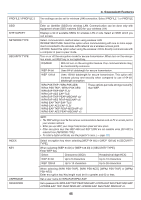
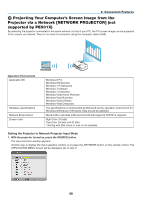
NETWORK SETTINGS 3. Convenient Features • SETTINGS WIRED or WIRELESS SETTING APPLY DHCP ON DHCP OFF IP ADDRESS SUBNET MASK GATEWAY WINS AUTO DNS ON AUTO DNS OFF Set for wired LAN or for wireless LAN. Apply your settings to wired LAN or wireless LAN. Automatically assign IP address, subnet mask, and gateway to the projector from your DHCP server. Set IP address, subnet mask, and gateway to the projector assigned by your network administrator. Set your IP address of the network connected to the projector. Set your subnet mask number of the network connected to the projector. Set the default gateway of the network connected to the projector. Set the IP address of your WINS server of the network connected to the projector when [DHCP] is turned on, this option is not available. DHCP server will automatically assign IP address of DNS server connected to the projector. Set your IP address of DNS server connected to the projector. Setting for WIRED LAN PROFILE 1/PROFILE 2 DISABLE Two settings can be set for wired LAN connection. Select PROFILE 1 or PROFILE 2. Turn off wired LAN connection Setting for WIRELESS LAN (the optional Wireless LAN Unit required) EASY CONNECTION Execute a wireless LAN using EASY CONNECTION. SIMPLE ACCES POINT Set the projector for simple access point. WPS Use WPS (Wi-Fi Protected Setup™) to set up the wireless LAN for the projector. NOTE: Use the projector's menus to make WPS connections and change the WPS profile settings. CHANNEL Select a channel. Available channels vary depending on the country and region. When you select [INFRASTRUCTURE], make sure that the projector and your access point are on the same channel; when you select [AD HOC], make sure that the projector and your computer are on the same channel. 45
-
 1
1 -
2
-
3
-
4
-
5
-
6
-
7
-
8
-
9
-
10
-
11
-
12
-
13
-
14
-
15
-
16
-
17
-
18
-
19
-
20
-
21
-
22
-
23
-
24
-
25
-
26
-
27
-
28
-
29
-
30
-
31
-
32
-
33
-
34
-
35
-
36
-
37
-
38
-
39
-
40
-
41
-
42
-
43
-
44
-
45
-
46
-
47
-
48
-
49
-
50
-
51
-
 52
52 -
 53
53 -
 54
54 -
 55
55 -
 56
56 -
 57
57 -
 58
58 -
 59
59 -
 60
60 -
 61
61 -
 62
62 -
63
-
64
-
65
-
66
-
67
-
68
-
69
-
70
-
71
-
72
-
73
-
74
-
75
-
76
-
77
-
78
-
79
-
80
-
81
-
82
-
83
-
84
-
85
-
86
-
87
-
88
-
89
-
90
-
91
-
92
-
93
-
94
-
95
-
96
-
97
-
98
-
99
-
100
-
101
-
102
-
103
-
104
-
105
-
106
-
107
-
108
-
109
-
110
-
111
-
112
-
113
-
114
-
115
-
116
-
117
-
118
-
119
-
120
-
121
-
122
-
123
-
124
-
125
-
126
-
127
-
128
-
129
-
130
-
131
-
132
-
133
-
134
-
135
-
136
-
137
-
138
-
139
-
140
-
141
-
142
-
143
-
144
-
145
-
146
-
147
-
148
-
149
-
150
-
151
-
152
-
153
-
154
-
155
-
156
-
157
-
158
-
159
-
160
-
161
-
162
-
163
-
164
-
165
-
166
-
167
-
168
-
169
-
170
-
171
-
172
-
173
-
174
-
175
-
176
-
177
-
178
-
179
-
180
-
181
-
182
-
183
-
184
-
185
-
186
-
187
-
188
-
189
-
190
-
191
-
192
-
193
-
194
-
195
-
196
-
197
-
198
-
199
-
200
-
201
-
202
-
203
-
204
-
205
-
206
-
207
-
208
-
209
-
210
-
211
-
212
-
213
-
214
-
215
-
216
-
217
-
218
-
219
-
220
-
221
-
222
-
223
-
224
-
225
-
226
-
227
-
228
-
229
-
230
-
231
 |
 |
