NEC NP-P501X User's Manual - Page 209
Press the SOURCE button on the projector unit., buttons to select [NETWORK]
 |
View all NEC NP-P501X manuals
Add to My Manuals
Save this manual to your list of manuals |
Page 209 highlights
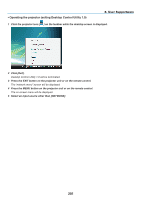
• Operating the projector (connecting computer) 1 Connect a USB mouse that is commercially available to the projector. USB 8. User Supportware 2 Turn on the power to the projector. Set the LAN setting of the projector in advance. 3 Press the SOURCE button on the projector unit. The Source list will be displayed. In case of the remote control, press the NETWORK button. The "network menu" screen will be displayed,proceed to step 5. 4 Press the SELECT ▼/▲ buttons to select [NETWORK], and then press the ENTER button. The "network menu" screen will be displayed. • The remaining operations can be performed using a USB mouse connected to the projector. 197
-
 1
1 -
2
-
3
-
4
-
5
-
6
-
7
-
8
-
9
-
10
-
11
-
12
-
13
-
14
-
15
-
16
-
17
-
18
-
19
-
20
-
21
-
22
-
23
-
24
-
25
-
26
-
27
-
28
-
29
-
30
-
31
-
32
-
33
-
34
-
35
-
36
-
37
-
38
-
39
-
40
-
41
-
42
-
43
-
44
-
45
-
46
-
47
-
48
-
49
-
50
-
51
-
52
-
53
-
54
-
55
-
56
-
57
-
58
-
59
-
60
-
61
-
62
-
63
-
64
-
65
-
66
-
67
-
68
-
69
-
70
-
71
-
72
-
73
-
74
-
75
-
76
-
77
-
78
-
79
-
80
-
81
-
82
-
83
-
84
-
85
-
86
-
87
-
88
-
89
-
90
-
91
-
92
-
93
-
94
-
95
-
96
-
97
-
98
-
99
-
100
-
101
-
102
-
103
-
104
-
105
-
106
-
107
-
108
-
109
-
110
-
111
-
112
-
113
-
114
-
115
-
116
-
117
-
118
-
119
-
120
-
121
-
122
-
123
-
124
-
125
-
126
-
127
-
128
-
129
-
130
-
131
-
132
-
133
-
134
-
135
-
136
-
137
-
138
-
139
-
140
-
141
-
142
-
143
-
144
-
145
-
146
-
147
-
148
-
149
-
150
-
151
-
152
-
153
-
154
-
155
-
156
-
157
-
158
-
159
-
160
-
161
-
162
-
163
-
164
-
165
-
166
-
167
-
168
-
169
-
170
-
171
-
172
-
173
-
174
-
175
-
176
-
177
-
178
-
179
-
180
-
181
-
182
-
183
-
184
-
185
-
186
-
187
-
188
-
189
-
190
-
191
-
192
-
193
-
194
-
195
-
196
-
197
-
198
-
199
-
200
-
201
-
202
-
203
-
 204
204 -
 205
205 -
 206
206 -
 207
207 -
 208
208 -
 209
209 -
 210
210 -
 211
211 -
 212
212 -
 213
213 -
 214
214 -
215
-
216
-
217
-
218
-
219
-
220
-
221
-
222
-
223
-
224
-
225
-
226
-
227
-
228
-
229
-
230
-
231
 |
 |

197
8. User Supportware
• Operating the projector (connecting computer)
1
Connect a USB mouse that is commercially available to the projector.
USB
2
Turn on the power to the projector.
Set the LAN setting of the projector in advance.
3
Press the SOURCE button on the projector unit.
The Source list will be displayed.
In case of the remote control, press the NETWORK button.
The “network menu” screen will be displayed,proceed to step 5.
4
Press the SELECT
▼
/
▲
buttons to select [NETWORK], and then press the ENTER button.
The “network menu” screen will be displayed.
•
The remaining operations can be performed using a USB mouse connected to the projector.