NEC NP1150 NP1150/2150/3150/3151W user's manual - Page 40
(3) Adjusting the Picture Size and Position, Correcting Keystone Distortion
 |
UPC - 805736019568
View all NEC NP1150 manuals
Add to My Manuals
Save this manual to your list of manuals |
Page 40 highlights
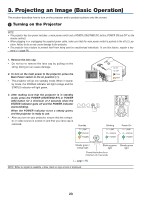
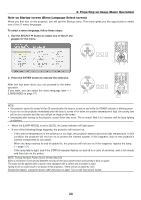
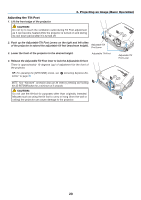
3. Projecting an Image (Basic Operation) Adjusting the Picture Size and Position Use the lens shift dials, the adjustable tilt foot levers, the zoom lever or the focus ring to adjust the picture size and position. Adjusting the position of a projected image [Lens shift] Adjusting the focus [Focus ring] WIRELESS SELECT LEFT LENS SHIFT RIGHT DOWN UP 3D REFORM AUTO ADJUST SOURCE ON/STAND BY POWSETRATLUASMUPSB (→ page 27) WIRELESS WIRELESS SELECT LEFT LENS SHIFT RIGHT DOWN UP 3D REFORM AUTO ADJUST SOURCE ON/STAND BY POWSETRATLUASMUPSB WIRELESS Adjusting the throw angle (the height of an image) [Tilt foot] *1 Finely adjusting the size of an image [Zoom lever] SELECT LEFT LENS SHIFT RIGHT DOWN UP 3D REFORM AUTO ADJUST SOURCE ON/STAND BY POWSETRATLUASMUPSB WIRELESS WIRELESS Adjusting the left and right tilt of an image [Tilt foot] SELECT LEFT LENS SHIFT RIGHT DOWN UP 3D REFORM AUTO ADJUST SOURCE ON/STAND BY POWSETRATLUASMUPSB WIRELESS WIRELESS Adjusting the keystone correction [Keystone] *2 SELECT LEFT LENS SHIFT RIGHT DOWN UP 3D REFORM AUTO ADJUST SOURCE ON/STAND BY POWSETRATLUASMUPSB SELECT LEFT LENS SHIFT RIGHT DOWN UP 3D REFORM AUTO ADJUST SOURCE ON/STAND BY POWSETRATLUASMUPSB WIRELESS WIRELESS WIRELESS WIRELESS NOTE*1: Adjust the throw angle (the height of an image) when the image position is higher than the lens shift adjustable range. NOTE*2: See " Correcting Keystone Distortion" on page 30 for Keystone. * In the above drawings, cables are omitted for clarity. 26
-
 1
1 -
2
-
3
-
4
-
5
-
6
-
7
-
8
-
9
-
10
-
11
-
12
-
13
-
14
-
15
-
16
-
17
-
18
-
19
-
20
-
21
-
22
-
23
-
24
-
25
-
26
-
27
-
28
-
29
-
30
-
31
-
32
-
33
-
34
-
 35
35 -
 36
36 -
 37
37 -
 38
38 -
 39
39 -
 40
40 -
 41
41 -
 42
42 -
 43
43 -
 44
44 -
 45
45 -
46
-
47
-
48
-
49
-
50
-
51
-
52
-
53
-
54
-
55
-
56
-
57
-
58
-
59
-
60
-
61
-
62
-
63
-
64
-
65
-
66
-
67
-
68
-
69
-
70
-
71
-
72
-
73
-
74
-
75
-
76
-
77
-
78
-
79
-
80
-
81
-
82
-
83
-
84
-
85
-
86
-
87
-
88
-
89
-
90
-
91
-
92
-
93
-
94
-
95
-
96
-
97
-
98
-
99
-
100
-
101
-
102
-
103
-
104
-
105
-
106
-
107
-
108
-
109
-
110
-
111
-
112
-
113
-
114
-
115
-
116
-
117
-
118
-
119
-
120
-
121
-
122
-
123
-
124
-
125
-
126
-
127
-
128
-
129
-
130
-
131
-
132
-
133
-
134
-
135
-
136
-
137
-
138
-
139
-
140
-
141
-
142
-
143
-
144
-
145
-
146
-
147
-
148
-
149
-
150
-
151
-
152
-
153
-
154
-
155
-
156
-
157
-
158
-
159
-
160
-
161
-
162
-
163
-
164
-
165
-
166
-
167
-
168
-
169
-
170
-
171
-
172
 |
 |
