Netgear EX2700 User Manual - Page 8
Place the Extender and Apply Power, Connect to an Existing WiFi Network, Connect with WPS - setup
 |
View all Netgear EX2700 manuals
Add to My Manuals
Save this manual to your list of manuals |
Page 8 highlights
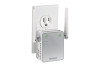
N300 WiFi Range Extender Place the Extender and Apply Power NETGEAR recommends that you place the extender near the router during initial setup. Then move it farther away from the router as needed to increase the area that receives a WiFi signal. To place the extender and apply power: 1. Place your extender in the same room as your WiFi router. 2. Plug the extender into an electrical outlet. The Power LED lights green. If the Power LED does not light, press the Power button. Connect to an Existing WiFi Network To extend the range of your WiFi network, you must connect the extender to your existing WiFi network. You can connect with WPS or with NETGEAR genie Smart Setup. Connect with WPS Wi-Fi Protected Setup (WPS) lets you connect the extender to a secure WiFi network without typing the network name and password. The WPS button is a physical button on the router or access point. WPS does not support WEP network security. If you are using WEP security, see Connect with NETGEAR genie Smart Setup on page 9. To connect with WPS: 1. Press the WPS button on the side panel of the extender. The WPS LED blinks. 2. Within two minutes, press the WPS button on your router or access point. The WPS LED on the extender lights solid green, the Router Link LED the extender is connected to your existing WiFi network. lights, and Note: If the Router Link LED does not light, try again. If it still does not light, see Connect with NETGEAR genie Smart Setup on page 9. 3. On your computer or wireless device, find the new extender network name. The extender's wireless network name (SSID) changes to your existing WiFi network name, with _EXT at the end of the name. For example: • Existing WiFi network name. MyNetworkName • New extended network name. MyNetworkName_EXT Install Your Extender 8
-
 1
1 -
2
-
 3
3 -
 4
4 -
 5
5 -
 6
6 -
 7
7 -
 8
8 -
 9
9 -
 10
10 -
 11
11 -
 12
12 -
 13
13 -
14
-
15
-
16
-
17
-
18
-
19
-
20
-
21
-
22
-
23
-
24
-
25
-
26
-
27
-
28
-
29
-
30
-
31
-
32
-
33
-
34
-
35
 |
 |
