Nikon Coolpix 7600 User Manual - Page 30
Step 3 - Focus and Shoot
 |
UPC - 018208255283
View all Nikon Coolpix 7600 manuals
Add to My Manuals
Save this manual to your list of manuals |
Page 30 highlights
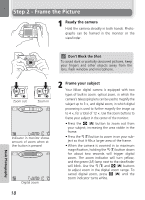
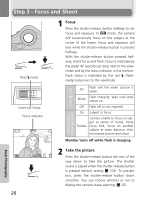
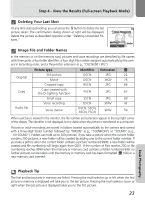
Step 3 - Focus and Shoot Red (!) lamp Green (AF) lamp Focus indicator AF 1 Focus Press the shutter-release button halfway to set focus and exposure. In P mode, the camera will automatically focus on the subject at the center of the frame. Focus and exposure will lock while the shutter-release button is pressed halfway. With the shutter-release button pressed halfway, check focus and flash. Focus is indicated by the green AF (autofocus) lamp next to the viewfinder and by the focus indicator in the monitor. Flash status is indicated by the red ! (flashready) lamp next to the viewfinder. On Flash will fire when picture is taken. Blinks Flash charging. Wait until lamp comes on. Off Flash off or not required. On Subject in focus. Flashes Camera unable to focus on subject at center of frame. Using focus lock, focus on another subject at same distance, then recompose picture and shoot. Monitor turns off while flash is charging. Red (!) lamp Green (AF) lamp/ focus indicator Basic Photography 7M 20 2 Take the picture AUTO 7 Press the shutter-release button the rest of the way down to take the picture. The shutter sound is played when the shutter-release button is pressed (default setting Q 103). To prevent blur, press the shutter-release button down smoothly. You can choose whether or not to display the camera shake warning (Q 25).
-
 1
1 -
2
-
3
-
4
-
5
-
6
-
7
-
8
-
9
-
10
-
11
-
12
-
13
-
14
-
15
-
16
-
17
-
18
-
19
-
20
-
21
-
22
-
23
-
24
-
 25
25 -
 26
26 -
 27
27 -
 28
28 -
 29
29 -
 30
30 -
 31
31 -
 32
32 -
 33
33 -
 34
34 -
 35
35 -
36
-
37
-
38
-
39
-
40
-
41
-
42
-
43
-
44
-
45
-
46
-
47
-
48
-
49
-
50
-
51
-
52
-
53
-
54
-
55
-
56
-
57
-
58
-
59
-
60
-
61
-
62
-
63
-
64
-
65
-
66
-
67
-
68
-
69
-
70
-
71
-
72
-
73
-
74
-
75
-
76
-
77
-
78
-
79
-
80
-
81
-
82
-
83
-
84
-
85
-
86
-
87
-
88
-
89
-
90
-
91
-
92
-
93
-
94
-
95
-
96
-
97
-
98
-
99
-
100
-
101
-
102
-
103
-
104
-
105
-
106
-
107
-
108
-
109
-
110
-
111
-
112
-
113
-
114
-
115
-
116
-
117
-
118
-
119
-
120
-
121
-
122
-
123
-
124
-
125
-
126
-
127
-
128
-
129
-
130
-
131
-
132
-
133
-
134
-
135
-
136
-
137
-
138
-
139
-
140
 |
 |
