Nikon Coolpix 7600 User Manual - Page 62
Viewing Pictures on a Computer - usb cable
 |
UPC - 018208255283
View all Nikon Coolpix 7600 manuals
Add to My Manuals
Save this manual to your list of manuals |
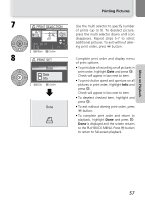
Page 62 highlights
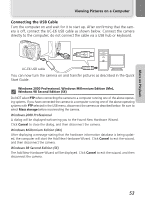
More on Playback Viewing Pictures on a Computer Using the UC-E6 USB cable and PictureProject software provided with your camera, you can view your photographs and movies on a computer. Before you can transfer (copy) pictures to your computer, you will need to install PictureProject. For more information on installing PictureProject and transferring pictures to your computer, see the Quick Start Guide and the PictureProject Reference Manual (on CD). Before Connecting the Camera Pictures can be copied from the camera to the computer by: • Pressing the I (V) button on the camera (Q 92) • Clicking the Transfer button in PictureProject Which method you will use depends on your computer's operating system and the USB option selected in the SET-UP menu of the camera. After consulting the following table, select the appropriate option using the USB item in the SET-UP menu of the camera. The default option is Mass storage. SET-UP 2/3 Blur warning ON Auto off 1m Format memory Language Interface Confirm Help INTERFACE USB Video mode Confirm USB PTP Mass storage Confirm Pictures transferred using: Operating system Camera I (V) PictureProject button* Transfer button Windows XP Home Edition Windows XP Professional Choose Mass storage or PTP. Windows 2000 Professional Windows Millennium Edition (Me) Windows 98 Second Edition (SE) Choose Mass storage. Mac OS X 10.1.5 or later Choose PTP. Choose Mass storage or PTP. * The camera I (V) button can not be used to transfer pictures in the following cases. Use the Transfer button in PictureProject. • When transferring pictures from the camera memory and Mass storage is selected for the USB option • When the memory card write-protect switch is in the "lock" position. Unlock by sliding the switch to the "write" position before transferring pictures. 52
-
 1
1 -
2
-
3
-
4
-
5
-
6
-
7
-
8
-
9
-
10
-
11
-
12
-
13
-
14
-
15
-
16
-
17
-
18
-
19
-
20
-
21
-
22
-
23
-
24
-
25
-
26
-
27
-
28
-
29
-
30
-
31
-
32
-
33
-
34
-
35
-
36
-
37
-
38
-
39
-
40
-
41
-
42
-
43
-
44
-
45
-
46
-
47
-
48
-
49
-
50
-
51
-
52
-
53
-
54
-
55
-
56
-
 57
57 -
 58
58 -
 59
59 -
 60
60 -
 61
61 -
 62
62 -
 63
63 -
 64
64 -
 65
65 -
 66
66 -
 67
67 -
68
-
69
-
70
-
71
-
72
-
73
-
74
-
75
-
76
-
77
-
78
-
79
-
80
-
81
-
82
-
83
-
84
-
85
-
86
-
87
-
88
-
89
-
90
-
91
-
92
-
93
-
94
-
95
-
96
-
97
-
98
-
99
-
100
-
101
-
102
-
103
-
104
-
105
-
106
-
107
-
108
-
109
-
110
-
111
-
112
-
113
-
114
-
115
-
116
-
117
-
118
-
119
-
120
-
121
-
122
-
123
-
124
-
125
-
126
-
127
-
128
-
129
-
130
-
131
-
132
-
133
-
134
-
135
-
136
-
137
-
138
-
139
-
140
 |
 |
