Nikon Coolpix 7600 User Manual - Page 34
When Lighting Is Poor: Using the Flash - fill flash function
 |
UPC - 018208255283
View all Nikon Coolpix 7600 manuals
Add to My Manuals
Save this manual to your list of manuals |
Page 34 highlights
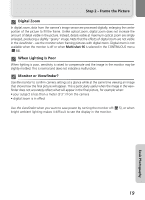
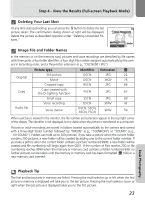
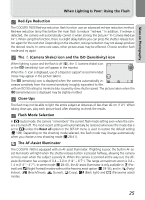
More on Photography More on Photography When Lighting Is Poor: Using the Flash The following flash modes are available: Mode !# Auto How it works When to use it Flash fires when lighting is poor. Best choice in most situations. % Auto with red-eye reduction Red-eye reduction fires before main reducing "red-eye." lamp flash, Use for portraits (works best when subject is well within range of flash and looking at pre-flash). When using this mode, the red-eye reduction function will also work automatically for the picture recorded. Not recommended when quick shutter response is required. $ Flash Cancel (off) ! Anytime Flash (fill flash) k (Slow sync) Use to capture natural lighting under Flash will not fire even dim light or where use of flash is prohib- when lighting is poor. ited. If 2 (camera shake) icon appears, care should be taken to avoid blurring. Flash fires whenever picture Use to "fill-in" (illuminate) shadows and is taken. back-lit subjects. Auto flash combined with Use to capture both subject and back- slow shutter speeds. ground at night or under dim light. To select the flash mode: 1 Flash 2 Flash AUTO : Confirm Display Flash menu. AUTO : Confirm 7M AUTO 7 Highlight desired mode (to exit without changing mode, wait for a while), and press I (the center of the multi selector). Flash mode shown by icon at bottom of monitor. Flash Range Flash range varies with zoom position. The range at minimum zoom is 0.4 - 3.3m (1'4" - 10'10") and 0.4 - 3.4 m (1'4" - 11'2") at maximum zoom. 24
-
 1
1 -
2
-
3
-
4
-
5
-
6
-
7
-
8
-
9
-
10
-
11
-
12
-
13
-
14
-
15
-
16
-
17
-
18
-
19
-
20
-
21
-
22
-
23
-
24
-
25
-
26
-
27
-
28
-
 29
29 -
 30
30 -
 31
31 -
 32
32 -
 33
33 -
 34
34 -
 35
35 -
 36
36 -
 37
37 -
 38
38 -
 39
39 -
40
-
41
-
42
-
43
-
44
-
45
-
46
-
47
-
48
-
49
-
50
-
51
-
52
-
53
-
54
-
55
-
56
-
57
-
58
-
59
-
60
-
61
-
62
-
63
-
64
-
65
-
66
-
67
-
68
-
69
-
70
-
71
-
72
-
73
-
74
-
75
-
76
-
77
-
78
-
79
-
80
-
81
-
82
-
83
-
84
-
85
-
86
-
87
-
88
-
89
-
90
-
91
-
92
-
93
-
94
-
95
-
96
-
97
-
98
-
99
-
100
-
101
-
102
-
103
-
104
-
105
-
106
-
107
-
108
-
109
-
110
-
111
-
112
-
113
-
114
-
115
-
116
-
117
-
118
-
119
-
120
-
121
-
122
-
123
-
124
-
125
-
126
-
127
-
128
-
129
-
130
-
131
-
132
-
133
-
134
-
135
-
136
-
137
-
138
-
139
-
140
 |
 |
