Nikon Coolpix 7600 User Manual - Page 31
Step 3 - Focus and Shoot, During Recording, Getting Good Results with Autofocus, Focusing on Off-
 |
UPC - 018208255283
View all Nikon Coolpix 7600 manuals
Add to My Manuals
Save this manual to your list of manuals |
Page 31 highlights
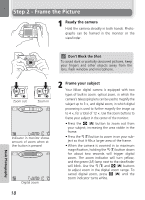
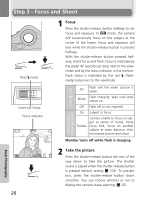
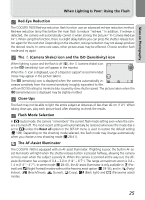
Step 3 - Focus and Shoot During Recording While pictures are being recorded to the memory or memory card, the green (AF) lamp blinks, and the < icon lights or the memory icon }// blinks. You can continue to take pictures until the < icon is displayed. Do not turn the camera off, eject the memory card, or remove or disconnect the power source while pictures are being recorded. Cutting power or removing the memory card in these circumstances could result in loss of data or in damage to the camera or card. Getting Good Results with Autofocus Autofocus performs best when there is contrast between the subject and the background and the subject is evenly lit. It does not perform well if the subject is very dark or moving rapidly, if there are objects of sharply differing brightness in the scene (e.g., the sun is behind your subject and their features are in deep shadow), or if there are several objects at different distances from the camera at the center of the frame (e.g., your subject is inside a cage). Focusing on Off-Center Subjects: Focus Lock If your subject is not at the center of the frame when the shutter-release button is pressed halfway, your picture may be out of focus. To focus on an off-center subject: 7M AUTO 7 AF 7M AUTO 7 n Focus Position the subject in the center of the frame and press the shutter-release button halfway. o Check the green (AF) lamp and focus indicator With the shutter-release button pressed halfway, check that the green (AF) lamp and focus indicator glow steadily, indicating that the subject is in focus. Focus and exposure will remain locked while the shutter-release button is pressed halfway. p Recompose the picture Keeping the shutter-release button pressed halfway, recompose your picture. Do not change the distance between the camera and your subject while focus lock is in effect. If your subject moves, remove your finger from the shutter-release button and focus again at the new distance. q Take the picture Press the shutter-release button the rest of the way down to shoot. Basic Photography 21
-
 1
1 -
2
-
3
-
4
-
5
-
6
-
7
-
8
-
9
-
10
-
11
-
12
-
13
-
14
-
15
-
16
-
17
-
18
-
19
-
20
-
21
-
22
-
23
-
24
-
25
-
 26
26 -
 27
27 -
 28
28 -
 29
29 -
 30
30 -
 31
31 -
 32
32 -
 33
33 -
 34
34 -
 35
35 -
 36
36 -
37
-
38
-
39
-
40
-
41
-
42
-
43
-
44
-
45
-
46
-
47
-
48
-
49
-
50
-
51
-
52
-
53
-
54
-
55
-
56
-
57
-
58
-
59
-
60
-
61
-
62
-
63
-
64
-
65
-
66
-
67
-
68
-
69
-
70
-
71
-
72
-
73
-
74
-
75
-
76
-
77
-
78
-
79
-
80
-
81
-
82
-
83
-
84
-
85
-
86
-
87
-
88
-
89
-
90
-
91
-
92
-
93
-
94
-
95
-
96
-
97
-
98
-
99
-
100
-
101
-
102
-
103
-
104
-
105
-
106
-
107
-
108
-
109
-
110
-
111
-
112
-
113
-
114
-
115
-
116
-
117
-
118
-
119
-
120
-
121
-
122
-
123
-
124
-
125
-
126
-
127
-
128
-
129
-
130
-
131
-
132
-
133
-
134
-
135
-
136
-
137
-
138
-
139
-
140
 |
 |
