Nikon Coolpix 7600 User Manual - Page 53
Scene Mode, Sound Files, Copying Voice Recordings to a Computer, Making a Voice Recording, Adding an - maximum memory card
 |
UPC - 018208255283
View all Nikon Coolpix 7600 manuals
Add to My Manuals
Save this manual to your list of manuals |
Page 53 highlights
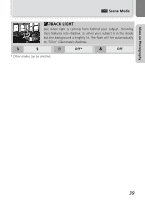
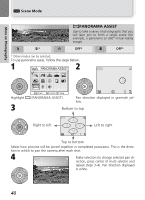
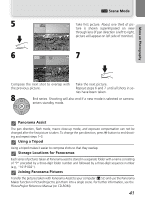
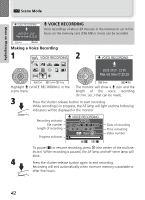
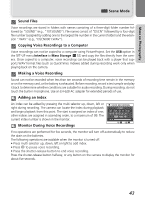
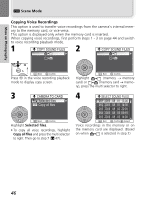
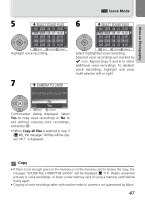
More on Photography e Scene Mode Sound Files Voice recordings are stored in folders with names consisting of a three-digit folder number followed by "SOUND" (e.g., "101SOUND"). File names consist of "DSCN" followed by a four-digit file number (assigned by adding one to the largest file number in the current folder) and the extension ".WAV" (e.g., "DSCN0001.WAV"). Copying Voice Recordings to a Computer Voice recordings can not be copied to a computer using PictureProject. Set the USB option in the SET-UP menu Interface to Mass Storage (Q 52) and copy the files directly from the camera. Once copied to a computer, voice recordings can be played back with a player that supports WAV format files (such as QuickTime). Indexes added during recording work only when playing back on the camera. Making a Voice Recording Sound can not be recorded when less than ten seconds of recording time remain in the memory or on the memory card, or the battery is exhausted. Before recording, record a test sample and play it back to determine whether conditions are suitable for audio recording. During recording, do not touch the built-in microphone. Use an EH-62B AC adapter for extended periods of use. Adding an Index An index can be added by pressing the multi selector up, down, left or right during recording. The camera can locate the index during playback and begin playback from this point. The start is assigned an index of one; other indices are assigned in ascending order, to a maximum of 99. The current index number is shown in the monitor. VOICE RECORDING REC 001 2005 . 08 . 01 13:00 00 : 05 : 00 / 00 : 24 : 29 Index : 02 Monitor During Voice Recordings If no operations are performed for five seconds, the monitor will turn off automatically to reduce the drain on the batteries. The following operations are available when the monitor is turned off. • Press multi selector up, down, left or right to add index. • Press I to pause voice recording. • Press the shutter-release button to end voice recording. Press the shutter-release button halfway, or any button on the camera to display the monitor for about five seconds. 43
-
 1
1 -
2
-
3
-
4
-
5
-
6
-
7
-
8
-
9
-
10
-
11
-
12
-
13
-
14
-
15
-
16
-
17
-
18
-
19
-
20
-
21
-
22
-
23
-
24
-
25
-
26
-
27
-
28
-
29
-
30
-
31
-
32
-
33
-
34
-
35
-
36
-
37
-
38
-
39
-
40
-
41
-
42
-
43
-
44
-
45
-
46
-
47
-
 48
48 -
 49
49 -
 50
50 -
 51
51 -
 52
52 -
 53
53 -
 54
54 -
 55
55 -
 56
56 -
 57
57 -
 58
58 -
59
-
60
-
61
-
62
-
63
-
64
-
65
-
66
-
67
-
68
-
69
-
70
-
71
-
72
-
73
-
74
-
75
-
76
-
77
-
78
-
79
-
80
-
81
-
82
-
83
-
84
-
85
-
86
-
87
-
88
-
89
-
90
-
91
-
92
-
93
-
94
-
95
-
96
-
97
-
98
-
99
-
100
-
101
-
102
-
103
-
104
-
105
-
106
-
107
-
108
-
109
-
110
-
111
-
112
-
113
-
114
-
115
-
116
-
117
-
118
-
119
-
120
-
121
-
122
-
123
-
124
-
125
-
126
-
127
-
128
-
129
-
130
-
131
-
132
-
133
-
134
-
135
-
136
-
137
-
138
-
139
-
140
 |
 |