Nokia 2170 Nokia 2170 User Guide in English
Nokia 2170 Manual
 |
View all Nokia 2170 manuals
Add to My Manuals
Save this manual to your list of manuals |
Nokia 2170 manual content summary:
- Nokia 2170 | Nokia 2170 User Guide in English - Page 1
OWNER'S MANUAL - Nokia 2170 | Nokia 2170 User Guide in English - Page 2
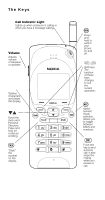
the menu and Personal Directory. Press and hold for continual scrolling. ó "Dials" the number on the display. -ii ð Press and hold to switch your phone on and off. Soft keys. The function of these keys changes to suit the current operation. ÷ Alpha/ numeric mode selection. Allows you to toggle - Nokia 2170 | Nokia 2170 User Guide in English - Page 3
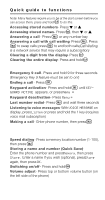
guide to swap calls; press to end both calls(Call Waiting is a network service that may require a subscription.) ù Clearing a digit from the display- Press 1 key (requires voice mail subscription) ó Making a call - Enter phone number, then press ó Speed dialing- Press a memory location number (1-100 - Nokia 2170 | Nokia 2170 User Guide in English - Page 4
guide Hide Memory 6 Network Services Items shown with * appear only if this feature has been activated in your phone and is supported by the network. Service Search 7 Network Feature Setting 4 Phone Settings 1 Lights 2 Keypad Tones 3 Manual DTMF Tones 4 Auto DTMF Length 5 Network Time 7 Phone - Nokia 2170 | Nokia 2170 User Guide in English - Page 5
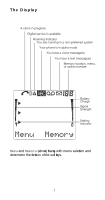
Display A call is in progress Digital service is available Roaming Indicator You are roaming in a non-preferred system Your phone is in alpha mode You have a voice message(s) You have a text message(s) Memory location, menu, or option number Battery Charge Signal Strength Setting Indicator 0HQX and - Nokia 2170 | Nokia 2170 User Guide in English - Page 6
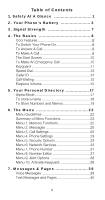
1. Safety At A Glance 1 2. Your Phone's Battery 3 3. Signal Strength 7 4. The Basics 8 Cool Features 8. To Switch Your Phone On 8 To Answer A Call 8. To Settings 2. 5 Menu 4, Phone Settings 29 Menu 5, Security Options 33 Menu 6, Network Services 33 Menu 7, Phone Number 37 Menu 8, Number - Nokia 2170 | Nokia 2170 User Guide in English - Page 7
47 Notepad 4. 8 Menu 01 7, Call Timers 49 10. Touch Tones 50 Touch Tone Settings 5. 0 Touch Tone Strings 5. 1 11. Accessories 53 Batteries 5. 3 Chargers 5. 5 12. Care & Maintenance 57 13. For Your Safety 58 Traffic Safety 5. 8 Operating Environment 58 Electronic Devices 5. 8 Potentially - Nokia 2170 | Nokia 2170 User Guide in English - Page 8
this manual. See “For Your Safety” on page 58. Road Safety Comes First Don't use a hand-held phone phones may get interference which could affect performance. Use Sensibly Use only in the normal position (to ear). Don’t touch the antenna unneccesarily. Use Qualified Service Only qualified service - Nokia 2170 | Nokia 2170 User Guide in English - Page 9
this Guide The wireless phone described in this manual is approved for use in CDMA networks. A number of features included in this guide are called Network Services. They are special services provided by wireless service providers. Before you can take advantage of any of these Network Services, you - Nokia 2170 | Nokia 2170 User Guide in English - Page 10
have found at least one battery and charger, one phone, and this user guide. For detailed information on these items, see “Accessories” on page 53. To install your battery Simply (1) place the battery in the grooves on the back of your phone. Then (2) slide the battery upward until it clicks. To - Nokia 2170 | Nokia 2170 User Guide in English - Page 11
full performance is achieved only after two or three complete charge and discharge cycles! WARNING! Use only batteries, chargers and accessories approved by the phone manufacturer for use with this particular model. The use of any other types will invalidate any approval or warranty applying to the - Nokia 2170 | Nokia 2170 User Guide in English - Page 12
it serviced. Also remember to bring in your battery and charger. To discharge your battery There are two ways to properly discharge a battery. You can leave your phone on while your battery drains, finally turning itself off. Or you can use the discharge facility of any approved accessory equipped - Nokia 2170 | Nokia 2170 User Guide in English - Page 13
Use only batteries and chargers approved by the phone manufacturer. When a charger is not in use, disconnect it from the power source. Do not leave the battery connected to a charger for longer than a week; overcharging may shorten its life. If left unused, a fully charged battery may completely - Nokia 2170 | Nokia 2170 User Guide in English - Page 14
calling from inside a building. No service If you’re outside the wireless service area, 12 6(59,&( will display on your phone. No calls can be made or received, including emergency calls. Unavailable service When network service is unavailable from your service provider or its affiliates, emergency - Nokia 2170 | Nokia 2170 User Guide in English - Page 15
Cool Features. These are just some of the many Cool Features you’ll find in your phone. Look for the icon throughout this owner’s manual to see how you can use these Cool Features. To Switch Your Phone On ð 1) Press and hold for about three seconds 2) If you want to make a call, fully - Nokia 2170 | Nokia 2170 User Guide in English - Page 16
want to be disturbed. You’ll know who called as soon as your phone rings if you subscribe to Caller ID. And if you have Voice information on these features. To Make A Call 1) Extend the antenna 2) Enter the phone number, include area code if necessary ó 3) Press If the call didn't go through - Nokia 2170 | Nokia 2170 User Guide in English - Page 17
do you get to the start screen? ù Press and hold Throughout this manual, you may notice that before you can access certain features , it’s necessary on page 61 for important safety information. 1) Switch your phone on and make sure service is available (see “Signal Strength” on page 7 for details - Nokia 2170 | Nokia 2170 User Guide in English - Page 18
certain network services and/or phone features are in use. Check with local wireless service providers. If certain features are in use (e.g., Keyguard, Restrict calls, etc.), you may first need to turn those features off before you can make an emergency call. Please read this manual thoroughly and - Nokia 2170 | Nokia 2170 User Guide in English - Page 19
Keyguard You can activate Keyguard a third way by pressing 0HQX 10. Your phone will then be protected from any unwanted key presses. To deactivate Keyguard Press 0HQX active ó Press During the call, the keypad remains unlocked for normal operation. Keyguard automatically reactivates after the call - Nokia 2170 | Nokia 2170 User Guide in English - Page 20
Speed Dial Speed Dial is a convenient feature, allowing you to make phone calls quickly and easily. Your phone recalls the phone number from your personal directory, displays it briefly, then dials it. 1) Enter memory location number (2 to 99) ó 2) Press Note: Memory location 9 only works when - Nokia 2170 | Nokia 2170 User Guide in English - Page 21
be done quickly, otherwise the last number dialed will be redialed. ó Once the phone number you wish to dial is displayed, simply press again. Caller ID Caller ID is a feature that may be available from your service provider. This feature helps identify incoming calls, so you can decide if you want - Nokia 2170 | Nokia 2170 User Guide in English - Page 22
on your service provider. This feature appears on the menu only when activated with Menu 6 7. See “Menu 6 6, Service Search” on phone’s earpiece. These buttons also control the volume for most connected accessories. When adjusting the volume for your phone while connected to certain accessories - Nokia 2170 | Nokia 2170 User Guide in English - Page 23
call, 1) Press and hold left for a second 2) Press W or V to 0XWH 3) Press 2. Note: This feature is only available during a call. To unmute your phone's microphone Follow the same steps as above, except press W or V to 8QPXWH and press 2.. For more information on DTMF tones, please see “Touch Tones - Nokia 2170 | Nokia 2170 User Guide in English - Page 24
long. Stored names may be up to 16 characters long. Your phone has 8 “extended number” locations (of your choice) that allow the ÷ To enter names, retrieve numbers based on names, and view names, press . Your phone displays ABC to indicate that you can use the number keys to enter letters as well - Nokia 2170 | Nokia 2170 User Guide in English - Page 25
to enter these special characters: Press This Key: To Get This Special Character: óó +, links memory locations together óóó p, creates a pause óóóó w, causes the phone to wait for input Also, see “Touch Tones” on page 50 for more information on using special characters. To store a name - Nokia 2170 | Nokia 2170 User Guide in English - Page 26
To Store Numbers and Names To fast save 1) Enter phone number 2) Press and hold 0HPRU\ To add a name to a stored phone number 1) Recall stored number (notice memory location at top, right corner of display; write this number down to use in step 4) ÷ 2) While number is displayed, - Nokia 2170 | Nokia 2170 User Guide in English - Page 27
To change the number stored with a name 1) Recall stored number ù 2) Press repeatedly to erase number 3) Enter new number 4) Press 0HPRU\ 5) Press 6WRUH, then 2. at 5(3/$&(" To erase stored names and numbers ù Press and hold to go to the start screen, 1) Press 0HPRU\ 2) Press 6WRUH, then 6WRUH again - Nokia 2170 | Nokia 2170 User Guide in English - Page 28
Press to call the displayed number or name. To recall numbers by name 1) Press 0HPRU\ 2) Enter name or its first few letters 3) Press )LQG Your phone may find more than one entry that begins with the same letter. Use W or V until the desired name appears. To begin scrolling at a particular location - Nokia 2170 | Nokia 2170 User Guide in English - Page 29
and allowing you to customize your phone to suit your individual preferences. Menu Guidelines 0HQX enters your phone’s menu structure W and V scroll each other when using this method. Most of the instructions given in this guide use this method, e.g. to access the Dialed Numbers submenu, simply press the - Nokia 2170 | Nokia 2170 User Guide in English - Page 30
4 Emergency Key 9 5 Automatic Redial 6 Automatic Answer 7 Calling Card 8 Messages Only Mode See page 25 for details Phone Settings Menu 4 1 Lights 2 Keypad Tones 3 Manual DTMF Tones 4 Auto DTMF Length 5 Network Time 6 Countdown Timer 7 Personal Banner 8 Restore Settings 9 Menu List 10 Language - Nokia 2170 | Nokia 2170 User Guide in English - Page 31
and is supported by your service provider. 1 Voice Privacy 2 Call Forwarding ó 3 Call Waiting ó 4 Selective Call Acceptance ó 5 Send Own Number ó 6 Service Search 7 Network Feature Setting See page 33 for details. Phone Number Menu 7 This feature allows you to view your mobile phone number. This - Nokia 2170 | Nokia 2170 User Guide in English - Page 32
1, Ringing Volume You hear each ringing level as you scroll through the volume levels. When your phone is connected to an accessory, such as a headset or a car kit, the ringing volume for that accessory can be set individually with this feature. Menu 3 2, Ringing Tone Wait a couple of seconds as you - Nokia 2170 | Nokia 2170 User Guide in English - Page 33
9 key to attempt emergency calls to the emergency number ó preprogrammed into your phone. Either press and hold 9 or press 9 then . The default setting is information. Menu 3 5, Automatic Redial ô When this feature is on, your phone redials the number you are trying to call up to 3 times. Press to - Nokia 2170 | Nokia 2170 User Guide in English - Page 34
will automatically use this card when you make calling card calls unless you select a different one. To store a calling card Once you press 0HQX 3 7, your phone lists &DUG $0' and 1RQH. Press W to select the card you want and press 2.. Enter your five-digit security code at the 6HFXULW\ &RGH: prompt - Nokia 2170 | Nokia 2170 User Guide in English - Page 35
Cards using this sequence* Access No. Dial 1-800 access number, MCI, AT&T True + Phone No. then phone number, then card Choice, Sprint + Card No. + PIN number + PIN (if required card information already stored in your phone, simply follow the same instructions used to store a new calling card. 28 - Nokia 2170 | Nokia 2170 User Guide in English - Page 36
when someone is calling, or when you connect your phone to any accessory. They’ll stay on permanently if your phone is connected to a car kit. When you turn the lights 2II while your phone is connected to a car kit, your phone’s display and keypad will illuminate for fifteen seconds whenever someone - Nokia 2170 | Nokia 2170 User Guide in English - Page 37
is in idle state and during a call. Because this feature is network-supported, there is no need to set the date or time. However, this feature only functions in areas where digital service is available. To display network time Your phone can display both time and date, or just the time. ù Press and - Nokia 2170 | Nokia 2170 User Guide in English - Page 38
the time you have entered has elapsed. The timer stops if the battery runs out or if you turn your phone off. An incoming call overrides the timer alarm. After you’ve completed the call, &2817'2:1 &203/(7(' appears, but your phone does not sound an alarm. To stop the timer before the alarm - Nokia 2170 | Nokia 2170 User Guide in English - Page 39
4 8, Restore Settings This option allows you to reset the settings of most menu features to factory defaults (the same as when you first received your phone). If you wish to restore your settings, simply press 0HQX 4 8 and follow the prompts. Have your security code handy, because you’ll need it to - Nokia 2170 | Nokia 2170 User Guide in English - Page 40
this feature depends on the networks ability to support voice encryption. If Voice Privacy is on while in a network that supports this feature, your phone will display 92,&( 35,9$&< $&7,9(. Check for availability of this feature from your service provider. Menu 6 2, Call Forwarding This feature is - Nokia 2170 | Nokia 2170 User Guide in English - Page 41
on the menu only if activated with Menu 6 7. Contact your service provider for details. To activate Call Forwarding 1) Press 0HQX 6 2 2) Press W to desired option (see below) 3) Press 2. 4) Press W to $FWLYDWH or &DQFHO 5) Enter phone number that calls are to be forwarded to at 1XPEHU= 6) Press - Nokia 2170 | Nokia 2170 User Guide in English - Page 42
0HQX 6 5, choose - Nokia 2170 | Nokia 2170 User Guide in English - Page 43
gives you a separate code (known as a “feature code”) to activate and deactivate each service. Menu 6 7 lets you store all the feature codes you use in your phone. Once the feature code is stored in your phone, the service appears as a menu item. You can then use the menu to activate and deactivate - Nokia 2170 | Nokia 2170 User Guide in English - Page 44
= (without entering a code). Note: Any feature codes that are received from your service provider are unrelated to your phone’s security code. Menu 7, Phone Number This feature allows you to use your phone to view your own mobile phone number. When you want to view your own number, simply press 0HQX - Nokia 2170 | Nokia 2170 User Guide in English - Page 45
need an optional vibrating battery (BBT-1XV) when selecting vibrating options. See your dealer for details. With 6LOHQW, your phone only flashes its lights your phone is connected to a HF desktop charger, HF car kit, or headset, the alert option can be set separately for each of these accessories. - Nokia 2170 | Nokia 2170 User Guide in English - Page 46
from your voice mailbox, your voice mailbox number must first be stored in your phone. When you receive a voice message or a page, the display text may vary due to short message services used by different service providers. To store your voice mailbox number Use Menu 2 3 to store your voice mailbox - Nokia 2170 | Nokia 2170 User Guide in English - Page 47
are heard. See “The Display” at the beginning of this owner’s manual for a description of the Text Message indicator. If someone has paged you, your phone displays 3/($6( &$// followed by the phone number. Note: Some service providers may send a text message when notifying you of any pages received - Nokia 2170 | Nokia 2170 User Guide in English - Page 48
that you’ve locked the message or page. It will not be overwritten even if there’s no space remaining in your phone’s memory and there’s an attempt to deliver a new message to your phone. New messages or pages will override old unlocked messages or pages when there is no space remaining in your - Nokia 2170 | Nokia 2170 User Guide in English - Page 49
can use 0HQX 3 8 to set it to 2Q. Once this feature is activated, your phone will display 06*6 21/ - Nokia 2170 | Nokia 2170 User Guide in English - Page 50
for a five-digit security code to enter certain features. The factory default code is 12345, and that is what your phone will accept until it is changed. If your service provider hasn’t already changed your security code, it’s recommended you have it changed immediately. See “To change your security - Nokia 2170 | Nokia 2170 User Guide in English - Page 51
will be locked every time you switch on your phone. You must enter a four-digit lock code to unlock your phone. Without entering your lock code, you’ll be denied access to almost every memory and menu function. When your phone is locked, your phone will only receive incoming calls and make outgoing - Nokia 2170 | Nokia 2170 User Guide in English - Page 52
and press . ó 3. Press desired unlocked location (either 2, 3, or 4) and press . 4. Press and hold the desired unlocked location. To turn Auto Lock off your phone’s menu. It’s recommended that you change your code immediately because the default lock code (1234) appears in this owner’s manual. In - Nokia 2170 | Nokia 2170 User Guide in English - Page 53
that all calls can be made as usual. %ORFNHG means that no calls can be made. /LPLWHG means that calls can be made only to phone numbers stored in certain memory locations. When restricting outgoing calls by selecting /LPLWHG, you are prompted for an $OORZ IURP ORFDWLRQ= and 7R ORFDWLRQ= value - Nokia 2170 | Nokia 2170 User Guide in English - Page 54
you ten temporary storage spaces in a “notepad.” Note: Your phone displays the phone numbers of received and missed calls only if you have subscribed to , Press ∗ then W or V to scroll the list. This shows the calling phone numbers of the ten most ÷ recent calls you’ve answered. If the number listed - Nokia 2170 | Nokia 2170 User Guide in English - Page 55
display), then press W or V to scroll the list This shows you the calling phone numbers of the 10 most recent calls you’ve missed. 0HQX 01 3 also accesses 127 $16:(5(' option in the Call Forwarding feature is activated, your phone treats the forwarded calls as missed calls. Notepad Use the Notepad to - Nokia 2170 | Nokia 2170 User Guide in English - Page 56
67 6, +20( $5($ &$//6, 52$0,1* &$//6 & /,)( 7,0(5. Note: The actual time invoiced for calls by your service provider may vary, depending upon network features, rounding off for billing, and so forth. To clear Call Timers total of all calls made and received with your phone, cannot be reset. 49 - Nokia 2170 | Nokia 2170 User Guide in English - Page 57
are pressed. Touch Tones can be used for many automated, overthe-phone services such as checking bank balances, airline arrival and departure times, and manually or automatically. Note: Individual Touch Tones can be sent manually only if 0HQX 4 3 is set to On. Touch Tone Settings Menu 4 3, Manual - Nokia 2170 | Nokia 2170 User Guide in English - Page 58
numbers. These number strings can also be linked with other stored phone numbers. Read on for more information on linking strings with stored numbers Pressing creates a “w” (wait) when you are storing numbers. The “w” makes the phone wait for you to press the '70) soft key, then it sends the digits - Nokia 2170 | Nokia 2170 User Guide in English - Page 59
location storing the DTMF string 4) Store the number as you normally would ó When you recall this number sequence from memory and press , your phone dials the phone number, displays digits stored in the memory location after the “+”, then sends them as Touch Tones when you press '70). Note: Your - Nokia 2170 | Nokia 2170 User Guide in English - Page 60
are mounted and are operating properly. Installation of complex car accessories must be made by qualified personnel only. Note: Use only batteries, antennas, chargers, and accessories approved by the phone manufacturer. The use of any other types will invalidate any approval or warranty applying - Nokia 2170 | Nokia 2170 User Guide in English - Page 61
1SF) 800 mAh NiMH Extended Slim Battery (BBH-2H) 1100 mAh NiCd Ultra Extended Battery (BBH-1H) 1700 mAh NiMH Ultra Extended Battery Also, see “Your Phone’s Battery” on page 3 and “Important battery information” on page 6. Approximate battery operation times Battery Charge Time Talk Time Standby - Nokia 2170 | Nokia 2170 User Guide in English - Page 62
ACH-4U) This light and compact AC charger can be used with all battery options mentioned in this manual. To use the Rapid Travel Charger, plug it into a wall outlet and connect the lead from the charger to the base of your phone. This charger can also be used together with the Light Desktop Charging - Nokia 2170 | Nokia 2170 User Guide in English - Page 63
Light Desktop Charging Stand (CHH-2L) offers support for the phone during charging. Used together with the Rapid Travel Charger (ACH-4U), this drop-in stand is an economical choice when you need your phone close at hand. Charging is indicated by the scrolling battery bars on the right side of the - Nokia 2170 | Nokia 2170 User Guide in English - Page 64
. Unauthorized antennas, modifications or attachments could damage the phone and may violate regulations governing radio devices. If the phone, battery, charger, or any accessory is not working properly, take it to your nearest qualified service facility. The personnel there will assist you, and - Nokia 2170 | Nokia 2170 User Guide in English - Page 65
may cause interference or danger. When connecting the phone or any accessory to another device, read its user guide for detailed safety instructions. Do not connect incompatible products. As with other mobile radio transmitting equipment, users are advised that for the satisfactory operation of the - Nokia 2170 | Nokia 2170 User Guide in English - Page 66
to consult your service provider. Other Medical Devices Operation of any radio transmitting equipment, including wireless phones, may interfere with you have any questions. Switch off your phone in health care facilities when any regulations posted in these areas instruct you to do so. Hospitals or - Nokia 2170 | Nokia 2170 User Guide in English - Page 67
instructions. Sparks in such areas could cause an explosion or fire resulting in bodily injury or even death. Users are advised to switch off the phone while at a refueling point (service station). Users compartment as a wireless phone or any of its parts or accessories. For vehicles equipped with - Nokia 2170 | Nokia 2170 User Guide in English - Page 68
well as user-programmed functions which cannot guarantee connection in all conditions. Therefore, you should never rely solely upon any wireless phone for essential communications (e.g. medical emergencies). Remember, to make or receive any calls, the phone must be switched on and in a service area - Nokia 2170 | Nokia 2170 User Guide in English - Page 69
reviewed the available body of research to develop the ANSI Standard (C95.1). The design of your phone NOKIA One-Year Limited Warranty Nokia Mobile Phones (“NMP”) warrants that this wireless phone assignable or transferable to any subsequent purchaser/end user. 3. The limited warranty extends only to - Nokia 2170 | Nokia 2170 User Guide in English - Page 70
c) The Product serial number plate or the accessory date code has been removed, defaced, or altered by the external antenna. 8. If a problem develops during the limited warranty period, the Service Department at NMP, at the phone number listed on the bottom of the next page for further instructions - Nokia 2170 | Nokia 2170 User Guide in English - Page 71
concerning this limited warranty may be directed to the Customer Service Department at Nokia, 6200 Courtney Campbell Causeway, Suite 900, Tampa, FL 14. The limited warranty period for Nokia Product Corp. supplied attachments and accessories are specifically defined within their own warranty cards - Nokia 2170 | Nokia 2170 User Guide in English - Page 72
Power 10µW to 200mW Battery Voltage 6 V nominal Charging phone was written for single-mode phone NHP-4. The right to make changes and improvements to any of the products described in this guide without prior notice is reserved. Issue No. 1 04/98 Printed in Canada ©1998 Nokia Mobile Phones - Nokia 2170 | Nokia 2170 User Guide in English - Page 73
Index A Accessories 53 Alert options 38 Alpha mode 17 Answering a call 8 Automatic answer 26 Automatic phone lock 44 B Basic features 8 Batteries 53 Installing and removing 3 Battery Discharig ng your battery 5 Important battery information 6 C Call Forwarding 33 Call Restriction 45 Call settings - Nokia 2170 | Nokia 2170 User Guide in English - Page 74
17 Phone number 37 Phone settings 29 R Technical data 65 Temporary lists 47 Text messages 40 Touch tones 50 U Using this owner's manual 2 43 Selective Call Acceptance 34 Service search 36 Sing al strength 7 Special characters 18, 51 Speed Dial 13 Stopping your phone from rinig ng 9 Storing - Nokia 2170 | Nokia 2170 User Guide in English - Page 75
NOTES 66
-
 1
1 -
 2
2 -
 3
3 -
 4
4 -
 5
5 -
 6
6 -
 7
7 -
8
-
9
-
10
-
11
-
12
-
13
-
14
-
15
-
16
-
17
-
18
-
19
-
20
-
21
-
22
-
23
-
24
-
25
-
26
-
27
-
28
-
29
-
30
-
31
-
32
-
33
-
34
-
35
-
36
-
37
-
38
-
39
-
40
-
41
-
42
-
43
-
44
-
45
-
46
-
47
-
48
-
49
-
50
-
51
-
52
-
53
-
54
-
55
-
56
-
57
-
58
-
59
-
60
-
61
-
62
-
63
-
64
-
65
-
66
-
67
-
68
-
69
-
70
-
71
-
72
-
73
-
74
-
75
 |
 |
OWNER
’
S
MANUAL