Nokia 6061 Nokia 6061 User Guide in English - Page 13
Charge the battery - sim card insert
 |
View all Nokia 6061 manuals
Add to My Manuals
Save this manual to your list of manuals |
Page 13 highlights
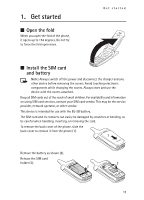
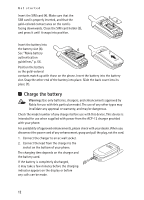
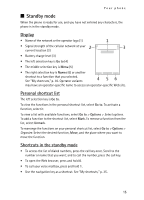
Get started Insert the SIM card (4). Make sure that the SIM card is properly inserted, and that the gold-colored contact area on the card is facing downwards. Close the SIM card holder (5), and press it until it snaps into position. Insert the battery into the battery slot (6). See "Nokia battery authentication guidelines," p. 56. Position the battery so the gold-colored contacts match up with those on the phone. Insert the battery into the battery slot. Snap the other end of the battery into place. Slide the back cover into its place (7). ■ Charge the battery Warning: Use only batteries, chargers, and enhancements approved by Nokia for use with this particular model. The use of any other types may invalidate any approval or warranty, and may be dangerous. Check the model number of any charger before use with this device. This device is intended for use when supplied with power from the ACP-12 charger provided with your phone. For availability of approved enhancements, please check with your dealer. When you disconnect the power cord of any enhancement, grasp and pull the plug, not the cord. 1. Connect the charger to an ac wall socket. 2. Connect the lead from the charger to the socket on the bottom of your phone. The charging time depends on the charger and the battery used. If the battery is completely discharged, it may take a few minutes before the charging indicator appears on the display or before any calls can be made. 12
-
 1
1 -
2
-
3
-
4
-
5
-
6
-
7
-
 8
8 -
 9
9 -
 10
10 -
 11
11 -
 12
12 -
 13
13 -
 14
14 -
 15
15 -
 16
16 -
 17
17 -
 18
18 -
19
-
20
-
21
-
22
-
23
-
24
-
25
-
26
-
27
-
28
-
29
-
30
-
31
-
32
-
33
-
34
-
35
-
36
-
37
-
38
-
39
-
40
-
41
-
42
-
43
-
44
-
45
-
46
-
47
-
48
-
49
-
50
-
51
-
52
-
53
-
54
-
55
-
56
-
57
-
58
-
59
-
60
-
61
-
62
-
63
-
64
-
65
-
66
-
67
-
68
-
69
-
70
-
71
-
72
-
73
-
74
-
75
-
76
-
77
-
78
-
79
-
80
-
81
-
82
-
83
-
84
-
85
-
86
-
87
-
88
-
89
-
90
-
91
-
92
-
93
-
94
-
95
-
96
-
97
-
98
-
99
-
100
-
101
-
102
-
103
-
104
-
105
-
106
-
107
-
108
-
109
-
110
-
111
-
112
-
113
-
114
-
115
-
116
-
117
-
118
-
119
-
120
-
121
-
122
-
123
-
124
-
125
-
126
-
127
-
128
-
129
-
130
-
131
-
132
-
133
-
134
-
135
-
136
-
137
 |
 |
