Oki C5300n OKI C5300 User's Guide: Windows (Am English) - Page 327
Installing The Print Job Accounting Software, Print Time Filters
 |
View all Oki C5300n manuals
Add to My Manuals
Save this manual to your list of manuals |
Page 327 highlights
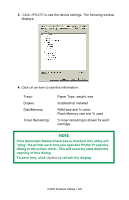
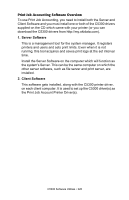
Installing The Print Job Accounting Software Installing the Server Software 1. Place the "Drivers, Color and Network Utilities" CD supplied with your printer in the CD-ROM drive on the Server computer and wait for the Menu Installer to open. (If the CD does not AutoPlay, click Start → Run → Browse. Browse to your CD-ROM and double-click Install.exe, then click OK.) 2. Click Next to accept the terms in the license agreement. 3. Click Network Software → Administration Tools → Job Accounting → Server and follow the on-screen instructions. Be sure to note the Server ID that is issued. You will need this later. Installing the Client Software on WIndows Computers 1. Place the driver CD supplied with your printer in the CD-ROM drive of the Client computer and wait for the Menu Installer to open. (If the CD does not AutoPlay, click Start → Run → Browse. Browse to your CD-ROM and double-click Install.exe, then click OK.) 2. Click Next to accept the terms in the license agreement. 3. Click Network Software → Administration Tools → Job Accounting → Client and follow the on-screen instructions. Activating the Client Software on Macintosh Computers Normally, the Oki Job Accounting software is automatically installed when you install the printer driver. To activate Job Accounting: 1. Select Print Desktop... on the File menu. 2. Ensure that your printer model is selected, then click General and select Plug-in Preferences. 3. Open the Print Time Filters menu, then check Print Time Filters, JobType and JobAccounting. 4. Click Save Settings, then click OK. 5. Click Cancel. C5300 Software Utilities • 327
-
 1
1 -
2
-
3
-
4
-
5
-
6
-
7
-
8
-
9
-
10
-
11
-
12
-
13
-
14
-
15
-
16
-
17
-
18
-
19
-
20
-
21
-
22
-
23
-
24
-
25
-
26
-
27
-
28
-
29
-
30
-
31
-
32
-
33
-
34
-
35
-
36
-
37
-
38
-
39
-
40
-
41
-
42
-
43
-
44
-
45
-
46
-
47
-
48
-
49
-
50
-
51
-
52
-
53
-
54
-
55
-
56
-
57
-
58
-
59
-
60
-
61
-
62
-
63
-
64
-
65
-
66
-
67
-
68
-
69
-
70
-
71
-
72
-
73
-
74
-
75
-
76
-
77
-
78
-
79
-
80
-
81
-
82
-
83
-
84
-
85
-
86
-
87
-
88
-
89
-
90
-
91
-
92
-
93
-
94
-
95
-
96
-
97
-
98
-
99
-
100
-
101
-
102
-
103
-
104
-
105
-
106
-
107
-
108
-
109
-
110
-
111
-
112
-
113
-
114
-
115
-
116
-
117
-
118
-
119
-
120
-
121
-
122
-
123
-
124
-
125
-
126
-
127
-
128
-
129
-
130
-
131
-
132
-
133
-
134
-
135
-
136
-
137
-
138
-
139
-
140
-
141
-
142
-
143
-
144
-
145
-
146
-
147
-
148
-
149
-
150
-
151
-
152
-
153
-
154
-
155
-
156
-
157
-
158
-
159
-
160
-
161
-
162
-
163
-
164
-
165
-
166
-
167
-
168
-
169
-
170
-
171
-
172
-
173
-
174
-
175
-
176
-
177
-
178
-
179
-
180
-
181
-
182
-
183
-
184
-
185
-
186
-
187
-
188
-
189
-
190
-
191
-
192
-
193
-
194
-
195
-
196
-
197
-
198
-
199
-
200
-
201
-
202
-
203
-
204
-
205
-
206
-
207
-
208
-
209
-
210
-
211
-
212
-
213
-
214
-
215
-
216
-
217
-
218
-
219
-
220
-
221
-
222
-
223
-
224
-
225
-
226
-
227
-
228
-
229
-
230
-
231
-
232
-
233
-
234
-
235
-
236
-
237
-
238
-
239
-
240
-
241
-
242
-
243
-
244
-
245
-
246
-
247
-
248
-
249
-
250
-
251
-
252
-
253
-
254
-
255
-
256
-
257
-
258
-
259
-
260
-
261
-
262
-
263
-
264
-
265
-
266
-
267
-
268
-
269
-
270
-
271
-
272
-
273
-
274
-
275
-
276
-
277
-
278
-
279
-
280
-
281
-
282
-
283
-
284
-
285
-
286
-
287
-
288
-
289
-
290
-
291
-
292
-
293
-
294
-
295
-
296
-
297
-
298
-
299
-
300
-
301
-
302
-
303
-
304
-
305
-
306
-
307
-
308
-
309
-
310
-
311
-
312
-
313
-
314
-
315
-
316
-
317
-
318
-
319
-
320
-
321
-
 322
322 -
 323
323 -
 324
324 -
 325
325 -
 326
326 -
 327
327 -
 328
328 -
 329
329 -
 330
330 -
 331
331 -
 332
332 -
333
-
334
-
335
-
336
-
337
-
338
-
339
-
340
-
341
-
342
-
343
-
344
-
345
-
346
-
347
-
348
-
349
 |
 |
