Oki OKIPAGE10i Flash Simm Hardware Installation Guide - Page 6
Removing the Access Plate, Installing the SIMM Card
 |
View all Oki OKIPAGE10i manuals
Add to My Manuals
Save this manual to your list of manuals |
Page 6 highlights
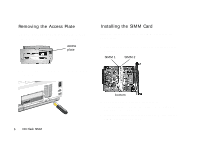
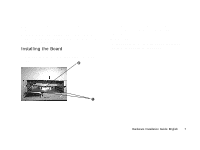
Removing the Access Plate If you are installing an option board for the first time: a. Turn the printer around so the rear is facing you. access plate Installing the SIMM Card Install the Flash SIMM card in the SIMM 2 socket on the option board. 1 Place the option board on a flat surface. Locate the SIMM 2 socket. SIMM 1 SIMM 2 b. Use a screwdriver to pry the plate from the back panel of the printer. |6 OKI Flash SIMM bottom 2 Remove the SIMM card from its packaging. 3 Hold the SIMM card with the metallic contact edge down, and the notch on the bottom. 4 Insert the metallic contact edge of the SIMM card into the SIMM 2 socket at a 45° angle.
-
 1
1 -
 2
2 -
 3
3 -
 4
4 -
 5
5 -
 6
6 -
 7
7 -
 8
8 -
 9
9 -
 10
10 -
 11
11 -
 12
12 -
13
-
14
-
15
-
16
-
17
-
18
-
19
 |
 |

6
OKI Flash SIMM
|
Removing the Access Plate
If you are installing an option board for the first time:
a.
Turn the printer around so the rear is facing you.
b.
Use a screwdriver to pry the plate from the back panel of
the printer.
Installing the SIMM Card
Install the Flash SIMM card in the
SIMM 2
socket on the
option board.
1
Place the option board on a flat surface. Locate the SIMM
2 socket.
2
Remove the SIMM card from its packaging.
3
Hold the SIMM card with the metallic contact edge down,
and the notch on the bottom.
4
Insert the metallic contact edge of the SIMM card into the
SIMM 2 socket
at a 45° angle.
access
plate
SIMM 1
SIMM 2
bottom