Oki OKIPAGE10i Flash Simm Hardware Installation Guide - Page 7
Installing the Board
 |
View all Oki OKIPAGE10i manuals
Add to My Manuals
Save this manual to your list of manuals |
Page 7 highlights
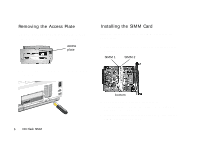
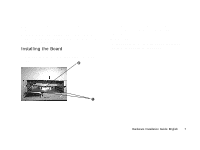
5 Push in until the metallic contacts are fully inserted into the socket. 6 Push the SIMM card forward slightly until it snaps into place. The plastic mount pins should fit into the holes on each end of the SIMM card. Installing the Board 1 Locate the guide rails (1) and edge connector (2) in the printer. 2 Insert the option board into the printer, making sure that it locates in the guide rails. Slide in the board and push it firmly into place. 3 Tighten the screws. ! If the screws do not fit, the board may not be properly seated. Slide the board out and reinstall it. | Hardware Installation Guide: English 7
-
 1
1 -
 2
2 -
 3
3 -
 4
4 -
 5
5 -
 6
6 -
 7
7 -
 8
8 -
 9
9 -
 10
10 -
 11
11 -
 12
12 -
13
-
14
-
15
-
16
-
17
-
18
-
19
 |
 |

|
Hardware Installation Guide: English
7
5
Push in
until the metallic contacts are fully inserted into
the socket.
6
Push the SIMM card
forward
slightly until it snaps into
place. The plastic mount pins should fit into the holes on
each end of the SIMM card.
Installing the Board
1
Locate the guide rails (1) and edge connector (2) in the
printer.
2
Insert the option board into the printer, making sure that it
locates in the guide rails. Slide in the board and push it
firmly into place.
3
Tighten the screws.
!
If the screws do not fit, the board may not be properly
seated. Slide the board out and reinstall it.