Olympus D150 D-150/C-1 Zoom Basic Manual (2.5MB) - Page 16
Using the Flash
 |
View all Olympus D150 manuals
Add to My Manuals
Save this manual to your list of manuals |
Page 16 highlights
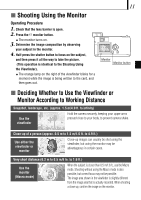
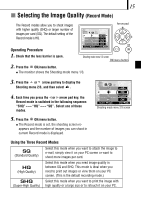
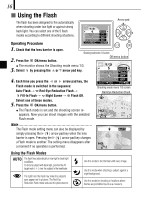
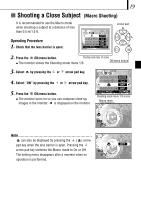
16 í Using the Flash The flash has been designed to fire automatically when shooting under low light or against strong back light. You can select one of the 5 flash modes according to different shooting situations. Operating Procedure 1/3 AUTO OFF DIGITAL ZOOM OFF SELECT END OK Arrow pad 1. Check that the lens barrier is open. Shooting mode menu 1/3 screen 2. Press the OK/menu button. OK/menu button ¼ The monitor shows the Shooting mode menu 1/3. 3. Select by pressing the or arrow pad key. 1/3 AUTO 4. Each time you press the or arrow pad key, the Flash mode is switched in the sequence: Auto-Flash[ Red-Eye Reduction Flash[ Fill-In Flash[ Night Scene[ Flash Off. Select one of these modes. 5. Press the OK/menu button. ¼ The Flash mode is set and the shooting screen reappears. Now you can shoot images with the selected Flash mode. OFF DIGITAL ZOOM OFF SELECT END OK Shooting mode menu 1/3 screen Red-Eye Reduction Flash HQ Note The Flash mode setting menu can also be displayed by simply pressing the ( ) arrow pad key when the lens barrier is open. Pressing the ( ) arrow pad key changes a Flash mode to another. The setting menu disappears after a moment if no operation is performed. AUTO Using the Flash Modes AUTO The flash fires automatically in low light or back light conditions. To shoot a subject with back light, position the AF target mark ( ) over the subject in the viewfinder. The light from the flash may make the subject's eyes appear red in pictures. The Red-Eye Reduction Flash mode reduces this phenomenon. Use this mode to fire the flash with every image. Use this mode when shooting a subject against a night background. Use this mode for shooting in locations where flashes are prohibited (such as a museum).
-
 1
1 -
2
-
3
-
4
-
5
-
6
-
7
-
8
-
9
-
10
-
 11
11 -
 12
12 -
 13
13 -
 14
14 -
 15
15 -
 16
16 -
 17
17 -
 18
18 -
 19
19 -
 20
20 -
 21
21 -
22
-
23
-
24
-
25
-
26
-
27
-
28
-
29
-
30
-
31
-
32
-
33
-
34
-
35
-
36
-
37
-
38
-
39
-
40
-
41
-
42
-
43
-
44
-
45
-
46
-
47
-
48
-
49
-
50
-
51
-
52
-
53
-
54
-
55
-
56
-
57
-
58
-
59
-
60
-
61
-
62
-
63
-
64
-
65
-
66
-
67
-
68
-
69
-
70
-
71
-
72
-
73
-
74
-
75
-
76
-
77
-
78
-
79
-
80
-
81
-
82
-
83
-
84
-
85
-
86
-
87
-
88
-
89
-
90
-
91
-
92
-
93
-
94
-
95
-
96
-
97
-
98
-
99
-
100
-
101
-
102
-
103
-
104
-
105
-
106
-
107
-
108
-
109
-
110
-
111
-
112
-
113
-
114
-
115
-
116
-
117
-
118
-
119
-
120
-
121
-
122
-
123
-
124
-
125
-
126
-
127
-
128
-
129
-
130
-
131
-
132
-
133
-
134
-
135
-
136
-
137
-
138
-
139
-
140
-
141
-
142
-
143
-
144
-
145
-
146
 |
 |
