Olympus D150 D-150/C-1 Zoom Basic Manual (2.5MB) - Page 4
Contents - digital camera
 |
View all Olympus D150 manuals
Add to My Manuals
Save this manual to your list of manuals |
Page 4 highlights
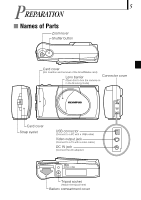
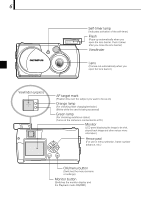
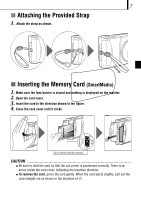
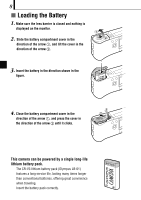
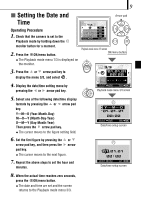
4 CONTENTS Read the Following Before Use 2 PREPARATION Names of Parts 5 Attaching the Provided Strap 7 Inserting the Memory Card (SmartMedia) 7 Loading the Battery 8 Setting the Date and Time 9 SHOOTING OPERATIONS Shooting Pictures 10 Shooting Using the Monitor 11 Deciding Whether to Use the Viewfinder or Monitor According to Working Distance 11 Checking the Camera Status Indication Next to the Viewfinder or on the Monitor (in Shooting Mode) 12 Selecting the Image Quality (Record Mode) 15 Using the Flash 16 Magnifying the Subject (Zooming) 17 Shooting a Close Subject (Macro Shooting) 19 Using the Self-Timer 20 Shooting Images Sequentially (Sequential Shooting) 21 Varying the Image Brightness (Exposure Compensation) 22 Varying the Image Color Tone (White Balance Control) 23 Muting the Beep Tones 24 VIEWING OR ERASING IMMEDIATELY AFTER SHOOTING Viewing Pictures 25 Image Playback Operations 26 Erasing Pictures (One-Frame Erase) 28 Erasing All Pictures (All-Frame Erase) 29 Viewing Multiple Images Automatically in Sequence (Slide Show) 30 Preventing Accidental Erasure (Protection) 31 Adjusting the Monitor Brightness 32 VIEWING OPTIONS If an Alarm Message Is Displayed 33 Making the Most of Your Digital Camera 34 Specifications 36
-
 1
1 -
 2
2 -
 3
3 -
 4
4 -
 5
5 -
 6
6 -
 7
7 -
 8
8 -
 9
9 -
 10
10 -
11
-
12
-
13
-
14
-
15
-
16
-
17
-
18
-
19
-
20
-
21
-
22
-
23
-
24
-
25
-
26
-
27
-
28
-
29
-
30
-
31
-
32
-
33
-
34
-
35
-
36
-
37
-
38
-
39
-
40
-
41
-
42
-
43
-
44
-
45
-
46
-
47
-
48
-
49
-
50
-
51
-
52
-
53
-
54
-
55
-
56
-
57
-
58
-
59
-
60
-
61
-
62
-
63
-
64
-
65
-
66
-
67
-
68
-
69
-
70
-
71
-
72
-
73
-
74
-
75
-
76
-
77
-
78
-
79
-
80
-
81
-
82
-
83
-
84
-
85
-
86
-
87
-
88
-
89
-
90
-
91
-
92
-
93
-
94
-
95
-
96
-
97
-
98
-
99
-
100
-
101
-
102
-
103
-
104
-
105
-
106
-
107
-
108
-
109
-
110
-
111
-
112
-
113
-
114
-
115
-
116
-
117
-
118
-
119
-
120
-
121
-
122
-
123
-
124
-
125
-
126
-
127
-
128
-
129
-
130
-
131
-
132
-
133
-
134
-
135
-
136
-
137
-
138
-
139
-
140
-
141
-
142
-
143
-
144
-
145
-
146
 |
 |
