Olympus FE 340 FE-340 Instruction Manual (English) - Page 44
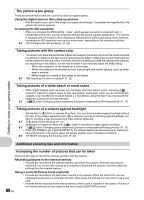
Taking pictures of a white beach or snow scene - camera manual
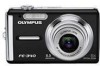 |
UPC - 050332164031
View all Olympus FE 340 manuals
Add to My Manuals
Save this manual to your list of manuals |
Page 44 highlights
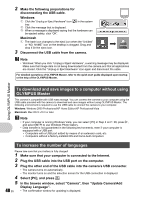
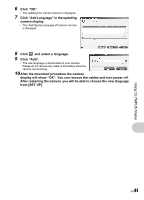
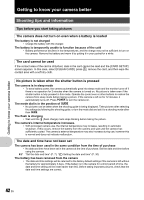
Getting to know your camera better The picture is too grainy There are several factors that can cause the picture to appear grainy. Using the digital zoom to take close-up pictures • With the digital zoom, part of the image is cropped and enlarged. The greater the magnification, the grainier the picture appears. Increasing the ISO sensitivity • When you increase the [ISO] setting, "noise", which appears as spots of unwanted color or unevenness in the color, can be introduced and give the picture a grainy appearance. This camera is equipped with a function to allow shooting at high sensitivity while suppressing noise; however, increasing the ISO sensitivity can result in some noise, depending on the shooting conditions. g "ISO Changing the ISO sensitivity" (P. 23) Taking pictures with the correct color • The reason why there are sometimes differences between the actual colors and the colors recorded in a picture is related to the light source illuminating the subject. [WB] is the function that helps the camera determine the true colors. Normally, the [AUTO] setting provides the optimal white balance, but depending on the subject, results may be better if you manually adjust the [WB] setting. • When the subject is in the shade on a sunny day • When the subject is illuminated by both natural light and indoor lighting, such as when near a window • When there is no white in the center of the frame g "WB Adjusting the color of a picture" (P. 22) Taking pictures of a white beach or snow scene • Often, bright subjects (such as snow) turn out darker than their natural colors. Adjusting OF toward [+] makes the subject closer to their real shades. Conversely, when you are shooting dark subjects, it can be effective to adjust toward [-]. Sometimes, using the flash may not produce the brightness (exposure) that was intended. g "OF/< button Changing picture brightness (Exposure compensation)/Printing pictures" (P. 15) Taking pictures of a subject against backlight • Set the flash to [#] (fill-in) to activate fill-in-flash. You can shoot a subject against backlight without the face of the subject appearing dark. [#] is effective not only for shooting against backlight, but also for shooting under fluorescent and other artificial lightening. g "Y# button Flash shooting" (P. 15) • Selecting a [+] exposure value with OF is useful in shooting a subject against backlight. g "OF/< button Changing picture brightness (Exposure compensation)/Printing pictures" (P. 15) • When [AF MODE] is set to [FACE DETECT], the camera determines the exposure by metering a face and the face in the picture taken will appear brighter even in backlight conditions. g "AF MODE Changing the focusing area" (P. 24) Additional shooting tips and information Increasing the number of pictures that can be taken There are two ways to record the pictures you take with this camera. Recording pictures to the internal memory • Pictures are recorded to the internal memory, and when the number of storable still pictures reaches 0, you connect the camera to a computer to download the pictures; and then erase the pictures from the internal memory. Using a card (xD-Picture Card) (optional) • Pictures are recorded to the card when inserted in the camera. When the card is full, you can download the pictures to a computer and then either erase the pictures from the card or use a new card. • Pictures are not recorded to the internal memory when a card is inserted in the camera. Pictures in the internal memory can be copied to the card using the [BACKUP] function. 44 EN
-
 1
1 -
2
-
3
-
4
-
5
-
6
-
7
-
8
-
9
-
10
-
11
-
12
-
13
-
14
-
15
-
16
-
17
-
18
-
19
-
20
-
21
-
22
-
23
-
24
-
25
-
26
-
27
-
28
-
29
-
30
-
31
-
32
-
33
-
34
-
35
-
36
-
37
-
38
-
 39
39 -
 40
40 -
 41
41 -
 42
42 -
 43
43 -
 44
44 -
 45
45 -
 46
46 -
 47
47 -
 48
48 -
 49
49 -
50
-
51
-
52
-
53
-
54
-
55
-
56
-
57
-
58
-
59
-
60
-
61
-
62
-
63
-
64
-
65
-
66
-
67
-
68
 |
 |
