Olympus LS-100 LS-100 Instruction Manual (English) - Page 121
Using the recorder as a USB microphone/speaker, Using the recorder as an external memory for your PC
 |
View all Olympus LS-100 manuals
Add to My Manuals
Save this manual to your list of manuals |
Page 121 highlights
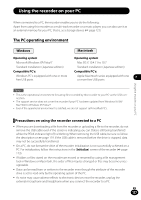
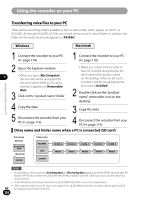
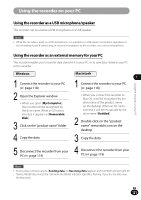
Using the recorder on your PC Using the recorder as a USB microphone/speaker This recorder can be used as a USB microphone or a USB speaker. Note • While the recorder is used as a USB microphone, it is available as a USB stereo microphone regardless of the recording mode. If connecting an external microphone to this recorder, use a stereo microphone. Using the recorder as an external memory for your PC This recorder enables you to transfer data stored in it to your PC, or to save data stored in your PC to this recorder. Windows Macintosh 7 1 Connect the recorder to your PC (☞ page 118) 1 Connect the recorder to your PC (☞ page 118) Using the recorder on your PC 2 Open the Explorer window • When you open [My Computer], the recorder will be recognized by the drive name. While an SD card is inserted, it appears as [Removable Disk]. 3 Click on the "product name" folder • When you connect the recorder to Mac OS, it will be recognized by the drive name of the product name on the desktop. When an SD card is inserted, it will be recognized by the drive name [Untitled]. 2 Double-click on the "product name" removable icon on the desktop 4 Copy the data 3 Copy the data 5 Disconnect the recorder from your PC (☞ page 119) 4 Disconnect the recorder from your PC (☞ page 119) Note • During data communications, [Sending data] or [Receiving data] appears and the PEAK indicator light (R) flashes. NEVER disconnect the USB while the [PEAK] indicator light (R) is flashing. If you do, the data may be destroyed. EN 121
-
 1
1 -
2
-
3
-
4
-
5
-
6
-
7
-
8
-
9
-
10
-
11
-
12
-
13
-
14
-
15
-
16
-
17
-
18
-
19
-
20
-
21
-
22
-
23
-
24
-
25
-
26
-
27
-
28
-
29
-
30
-
31
-
32
-
33
-
34
-
35
-
36
-
37
-
38
-
39
-
40
-
41
-
42
-
43
-
44
-
45
-
46
-
47
-
48
-
49
-
50
-
51
-
52
-
53
-
54
-
55
-
56
-
57
-
58
-
59
-
60
-
61
-
62
-
63
-
64
-
65
-
66
-
67
-
68
-
69
-
70
-
71
-
72
-
73
-
74
-
75
-
76
-
77
-
78
-
79
-
80
-
81
-
82
-
83
-
84
-
85
-
86
-
87
-
88
-
89
-
90
-
91
-
92
-
93
-
94
-
95
-
96
-
97
-
98
-
99
-
100
-
101
-
102
-
103
-
104
-
105
-
106
-
107
-
108
-
109
-
110
-
111
-
112
-
113
-
114
-
115
-
 116
116 -
 117
117 -
 118
118 -
 119
119 -
 120
120 -
 121
121 -
 122
122 -
 123
123 -
 124
124 -
 125
125 -
 126
126 -
127
-
128
-
129
-
130
-
131
-
132
-
133
-
134
-
135
 |
 |
