Olympus TG-310 TG-610 Instruction Manual (English) - Page 32
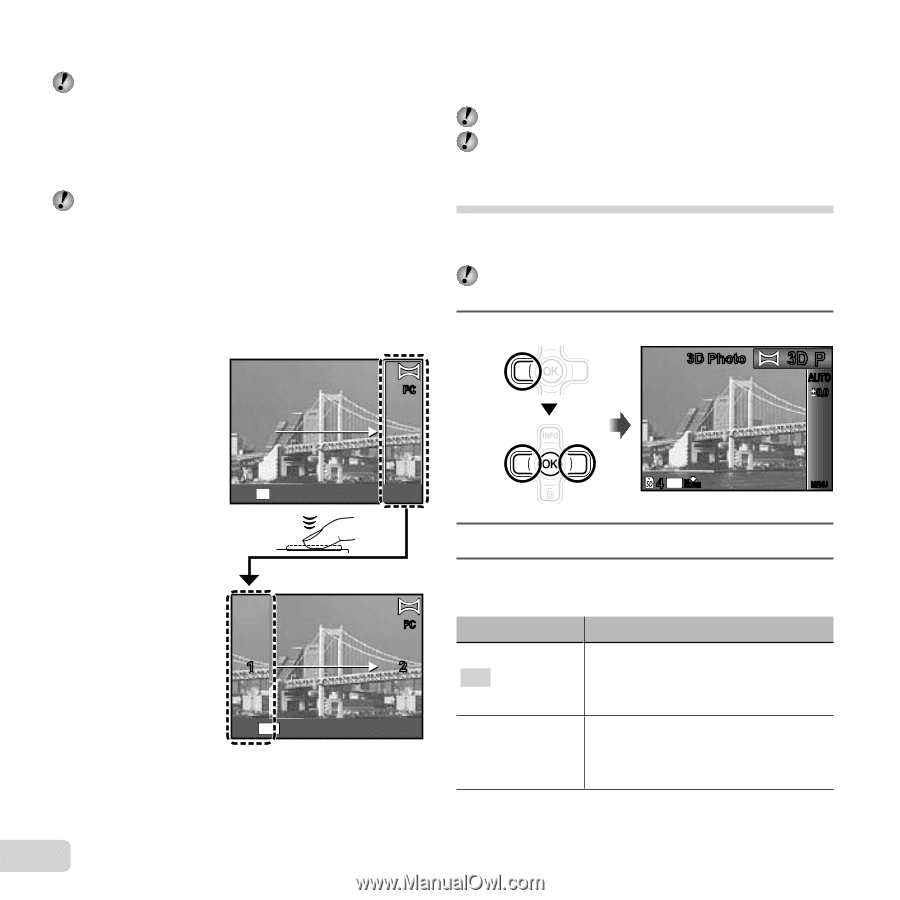
Taking pictures with [PC], Set the shooting mode to, Press, to go to the submenu. - software
 |
View all Olympus TG-310 manuals
Add to My Manuals
Save this manual to your list of manuals |
Page 32 highlights
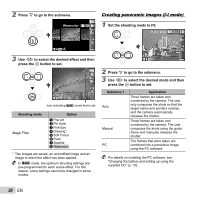
4 Press the shutter button to take the next shot. To combine only two pictures, press the A button before taking the third frame. 5 Repeat steps 3 and 4 to take a third frame. ● After the third frame is taken, the camera automatically processes the frames and the combined panorama image is displayed. To exit the panorama function without saving an image, press the m button. Taking pictures with [PC] 1 Use FGHI to select the direction that the frames are combined. 2 Press the shutter button to take the first frame, and then compose the second shot. Before first shot PC 3 Repeat Step 2 until the number of desired frames is taken, and then press the A button or m button when finished. Panorama shooting is possible for up to 10 frames. Refer to the PC software help guide for details on how to make panorama images. Shooting 3D images (W mode) In this mode, 3D images are shot for viewing on 3D-compatible display devices. Images shot in 3D mode cannot be displayed in 3D on this camera's monitor. 1 Set the shooting mode to W. 3D Photo 3D P AUTO 0.0 Set OK After first shot PC 1 2 Exit MENU ● After the first shot, the area shown in white reappears on the side of the display opposite the pan direction. Frame subsequent photographs so that they overlap with the image in the monitor. 32 EN 4 14M NORM MENU 2 Press G to go to the submenu. 3 Use HI to select [Auto] or [Manual] and then press the A button to set. Submenu 1 Auto Manual Description After shooting the first frame, overlap the subject with the image in the monitor. The next frame is taken automatically. After shooting the first frame, move the camera to overlap the subject with the image in the monitor. Then manually release the shutter.
-
 1
1 -
2
-
3
-
4
-
5
-
6
-
7
-
8
-
9
-
10
-
11
-
12
-
13
-
14
-
15
-
16
-
17
-
18
-
19
-
20
-
21
-
22
-
23
-
24
-
25
-
26
-
 27
27 -
 28
28 -
 29
29 -
 30
30 -
 31
31 -
 32
32 -
 33
33 -
 34
34 -
 35
35 -
 36
36 -
 37
37 -
38
-
39
-
40
-
41
-
42
-
43
-
44
-
45
-
46
-
47
-
48
-
49
-
50
-
51
-
52
-
53
-
54
-
55
-
56
-
57
-
58
-
59
-
60
-
61
-
62
-
63
-
64
-
65
-
66
-
67
-
68
-
69
-
70
-
71
-
72
-
73
-
74
-
75
-
76
-
77
-
78
-
79
-
80
-
81
-
82
-
83
 |
 |