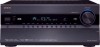
Onkyo TX-NR1007 Owner Manual - Page 127
Setting the Powered Zone 2/3, Notes, Not Act
 |
View all Onkyo TX-NR1007 manuals
Add to My Manuals
Save this manual to your list of manuals |
Page 127 highlights
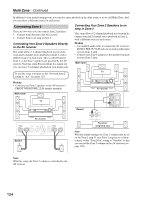
Multi Zone-Continued Setting the Powered Zone 2/3 4 If you've connected your Zone 2/3 speakers to the AV receiver, as explained in "Connecting Your Zone 2 Speakers Directly to the AV receiver" on page 124 or "Connecting Your Zone 3 Speakers Directly to the AV receiver" on page 126, you must set the "Powered Zone2" or "Powered Zone3" setting to "Act" (Acti- vated). 1 Press the [RECEIVER] button followed by the [SETUP] button. The main menu appears onscreen. If the main menu doesn't appear, make sure the appropriate external input is selected on your TV. 5 Use the Up and Down [R]/[X] buttons to select "Powered Zone2" or "Powered Zone3", and use the Left and Right [F]/[S] buttons to select: Not Act: ZONE 2/3 L/R speaker terminals not activated (Powered Zone 2/3 disabled). Act: ZONE 2/3 L/R speaker terminals activated (Powered Zone 2/3 enabled). Press the [SETUP] button. The setup menu closes. 2 Use the Up and Down [R]/[X] buttons to select "2. Speaker Notes: Setup", and then press [ENTER]. • Powered Zone3 cannot be used if "Speakers The "Speaker Setup" menu appears. Type(Front)" is set to "Bi-Amp" (see page 53). • This procedure can also be performed on the AV 2. Speaker Setup 1. Speaker Settings 2. Speaker Configuration 3. Speaker Distance 4. Level Calibration 5. Equalizer Settings 6. THX Audio Setup receiver by using its [SETUP] button, arrow buttons, and [ENTER] button. 3 Use the Up and Down [R]/[X] buttons to select "1. Speaker Settings", and then press [ENTER]. The "Speaker Settings" menu appears. 2-1. Speaker Settings Speaker Impedance Speakers Type(Front) Powered Zone2 Powered Zone3 6ohms Normal Not Act Not Act 127
-
 1
1 -
2
-
3
-
4
-
5
-
6
-
7
-
8
-
9
-
10
-
11
-
12
-
13
-
14
-
15
-
16
-
17
-
18
-
19
-
20
-
21
-
22
-
23
-
24
-
25
-
26
-
27
-
28
-
29
-
30
-
31
-
32
-
33
-
34
-
35
-
36
-
37
-
38
-
39
-
40
-
41
-
42
-
43
-
44
-
45
-
46
-
47
-
48
-
49
-
50
-
51
-
52
-
53
-
54
-
55
-
56
-
57
-
58
-
59
-
60
-
61
-
62
-
63
-
64
-
65
-
66
-
67
-
68
-
69
-
70
-
71
-
72
-
73
-
74
-
75
-
76
-
77
-
78
-
79
-
80
-
81
-
82
-
83
-
84
-
85
-
86
-
87
-
88
-
89
-
90
-
91
-
92
-
93
-
94
-
95
-
96
-
97
-
98
-
99
-
100
-
101
-
102
-
103
-
104
-
105
-
106
-
107
-
108
-
109
-
110
-
111
-
112
-
113
-
114
-
115
-
116
-
117
-
118
-
119
-
120
-
121
-
 122
122 -
 123
123 -
 124
124 -
 125
125 -
 126
126 -
 127
127 -
 128
128 -
 129
129 -
 130
130 -
 131
131 -
 132
132 -
133
-
134
-
135
-
136
-
137
-
138
-
139
-
140
-
141
-
142
-
143
-
144
-
145
-
146
-
147
-
148
-
149
-
150
-
151
-
152
-
153
-
154
-
155
-
156
 |
 |
