Onkyo TX-SR706 Owner Manual - Page 9
Continued, DIMMER or RT/PTY/TP button 55 - tx manual
 |
UPC - 751398008214
View all Onkyo TX-SR706 manuals
Add to My Manuals
Save this manual to your list of manuals |
Page 9 highlights
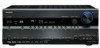
Front & Rear Panels-Continued The page numbers in parentheses show where you can find the main explanation for each item. B ON/STANDBY button (40) This button is used to set the AV receiver/AV amplifier to On or Standby. C STANDBY indicator (40) This indicator lights up when the AV receiver/AV amplifier is in Standby mode, and it flashes while a signal is being received from the remote controller. D ZONE 2 indicator (99) This indicator lights up when Zone 2 is selected. E Input selector buttons (54) These buttons are used to select from the following input sources: MULTI CH, DVD, VCR/DVR, CBL/SAT, GAME/TV, AUX, TAPE, TUNER, CD, PHONO. The [MULTI CH] button selects the DVD analog multichannel input. F Remote control sensor (14) This sensor receives control signals from the remote controller. G Display See "Display" on page 10. H SETUP button This button is used to access the onscreen setup menus that appear on the connected TV. I Arrow, TUNING, PRESET and ENTER buttons When the AM or FM input source is selected, the TUNING [R]/[X] buttons are used to tune the tuner, and the PRESET [F]/[S] buttons are used to select radio presets (see page 58) (TX-SR706 only). When the onscreen setup menus are used, they work as arrow buttons and are used to select and set items. The [ENTER] button is also used with the onscreen setup menus. J RETURN button This button is used to return to the previously displayed onscreen setup menu. K MASTER VOLUME control (54) and indicator This control is used to adjust the volume of the AV receiver/AV amplifier to -∞ dB, -81.5 dB through +18.0 dB (relative display). The volume level can also be displayed as an absolute value. See "Volume Setup" on page 89. L PURE AUDIO button and indicator (62) Selects the Pure Audio listening mode. The indicator lights up when this mode is selected. Pressing this button again selects the previous listening mode. O ZONE 2 LEVEL button (100) Used when adjusting the volume level of Zone 2. P TONE, [-] & [+] buttons (55) Used to adjust the tone (bass and treble). Q MOVIE/TV button (62) Selects the listening modes intended for use with movies and TV. R MUSIC button (62) Selects the listening modes intended for use with music. S GAME button (62) Selects the listening modes intended for use with video games. T DISPLAY button (55) This button is used to display various information about the currently selected input source. U DIGITAL INPUT button (96) Selects the options for automatic audio input selection setup. V DIMMER or RT/PTY/TP button (55, 60) This button is used to adjust the display brightness. On the European model, this is the [RT/PTY/TP] button, and it's for RDS (Radio Data System). See "Using RDS (not North American model)" on page 59. W MEMORY or Re-EQ button (58, 83) This button is used when storing or deleting radio presets. On the TX-SA706, this button is used to turn the Re-EQ function on or off. X TUNING MODE or LATE NIGHT button (57, 83) This button is used to select the Auto or Manual tuning mode. On the TX-SA706, this button is used to turn the Late Night function on or off. Y SETUP MIC jack (49) The included speaker setup microphone is connected here for automatic speaker setup. Z AUX INPUT This input can be used to connect a camcorder, game console, and so on. There are jacks for S-Video, composite video, analog audio, and optical digital audio. M PHONES jack (56) This 1/4-inch phone jack is for connecting a standard pair of stereo headphones for private listening. N ZONE 2 and OFF buttons (99) The [ZONE 2] button is used to select the input source for Zone 2. The [OFF] button is used to turn off the output of Zone 2. 9
-
 1
1 -
2
-
3
-
 4
4 -
 5
5 -
 6
6 -
 7
7 -
 8
8 -
 9
9 -
 10
10 -
 11
11 -
 12
12 -
 13
13 -
 14
14 -
15
-
16
-
17
-
18
-
19
-
20
-
21
-
22
-
23
-
24
-
25
-
26
-
27
-
28
-
29
-
30
-
31
-
32
-
33
-
34
-
35
-
36
-
37
-
38
-
39
-
40
-
41
-
42
-
43
-
44
-
45
-
46
-
47
-
48
-
49
-
50
-
51
-
52
-
53
-
54
-
55
-
56
-
57
-
58
-
59
-
60
-
61
-
62
-
63
-
64
-
65
-
66
-
67
-
68
-
69
-
70
-
71
-
72
-
73
-
74
-
75
-
76
-
77
-
78
-
79
-
80
-
81
-
82
-
83
-
84
-
85
-
86
-
87
-
88
-
89
-
90
-
91
-
92
-
93
-
94
-
95
-
96
-
97
-
98
-
99
-
100
-
101
-
102
-
103
-
104
-
105
-
106
-
107
-
108
-
109
-
110
-
111
-
112
-
113
-
114
-
115
-
116
-
117
-
118
-
119
-
120
 |
 |
