Optoma CinemaX P2 SmartFIT Installation Guide - Page 10
Wall Installation with SmartFIT
 |
View all Optoma CinemaX P2 manuals
Add to My Manuals
Save this manual to your list of manuals |
Page 10 highlights
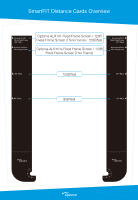
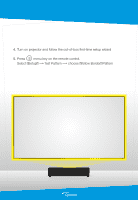
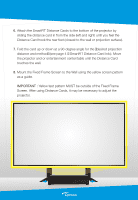
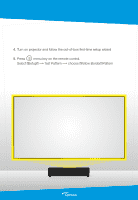
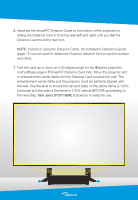
E Step Wall Installation with SmartFIT 1. Turn on projector and follow the on-screen first-time setup instructions. 2. Press menu key on the remote control. 3. Select "Setup" Test Pattern choose "Yellow Border" Pattern. 4. Ensure the test pattern is level on the top and sides - we strongly recommend the use of a "level tool". 5. Use black painters' tape with a width no larger than 0.50-inch to create a temporary frame of 100-inch diagonal (87-inch wide) or 120-inch diagonal (105-inch wide) image around the yellow test pattern. Stay as close to the INSIDE border of the yellow test pattern as possible. Yellow frame MUST be outside of the frame created with the painters' tape.
-
 1
1 -
2
-
3
-
4
-
 5
5 -
 6
6 -
 7
7 -
 8
8 -
 9
9 -
 10
10 -
 11
11 -
 12
12 -
 13
13 -
 14
14 -
 15
15 -
16
-
17
-
18
 |
 |

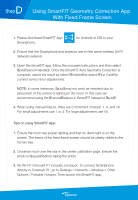
Step
E
Wall Installation with SmartFIT
Turn on projector and follow the on-screen first-time setup instructions.
Press
menu key on the remote control.
Select “Setup”
Test Pattern
choose “Yellow Border” Pattern.
Ensure the test pattern is level on the top and sides – we strongly
recommend the use of a “level tool”.
Use black painters' tape with a width no larger than 0.50-inch to create a
temporary frame of 100-inch diagonal (87-inch wide) or 120-inch diagonal
(105-inch wide) image around the yellow test pattern. Stay as close to the
INSIDE border of the yellow test pattern as possible.
Yellow frame MUST
be outside of the frame created with the painters’ tape.
1.
2.
3.
4.
5.