Optoma ZX210ST User's Manual - Page 11
Control Panel, Using the Control Panel - led
 |
View all Optoma ZX210ST manuals
Add to My Manuals
Save this manual to your list of manuals |
Page 11 highlights
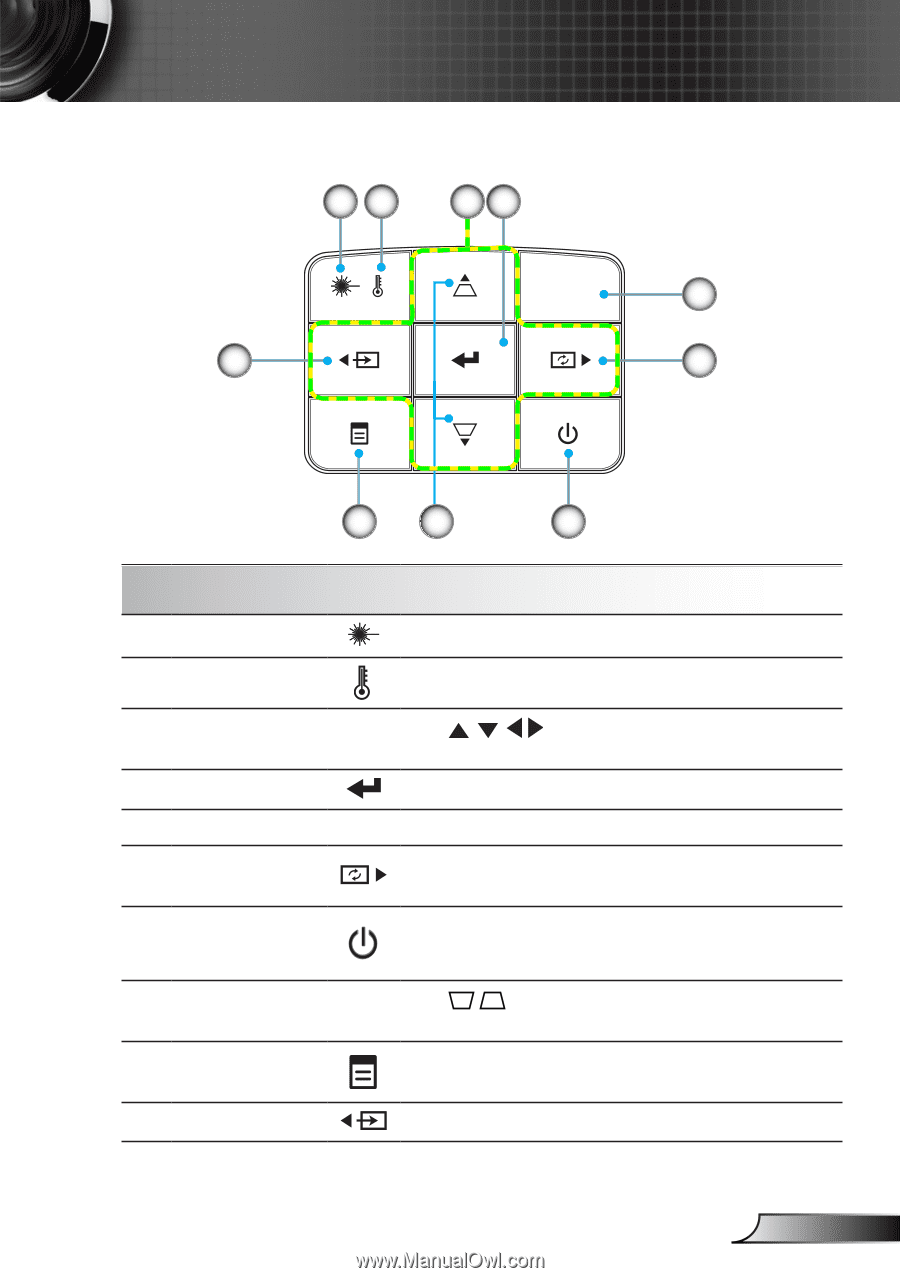
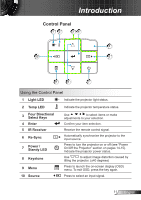
Introduction Control Panel 12 34 5 10 6 9 8 7 Using the Control Panel 1 Light LED Indicate the projector light status. 2 Temp LED Indicate the projector temperature status. 3 Four Directional Select Keys 4 Enter 5 IR Receiver 6 Re-Sync 7 Power / Standy LED 8 Keystone 9 Menu 10 Source Use to select items or make adjustments to your selection. Confirm your item selection. Receive the remote control signal. Automatically synchronize the projector to the input source. Press to turn the projector on or off (see "Power On/Off the Projector" section on pages 14-15). Indicate the projector power status. Use to adjust image distortion caused by tilting the projector. (±40 degrees) Press to launch the on-screen display (OSD) menu. To exit OSD, press the key again. Press to select an input signal. 11 English
-
 1
1 -
2
-
3
-
4
-
5
-
 6
6 -
 7
7 -
 8
8 -
 9
9 -
 10
10 -
 11
11 -
 12
12 -
 13
13 -
 14
14 -
 15
15 -
 16
16 -
17
-
18
-
19
-
20
-
21
-
22
-
23
-
24
-
25
-
26
-
27
-
28
-
29
-
30
-
31
-
32
-
33
-
34
-
35
-
36
-
37
-
38
-
39
-
40
-
41
-
42
-
43
-
44
-
45
-
46
-
47
-
48
-
49
-
50
-
51
-
52
-
53
-
54
-
55
-
56
-
57
-
58
-
59
-
60
-
61
-
62
-
63
-
64
-
65
-
66
-
67
-
68
-
69
-
70
-
71
-
72
-
73
-
74
-
75
-
76
-
77
-
78
-
79
-
80
-
81
-
82
-
83
-
84
-
85
-
86
-
87
-
88
-
89
-
90
-
91
-
92
-
93
-
94
-
95
-
96
-
97
-
98
-
99
-
100
-
101
-
102
-
103
-
104
-
105
-
106
-
107
-
108
-
109
-
110
-
111
-
112
-
113
-
114
-
115
-
116
-
117
-
118
 |
 |