Oregon Scientific WMR100N User Manual - Page 13
To Disable Sleep Mode On Computer - troubleshooting
 |
View all Oregon Scientific WMR100N manuals
Add to My Manuals
Save this manual to your list of manuals |
Page 13 highlights
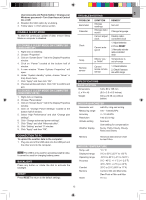
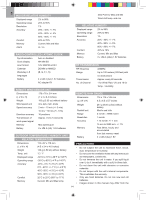
EN User Accounts and Family Safety > Change your Windows password > Turn User Account Control On or Off. 2. Deselect the UAC option by un-ticking. 3. Follow steps 1-4 from above section. DISABLE SLEEP MODE To allow for continuous update of data, ensure Sleep Mode on computer is disabled. TO DISABLE SLEEP MODE ON COMPUTER (WINDOWS XP) 1. Right click on Desktop. 2. Choose "Properties". 3. Click on "Screen Saver" Tab in the Display Properties window. 4. Click on "Power" located at the bottom half of window. 5. A new window "Power Options Properties" will open. 6. Under "System standby" option, choose "Never" in drop down menu. 7. Click "Apply" and then click "OK". 8. Previous window will return. Click "OK" to confirm and exit. TO DISABLE SLEEP MODE ON COMPUTER (WINDOWS VISTA) 1. Right click on Desktop. 2. Choose "Personalize". 3. Click on "Screen Saver" Tab in the Display Properties window. 4. Click on "Change Power Settings" located at the bottom half of window. 5. Select "High Performance" and click "Change plan settings". 6. Click "Change advanced power settings". 7. Click "Sleep" and click "Hibernate after". 8. Click "Setting" and set "0" minutes. 9. Click "Apply" and then "OK". CONNECTION TO PC To upload the weather data to the computer: 1. Plug one end of the USB cable into the USB port and the other end into the computer. NOTE The USB is only used for uploading weather data. It cannot be used for charging battery power. BACKLIGHT Press any button or rotate the dial to activate the backlight. RESET Press RESET to return to the default settings. TROUBLESHOOTING PROBLEM Barometer Calendar SYMPTOM Strange readings Strange date / month Cannot adjust clock Clock Cannot autosynch Temp Remote sensor Shows "LLL" or "HHH" Cannot locate remote sensor REMEDY Set unit Change language Disable radiocontrolled clock 1. Adjust batteries 2. Press RESET 3. Manually activate radio-controlled clock Temperature is out-of-range 1. Check batteries 2. Check if sensors are within range SPECIFICATIONS BASE STATION Dimensions 143 x 89 x 165 mm (L x W x H) (5.6 x 3.5 x 6.5 inches) Weight 300 g (10.58 oz) without battery INDOOR BAROMETER Barometer unit mb/hPa, inHg and mmHg Measuring range 700 - 1050mb/hPa Accuracy +/- 10 mb/hPa Resolution 1mb (0.0 inHg) Altitude setting Sea level User setting for compensation Weather display Sunny, Partly Cloudy, Cloudy, Rainy and Snowy Memory Historical data and bar chart for last 24hrs INDOOR TEMPERATURE Temp. unit °C / °F Displayed range 0°C to 50°C (32°F to 122°F) Operating range -30°C to 60°C (-4°F to 140°F) Accuracy 0°C - 40°C: +/- 1°C (+/- 2.0°F) 40°C - 50°C: +/- 2°C (+/- 4.0°F) Comfort 20°C to 25°C (68°F to 77°F) Memory Current, Min and Max temp. Dew Point w/ Min and Max Alarm Hi / Lo 13
-
 1
1 -
2
-
3
-
4
-
5
-
6
-
7
-
 8
8 -
 9
9 -
 10
10 -
 11
11 -
 12
12 -
 13
13 -
 14
14 -
 15
15
 |
 |