Panasonic DMREZ17K Dvd Recorder - Page 44
SETTING THE CHANNELS AND CLOCK, Automatic Clock and Channel
 |
View all Panasonic DMREZ17K manuals
Add to My Manuals
Save this manual to your list of manuals |
Page 44 highlights
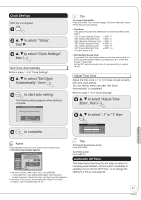
Setting the Channels and Clock Preparation: • Turn on the television and select the appropriate video input to suit the connections to this unit. • These are the first settings you make upon buying the unit. You don't need to make these settings again. to turn the unit on. Language: e, r to select, then TV Aspect Ratio: e, r to select "4:3 TV" or "16:9 Widescreen TV" then Select Language Seleccione el idioma Sélection de langue English Español Français Press ENTER Pulse ENTER Appuyer sur ENTER Aspect Ratio Selection Select TV type and press ENTER. (Please refer to Operation Instruction for details) 4:3 4:3 TV 16:9 16:9 Widescreen TV • When connecting to a 4:3 standard aspect TV: Select "4:3 TV". • When connecting to a 16:9 widescreen TV: Select "16:9 Widescreen TV". Quick Start Function: e, r to select "On" or "Off" then Quick Start Setting The unit can be turned on faster, in about 1 second. Please note that Quick Start mode slightly increases power consumption when the unit is off. (See Operation Instructions for details) Turn Quick Start on ? On Off Automatic Clock and Channel Setting: e, r to select "Yes" or "No" then Automatic Clock and Channel Settings Does this unit get its TV signal via RF IN? Example: Antenna, Cable TV or Cable Box connected to the unit's RF IN. Yes No • When connecting the cable from the wall (cable TV or antenna) to the unit's RF IN: Select "Yes". The unit then displays the source selection screen (➔ 45). • When not connecting the cable from the wall (cable TV or antenna) to the unit's RF IN: Select "No". The unit then displays "Set Clock Manually" screen (➔ 45, Manual Clock Setting). Tips • "Quick Start" function (➔ 32) If you set Quick Start to on, you can start recording to DVD-RAM about 1 second after you press [^ DVD POWER] to turn the unit on and then sequentially press [* REC]. The following happens when you have selected "On". - Power consumption in standby mode increases because power is supplied to the unit. To return to the previous screen Press [RETURN]. 44 RQT8850
-
 1
1 -
2
-
3
-
4
-
5
-
6
-
7
-
8
-
9
-
10
-
11
-
12
-
13
-
14
-
15
-
16
-
17
-
18
-
19
-
20
-
21
-
22
-
23
-
24
-
25
-
26
-
27
-
28
-
29
-
30
-
31
-
32
-
33
-
34
-
35
-
36
-
37
-
38
-
 39
39 -
 40
40 -
 41
41 -
 42
42 -
 43
43 -
 44
44 -
 45
45 -
 46
46 -
 47
47 -
 48
48 -
 49
49 -
50
-
51
-
52
-
53
-
54
-
55
-
56
-
57
-
58
-
59
-
60
-
61
-
62
-
63
-
64
-
65
-
66
-
67
-
68
-
69
-
70
-
71
-
72
 |
 |
