Panasonic DVD-LV50 Portable Dvd - Page 37
MAINTENANCE, To clean this unit, wipe with a, soft, dry cloth., Maintenance of the lens - screen problem
 |
UPC - 037988406265
View all Panasonic DVD-LV50 manuals
Add to My Manuals
Save this manual to your list of manuals |
Page 37 highlights
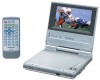
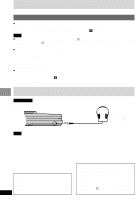
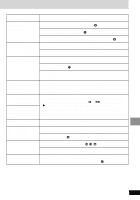
Displays On-Screen Menu Icons are cut off or are not displayed at all. Use [3, 4] while the rightmost icon is highlighted to move them down. G No On-Screen display. Go to the Display menu in the SETUP screen, and select "On" for "On-Screen Messages". K "Check the disc." appears on the LCD. Clean the disc. 9 ERROR stands for a number. " ERROR 01": A problem has occurred with the battery pack. Consult your dealer. " ERROR 02": The battery pack has been recharging for 12 hours but has failed to recharging for some reason. Recharge again. " ERROR 03": You are recharging in a location that is too hot or too cold. Recharge at normal temperature. H stands for a number. Trouble has occurred. The number appearing after H depends on the problem. Turn the unit off and on again. Alternatively, turn the unit off, disconnect the power source (AC or battery pack) reconnect the power and turn the unit on again. If the service numbers fail to clear, note the service number and contact a qualified service person. Note The following do not indicate malfunction. ≥Sound from the AC adaptor during recharging. ≥The battery pack warms up after recharging or during use. Maintenance ∫ To clean this unit, wipe with a soft, dry cloth. ≥Use eyeglass cleaner to remove stubborn dirt from the LCD. ≥Never use alcohol, paint thinner or benzine to clean this unit. ≥Before using chemically treated cloth, read the instructions that came with the cloth carefully. ∫ Maintenance of the lens ≥Remove dust carefully with an air blower for camera lenses (optional). ≥Recommended product: ≥≥Lens cleaner kit (SZZP1038C) ≥≥(Available from Panasonic dealers.) ≥Be careful not to touch the lens with your fingers. Reference RQT6450 37
-
 1
1 -
2
-
3
-
4
-
5
-
6
-
7
-
8
-
9
-
10
-
11
-
12
-
13
-
14
-
15
-
16
-
17
-
18
-
19
-
20
-
21
-
22
-
23
-
24
-
25
-
26
-
27
-
28
-
29
-
30
-
31
-
 32
32 -
 33
33 -
 34
34 -
 35
35 -
 36
36 -
 37
37 -
 38
38 -
 39
39 -
 40
40 -
 41
41 -
 42
42 -
43
-
44
-
45
-
46
-
47
-
48
-
49
-
50
-
51
-
52
-
53
-
54
-
55
-
56
-
57
-
58
-
59
-
60
-
61
-
62
-
63
-
64
-
65
-
66
-
67
-
68
-
69
-
70
-
71
-
72
-
73
-
74
-
75
-
76
-
77
-
78
-
79
-
80
 |
 |