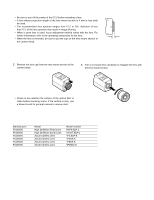
Panasonic GPUS932CU GPUS932CU User Guide - Page 16
Basic operations, ELECTRIC ZOOM
 |
View all Panasonic GPUS932CU manuals
Add to My Manuals
Save this manual to your list of manuals |
Page 16 highlights
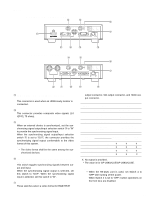
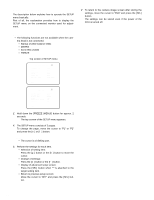
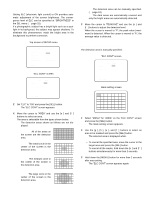
s Basic operations The description below explains how to operate the SETUP menu basically. First of all, the explanation provides how to display the SETUP menu on the connected monitor used for adjustment. Important: • The following functions are not available when the camera head is not connected. • Startup of white balance AWC • MATRIX • ELECTRIC ZOOM • FREEZE Top screen of SETUP menu ** SET UP ** P1 CAMERA ID ELC SHUTTER GAIN SENS UP OUTPUT SEL *OFF *OFF OFF OFF OFF RGB(NOR) END ** SET UP ** P2 SCENE FILE *FILE1 WHITE BAL AWC BLACK BAL *MANU SYNC INT ELECTRIC ZOOM ON FREEZE ON END z Hold down the [FREEZE (MENU)] button for approx. 2 seconds. → The top screen of the SETUP menu appears. x The SETUP menu consists of 2 pages. To change the page, move the cursor to "P1" or "P2" and press the [e] or [f] button. Note: • The cursor is a blinking part. c Perform the settings for each item. • Selection of setting item: Press the [g] button or the [h] button to move the cursor. • Change of settings: Press the [e] button or the [f] button. • Display of advanced setup screen: Press the [SEL] button when "*" is attached to the target setting item. • Return to previous setup screen: Move the cursor to "RET" and press the [SEL] button. v To return to the camera image screen after storing the settings, move the cursor to "END" and press the [SEL] button. The settings can be stored even if the power of the CCU is turned off. 16
-
 1
1 -
2
-
3
-
4
-
5
-
6
-
7
-
8
-
9
-
10
-
 11
11 -
 12
12 -
 13
13 -
 14
14 -
 15
15 -
 16
16 -
 17
17 -
 18
18 -
 19
19 -
 20
20 -
 21
21 -
22
-
23
-
24
-
25
-
26
-
27
-
28
-
29
-
30
-
31
-
32
 |
 |