Panasonic KV-S3065CL Scanner - Page 33
Repacking Instructions - service manual
 |
UPC - 092281842226
View all Panasonic KV-S3065CL manuals
Add to My Manuals
Save this manual to your list of manuals |
Page 33 highlights
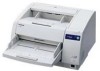
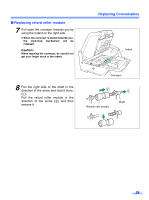
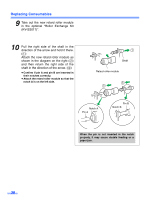
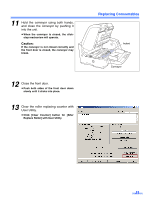
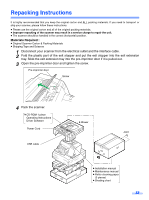
Repacking Instructions It is highly recommended that you keep the original carton and ALL packing materials. If you need to transport or ship your scanner, please follow these instructions. ≥ Please use the original carton and all of the original packing materials. ≥ Improper repacking of the scanner may result in a service charge to repair the unit. ≥ The scanner should be handled in the correct (horizontal) position. Materials Required : ≥ Original Scanner Carton & Packing Materials ≥ Shipping Tape and Scissors 1 Disconnect your scanner from the electrical outlet and the interface cable. 2 Fold the plastic part of the exit stopper and put the exit stopper into the exit extension tray. Slide the exit extension tray into the pre-imprinter door if it is pulled out. 3 Open the pre-imprinter door and tighten the screw. Pre-imprinter door Screw 4 Pack the scanner. ≥ CD-ROM 1 piece Operating Instructions Driver Software Power Cord USB cable ≥ Blower Joint ≥ Installation manual ≥ Maintenance manual ≥ Roller cleaning paper (3 pieces) ≥ Shading chart 33
-
 1
1 -
2
-
3
-
4
-
5
-
6
-
7
-
8
-
9
-
10
-
11
-
12
-
13
-
14
-
15
-
16
-
17
-
18
-
19
-
20
-
21
-
22
-
23
-
24
-
25
-
26
-
27
-
 28
28 -
 29
29 -
 30
30 -
 31
31 -
 32
32 -
 33
33 -
 34
34 -
 35
35 -
 36
36 -
 37
37 -
 38
38 -
39
-
40
 |
 |
