Panasonic KV-S3065CL Scanner - Page 36
Troubleshooting
 |
UPC - 092281842226
View all Panasonic KV-S3065CL manuals
Add to My Manuals
Save this manual to your list of manuals |
Page 36 highlights
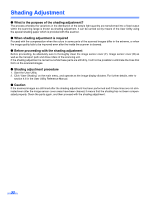
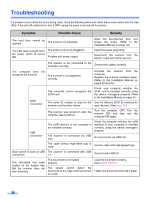
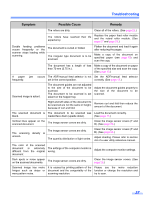
Troubleshooting If a problem occurs while the unit is being used, check the following items and check the scanner status with the User Utility. If the unit still malfunctions, turn it OFF, unplug the power cord and call for service. Symptom Possible Cause Remedy The front door cannot be opened. The screw is not loosened. Open the pre-imprinter door and loosen the screw. (Refer to the Installation Manual on page 19.) The LED does not light when the power switch is turned ON. The power cord is not plugged in. Problem with power supply. Insert the power plug firmly. Disconnect the scanner from the electric outlet and call for service. The scanner is not connected to the computer correctly. Connect the cables correctly. The computer does not recognize the scanner. The scanner is not registered correctly. Uninstall the scanner from the computer. Register the scanner hardware again. (Refer to the Installation Manual on pages 25 and 26.) SCSI connection The computer cannot recognize the SCSI card. Check your computer whether the SCSI card is installed correctly using the device manager's property. Refer to the Installation Manual on page 24. The same ID number is used for the Use the different SCSI ID numbers for scanner and the other device. each devices. (See page 12.) The scanner was turned on after the computer was turned on. Turn the computer OFF. Turn the scanner ON, and then turn the computer ON again. USB connection The USB interface of the computer is not installed correctly. Check the computer whether the USB interface of your computer is installed correctly using the device manager's property. The scanner is connected via USB hub. Do not connect via USB hub. The cable without High-Seed logo is used. Use the cable with High-Speed logo. Scan speed is slow at USB connection. The scanner is connected with USB 1.1. Connect with USB 2.0. The document has been loaded on the hopper tray. But the scanner does not start scanning. The document is not loaded properly. The sensor cannot detect the document as the edge of the document is curled. Load the document correctly. (See pages 13-16.) Flatten the document and load it again. 36
-
 1
1 -
2
-
3
-
4
-
5
-
6
-
7
-
8
-
9
-
10
-
11
-
12
-
13
-
14
-
15
-
16
-
17
-
18
-
19
-
20
-
21
-
22
-
23
-
24
-
25
-
26
-
27
-
28
-
29
-
30
-
 31
31 -
 32
32 -
 33
33 -
 34
34 -
 35
35 -
 36
36 -
 37
37 -
 38
38 -
 39
39 -
 40
40
 |
 |