Panasonic KX-HNS101 Operating Instructions CA
Panasonic KX-HNS101 Manual
 |
View all Panasonic KX-HNS101 manuals
Add to My Manuals
Save this manual to your list of manuals |
Panasonic KX-HNS101 manual content summary:
- Panasonic KX-HNS101 | Operating Instructions CA - Page 1
details about how to use the system, refer to the User's Guide (page 16). Please read this document before using the unit and save it for future reference. For assistance, please visit our support page on: www.panasonic.ca/english/support Printed in China HNS101C_(en_en)_0117_ver.201.pdf 1 2017/01 - Panasonic KX-HNS101 | Operating Instructions CA - Page 2
this system 4 For your safety 4 Important safety instructions ......5 For best performance 5 Other information 6 Setup Part Features available when using the [Home Network] app 16 Accessing the User's Guide ....16 Specifications 17 Other notices and information (for Canada 17 Warranty 18 2 - Panasonic KX-HNS101 | Operating Instructions CA - Page 3
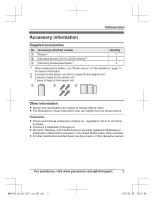
and specifications are subject to change without notice. R The illustrations in these instructions may vary slightly from the actual product. Trademarks R iPhone and iPad are owners. For assistance, visit www.panasonic.ca/english/support 3 HNS101C_(en_en)_0117_ver.201.pdf 3 2017/01/19 20: - Panasonic KX-HNS101 | Operating Instructions CA - Page 4
Do not use the product in health care facilities if any regulations posted in the area instruct you not to do so. Hospitals or health care facilities may be using equipment that . 4 For assistance, visit www.panasonic.ca/english/support HNS101C_(en_en)_0117_ver.201.pdf 4 2017/01/19 20:21:04 - Panasonic KX-HNS101 | Operating Instructions CA - Page 5
possible special disposal instructions. SAVE THESE INSTRUCTIONS For best performance Hub location/avoiding noise The hub and other compatible Panasonic devices use radio environment. For assistance, visit www.panasonic.ca/english/support 5 HNS101C_(en_en)_0117_ver.201.pdf 5 2017/01/19 20:21 - Panasonic KX-HNS101 | Operating Instructions CA - Page 6
Move away from the electrical appliances. Dispose of used batteries according to the instructions. Routine care R Wipe the outer surface of the product with a soft incorrect type. 6 For assistance, visit www.panasonic.ca/english/support HNS101C_(en_en)_0117_ver.201.pdf 6 2017/01/19 20:21:04 - Panasonic KX-HNS101 | Operating Instructions CA - Page 7
you can access the system using your mobile device. For details, refer to the System Setup Guide included with your hub. 2 Insert the battery The window/door sensor is battery powered. For assistance, visit www.panasonic.ca/english/support 7 HNS101C_(en_en)_0117_ver.201.pdf 7 2017/01/19 20:21:04 - Panasonic KX-HNS101 | Operating Instructions CA - Page 8
. 2 Window/door sensor: Remove the sensor unit cover and press and hold M N until the LED indicator blinks slowly in green (page 7). 8 For assistance, visit www.panasonic.ca/english/support HNS101C_(en_en)_0117_ver.201.pdf 8 2017/01/19 20:21:04 - Panasonic KX-HNS101 | Operating Instructions CA - Page 9
name to your devices and group them by location. For more information, refer to the User's Guide (page 16). Changing the sensor type You can select whether a window/door sensor functions as assistance, visit www.panasonic.ca/english/support 9 HNS101C_(en_en)_0117_ver.201.pdf 9 2017/01/19 20:21:04 - Panasonic KX-HNS101 | Operating Instructions CA - Page 10
in red even if the " " marks point directly at each other and are no more than 25.4 mm (1 inch) apart. 10 For assistance, visit www.panasonic.ca/english/support HNS101C_(en_en)_0117_ver.201.pdf 10 2017/01/19 20:21:04 - Panasonic KX-HNS101 | Operating Instructions CA - Page 11
far apart. 4 " " marks are not aligned. Magnet unit is too high. Result: When you press M N (A), the LED indicator lights in red (B). For assistance, visit www.panasonic.ca/english/support 11 HNS101C_(en_en)_0117_ver.201.pdf 11 2017/01/19 20:21:05 - Panasonic KX-HNS101 | Operating Instructions CA - Page 12
apart. 4 " " marks are not aligned. Magnet unit is too high. Result: When you press M N (A), the LED indicator lights in red (B). 12 For assistance, visit www.panasonic.ca/english/support HNS101C_(en_en)_0117_ver.201.pdf 12 2017/01/19 20:21:05 - Panasonic KX-HNS101 | Operating Instructions CA - Page 13
tape. Securing with screws 1 Remove the covers from each unit. R Lift from the indented area (A) and open the sensor unit cover (B). 2 2 1 1 For assistance, visit www.panasonic.ca/english/support 13 HNS101C_(en_en)_0117_ver.201.pdf 13 2017/01/19 20:21:05 - Panasonic KX-HNS101 | Operating Instructions CA - Page 14
the magnet unit so that they point directly at each other and are no more than 25.4 mm (1 inch) apart. 14 For assistance, visit www.panasonic.ca/english/support HNS101C_(en_en)_0117_ver.201.pdf 14 2017/01/19 20:21:05 - Panasonic KX-HNS101 | Operating Instructions CA - Page 15
. 2 Pull the thread tight and use it to cut the double-sided tape, and then remove any excess tape. 1 Excess tape 1 For assistance, visit www.panasonic.ca/english/support 15 HNS101C_(en_en)_0117_ver.201.pdf 15 2017/01/19 20:21:05 - Panasonic KX-HNS101 | Operating Instructions CA - Page 16
. R Android 4.1 or later versions are recommended. R You can also access the User's Guide at the web page listed below. www.panasonic.net/pcc/support/tel/ homenetwork/manual/ 16 For assistance, visit www.panasonic.ca/english/support HNS101C_(en_en)_0117_ver.201.pdf 16 2017/01/19 20:21:05 - Panasonic KX-HNS101 | Operating Instructions CA - Page 17
product and all person's body. R This product may not be collocated or operated in conjunction with any other antenna or transmitter. For assistance, visit www.panasonic.ca/english/support 17 HNS101C_(en_en)_0117_ver.201.pdf 17 2017/01/19 20:21:05 - Panasonic KX-HNS101 | Operating Instructions CA - Page 18
time, travel to and from the Authorized Servicer, loss of or damage to media or images, data or other memory or recorded content. This list of items is not exhaustive, but for illustration only.) 18 For assistance, visit www.panasonic.ca/english/support HNS101C_(en_en)_0117_ver.201.pdf 18 2017 - Panasonic KX-HNS101 | Operating Instructions CA - Page 19
depending on your province or territory. CONTACT INFORMATION For product information and operation assistance, please visit our Support page: www.panasonic.ca/english/support For defective product exchange within the warranty period, please contact the original dealer. For assistance, visit www - Panasonic KX-HNS101 | Operating Instructions CA - Page 20
. Date of purchase (found inside the sensor unit) Name and address of dealer Attach your purchase receipt here. 5770 Ambler Drive, Mississauga, Ontario L4W 2T3 © Panasonic Corporation 2014 HNS101C_(en_en)_0117_ver.201.pdf 20 2017/01/19 20:21:05 - Panasonic KX-HNS101 | Operating Instructions CA - Page 21
de ce système, se reporter au Guide d'utilisation (p. 17). Lire le présent document avant d'utiliser l'appareil et le conserver pour référence ultérieure. Pour de l'aide, visiter notre page de soutien client à : www.panasonic.ca/french/support Imprimé en Chine PNQX6707XA CC1014WK2126 (E) HNS101C_ - Panasonic KX-HNS101 | Operating Instructions CA - Page 22
13 Annexe Vérification du détecteur porte/ fenêtre 17 Fonctionnalités disponibles lors de l'utilisation de l'application [Home Network 17 Accès au Guide d'utilisation ..........17 Spécifications 18 Autres avis et informations (pour le Canada 19 Garantie 20 2 HNS101C_(fr-fr)_0202_ver.201.pdf - Panasonic KX-HNS101 | Operating Instructions CA - Page 23
/ou dans d'autres pays. R Toutes les autres marques de commerce identifiées aux présentes appartiennent à leurs propriétaires respectifs. Pour de l'aide, visiter www.panasonic.ca/french/support 3 HNS101C_(fr-fr)_0202_ver.201.pdf 3 2017/02/02 14:09:38 - Panasonic KX-HNS101 | Operating Instructions CA - Page 24
me auxiliaire ; il n'est pas conçu pour assurer une protection complète contre l'intrusion. Panasonic décline toute responsabilité en cas de perte ou de vol de biens durant l'utilisation de de l'aide, visiter www.panasonic.ca/french/support HNS101C_(fr-fr)_0202_ver.201.pdf 4 2017/02/02 14:09:38 - Panasonic KX-HNS101 | Operating Instructions CA - Page 25
du hub et prévention du bruit Le hub et les autres dispositifs Panasonic compatibles communiquent entre eux au moyen d'ondes radio. R Afin d'assurer une radios, ordinateurs, Pour de l'aide, visiter www.panasonic.ca/french/support 5 HNS101C_(fr-fr)_0202_ver.201.pdf 5 2017/02/02 14:09:38 - Panasonic KX-HNS101 | Operating Instructions CA - Page 26
ATTENTION : Il y a risque d'explosion si la pile est remplacée par une pile de type incorrect. Mettre au rebut les piles usagées conformément aux instructions. 6 Pour de l'aide, visiter www.panasonic.ca/french/support HNS101C_(fr-fr)_0202_ver.201.pdf 6 2017/02/02 14:09:38 - Panasonic KX-HNS101 | Operating Instructions CA - Page 27
mobile. Pour de plus amples renseignements, se reporter au Guide de configuration du système fourni avec le hub. 2 Mise en place de la pile Le détecteur porte/fenêtre est alimenté sur pile. Pour de l'aide, visiter www.panasonic.ca/french/support 7 HNS101C_(fr-fr)_0202_ver.201.pdf 7 2017/02/02 - Panasonic KX-HNS101 | Operating Instructions CA - Page 28
fait pas partie d'un ensemble). 4 Vérifier l'emplacement Lire attentivement les instructions de la présente notice en vue d'assurer que l'emplacement choisi permettra M OTHER DEVICEN 8 Pour de l'aide, visiter www.panasonic.ca/french/support HNS101C_(fr-fr)_0202_ver.201.pdf 8 2017/02/02 14:09:38 - Panasonic KX-HNS101 | Operating Instructions CA - Page 29
détecteur d'ouverture de porte. Pour de plus amples renseignements, se reporter au Guide d'utilisation (p. 17). Configuration Portée de la communication sans fil La portée du hub. Pour de l'aide, visiter www.panasonic.ca/french/support 9 HNS101C_(fr-fr)_0202_ver.201.pdf 9 2017/02/02 14:09:38 - Panasonic KX-HNS101 | Operating Instructions CA - Page 30
marques " " sont pointées l'une vers l'autre et ne sont pas à plus de 25,4 mm (1 po) l'une de l'autre. 10 Pour de l'aide, visiter www.panasonic.ca/french/support HNS101C_(fr-fr)_0202_ver.201.pdf 10 2017/02/02 14:09:38 - Panasonic KX-HNS101 | Operating Instructions CA - Page 31
alignées. Le module aimant n'est pas à la bonne hauteur. Résultat : lorsque l'on appuie sur M N (A), l'indicateur à diode s'allume en rouge (B). Pour de l'aide, visiter www.panasonic.ca/french/support 11 HNS101C_(fr-fr)_0202_ver.201.pdf 11 2017/02/02 14:09:38 - Panasonic KX-HNS101 | Operating Instructions CA - Page 32
ées. Le module aimant n'est pas à la bonne hauteur. Résultat : lorsque l'on appuie sur M N (A), l'indicateur à diode s'allume en rouge (B). 12 Pour de l'aide, visiter www.panasonic.ca/french/support HNS101C_(fr-fr)_0202_ver.201.pdf 12 2017/02/02 14:09:39 - Panasonic KX-HNS101 | Operating Instructions CA - Page 33
vis 1 Retirer le couvercle de chacun des modules. R Soulever la partie en saillie (A) et ouvrir le couvercle du module détecteur (B). 2 2 1 1 Pour de l'aide, visiter www.panasonic.ca/french/support 13 HNS101C_(fr-fr)_0202_ver.201.pdf 13 2017/02/02 14:09:39 - Panasonic KX-HNS101 | Operating Instructions CA - Page 34
'elles soient pointées l'une vers l'autre et ne soient pas à plus de 25,4 mm (1 po) l'une de l'autre. 14 Pour de l'aide, visiter www.panasonic.ca/french/support HNS101C_(fr-fr)_0202_ver.201.pdf 14 2017/02/02 14:09:39 - Panasonic KX-HNS101 | Operating Instructions CA - Page 35
des modules fixés au moyen d'une bande adhésive 1 Attacher une longueur de fil à deux bâtons, tournevis ou objets similaires. Pour de l'aide, visiter www.panasonic.ca/french/support 15 HNS101C_(fr-fr)_0202_ver.201.pdf 15 2017/02/02 14:09:39 - Panasonic KX-HNS101 | Operating Instructions CA - Page 36
Configuration 2 Tendre le fil et l'utiliser pour couper la bande adhésive double face, puis retirer toute bande adhésive restante. 1 Bande adhésive restante 1 16 Pour de l'aide, visiter www.panasonic.ca/french/support HNS101C_(fr-fr)_0202_ver.201.pdf 16 2017/02/02 14:09:39 - Panasonic KX-HNS101 | Operating Instructions CA - Page 37
l'application sur le dispositif mobile. 2 Taper sur [Guide de l'utilisateur]. Nota : R Les versions 8 et antérieures de l'application Microsoft® Windows® Internet Explorer® ne sont pas prises en charge. Pour de l'aide, visiter www.panasonic.ca/french/support 17 HNS101C_(fr-fr)_0202_ver.201.pdf 17 - Panasonic KX-HNS101 | Operating Instructions CA - Page 38
l'application Android sont recommandées. R Il est également possible d'accéder au Guide d'utilisation à la page Web indiquée ci-dessous. www.panasonic.net/pcc/support/tel/ homenetwork/manual/ Spécifications R Normes DECT (Digital Enhanced Cordless Telecommunications : télécommunications numériques - Panasonic KX-HNS101 | Operating Instructions CA - Page 39
. R Cet appareil ne doit pas être installé ni opéré de concert avec aucune autre antenne ni aucun autre émetteur. Annexe Pour de l'aide, visiter www.panasonic.ca/french/support 19 HNS101C_(fr-fr)_0202_ver.201.pdf 19 2017/02/02 14:09:39 - Panasonic KX-HNS101 | Operating Instructions CA - Page 40
une réparation effectuée par une entité autre qu'un centre de service Panasonic agréé ou encore d'une catastrophe naturelle. Les piles sèches sont temps, le transport jusqu'à et depuis un centre de service agréé, la perte ou la détérioration de supports ou d'images, de données ou de tout autre - Panasonic KX-HNS101 | Operating Instructions CA - Page 41
DEMANDE DE RENSEIGNEMENTS Pour tout renseignement sur les produits et de l'assistance technique, veuillez visiter notre page Soutien: www.panasonic.ca/french/support Pour le remplacement d'un produit défectueux couvert par la garantie, veuillez communiquer avec le revendeur d'origine. Pour de - Panasonic KX-HNS101 | Operating Instructions CA - Page 42
Notes 22 HNS101C_(fr-fr)_0202_ver.201.pdf 22 2017/02/02 14:09:39 - Panasonic KX-HNS101 | Operating Instructions CA - Page 43
Notes HNS101C_(fr-fr)_0202_ver.201.pdf 23 23 2017/02/02 14:09:39 - Panasonic KX-HNS101 | Operating Instructions CA - Page 44
Date d'achat (apposé à l'intérieur du module détecteur) Nom et adresse du détaillant Joindre votre reçu d'achat ici. 5770 Ambler Drive, Mississauga, Ontario L4W 2T3 © Panasonic Corporation 2014 HNS101C_(fr-fr)_0202_ver.201.pdf 24 2017/02/02 14:09:39
-
 1
1 -
 2
2 -
 3
3 -
 4
4 -
 5
5 -
 6
6 -
 7
7 -
8
-
9
-
10
-
11
-
12
-
13
-
14
-
15
-
16
-
17
-
18
-
19
-
20
-
21
-
22
-
23
-
24
-
25
-
26
-
27
-
28
-
29
-
30
-
31
-
32
-
33
-
34
-
35
-
36
-
37
-
38
-
39
-
40
-
41
-
42
-
43
-
44
 |
 |

Installation Guide
Home Network System
Window/Door Sensor
Model No.
KX-HNS101C
Thank you for purchasing a Panasonic product.
This document explains how to install the window/door sensor
properly.
For details about how to use the system, refer to the User’s Guide
(page 16).
Please read this document before using the unit and save it for future
reference.
For assistance, please visit our support page on:
www.panasonic.ca/english/support
Printed in China
HNS101C_(en_en)_0117_ver.201.pdf
1
2017/01/19
20:21:04