Panasonic KX MC6020 Multi-function Printer - Page 13
Remove the 4 toner cartridges from the protection, the toner cartridge correctly.
 |
UPC - 037988840441
View all Panasonic KX MC6020 manuals
Add to My Manuals
Save this manual to your list of manuals |
Page 13 highlights
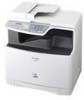
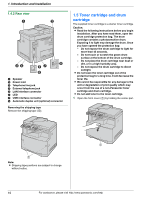
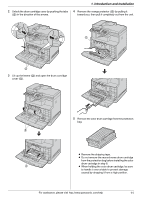
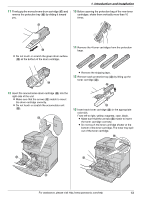
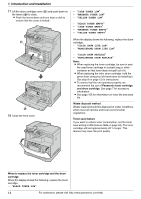
1. Introduction and Installation 11 Firmly grip the monochrome drum cartridge (q) and remove the protective tray (r) by sliding it toward you. 13 Before opening the protection bag of the new toner cartridges, shake them vertically more than 10 times. q r L Do not touch or scratch the green drum surface (s) at the bottom of the drum cartridge. 14 Remove the 4 toner cartridges from the protection bags. L Remove the shipping tape. 15 Remove each protective tray (w) by lifting up the toner cartridge (x). s x 12 Insert the monochrome drum cartridge (t) into the right side of the unit. L Make sure that the arrows (u) match to insert the drum cartridge correctly. L Do not touch or scratch the accumulator unit (v). u w 16 Insert each toner cartridge (y) in the appropriate color slot. From left to right, yellow, magenta, cyan, black. L Make sure that the arrows (z) match to insert the toner cartridge correctly. L Do not touch the toner cartridge shutter at the bottom of the toner cartridge. The toner may spill out of the toner cartridge. z t y v For assistance, please visit http://www.panasonic.com/help 13
-
 1
1 -
2
-
3
-
4
-
5
-
6
-
7
-
 8
8 -
 9
9 -
 10
10 -
 11
11 -
 12
12 -
 13
13 -
 14
14 -
 15
15 -
 16
16 -
 17
17 -
 18
18 -
19
-
20
-
21
-
22
-
23
-
24
-
25
-
26
-
27
-
28
-
29
-
30
-
31
-
32
-
33
-
34
-
35
-
36
-
37
-
38
-
39
-
40
-
41
-
42
-
43
-
44
-
45
-
46
-
47
-
48
-
49
-
50
-
51
-
52
-
53
-
54
-
55
-
56
-
57
-
58
-
59
-
60
-
61
-
62
-
63
-
64
-
65
-
66
-
67
-
68
-
69
-
70
-
71
-
72
-
73
-
74
-
75
-
76
-
77
-
78
-
79
-
80
-
81
-
82
-
83
-
84
-
85
-
86
-
87
-
88
-
89
-
90
-
91
-
92
-
93
-
94
-
95
-
96
-
97
-
98
-
99
-
100
-
101
-
102
-
103
-
104
-
105
-
106
-
107
-
108
-
109
-
110
-
111
-
112
-
113
-
114
-
115
-
116
-
117
-
118
-
119
-
120
 |
 |
