Panasonic KXTG9471B KXTG9471B User Guide - Page 9
Getting Started, If you subscribe to a DSL/ADSL, service, Battery installation
 |
View all Panasonic KXTG9471B manuals
Add to My Manuals
Save this manual to your list of manuals |
Page 9 highlights
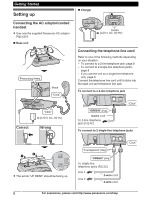
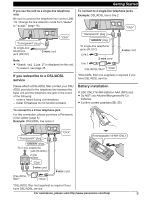
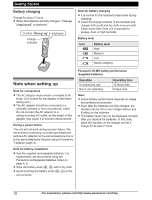
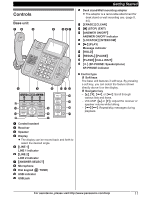
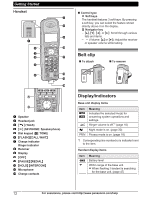
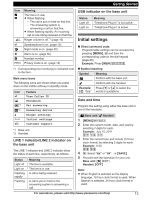
Getting Started If you use the unit as a single-line telephone only Be sure to connect the telephone line cord to LINE 1/2. Change the line selection mode from "Auto" to "Line1" (page 14). To connect to 2 single-line telephone jacks Example: DSL/ADSL line is line 2 "Click" "Click" "Transparent" plug To single-line telephone jack (RJ11C) 2-wire cord Note: R "Check tel line 2" is displayed on the unit. To erase it, see page 45. If you subscribe to a DSL/ADSL service Please attach a DSL/ADSL filter (contact your DSL/ ADSL provider) to the telephone line between the base unit and the telephone line jack in the event of the following: - noise is heard during conversations. - Caller ID features do not function properly. "Transparent" plug "GREEN" plug To single-line telephone jacks (RJ11C) Line 1 2-wire cord 4-wire cord Line 2 DSL/ADSL filter* "Click" *DSL/ADSL filter (not supplied) is required if you have DSL/ADSL service. Battery installation R USE ONLY Ni-MH batteries AAA (R03) size. R Do NOT use Alkaline/Manganese/Ni-Cd batteries. R Confirm correct polarities ( , ). To connect to a 2-line telephone jack For this connection, please purchase a Panasonic 2-line splitter (page 4). Example: DSL/ADSL line is line 2 "Transparent" plug "GREEN" plug To 2-line telephone jack (RJ14C) 2-line splitter "Click" 2-wire cord DSL/ADSL filter* "Click" "Click" 4-wire cord Rechargeable Ni-MH ONLY *DSL/ADSL filter (not supplied) is required if you have DSL/ADSL service. For assistance, please visit http://www.panasonic.com/help 9
-
 1
1 -
2
-
3
-
 4
4 -
 5
5 -
 6
6 -
 7
7 -
 8
8 -
 9
9 -
 10
10 -
 11
11 -
 12
12 -
 13
13 -
 14
14 -
15
-
16
-
17
-
18
-
19
-
20
-
21
-
22
-
23
-
24
-
25
-
26
-
27
-
28
-
29
-
30
-
31
-
32
-
33
-
34
-
35
-
36
-
37
-
38
-
39
-
40
-
41
-
42
-
43
-
44
-
45
-
46
-
47
-
48
-
49
-
50
-
51
-
52
-
53
-
54
-
55
-
56
-
57
-
58
-
59
-
60
-
61
-
62
-
63
-
64
 |
 |
