Panasonic NN-SE284 Operating Instructions - Page 30
CleaninG Vent grille Oven Air Vent, For Non-vented ductless application only., Charcoal Filter
 |
View all Panasonic NN-SE284 manuals
Add to My Manuals
Save this manual to your list of manuals |
Page 30 highlights
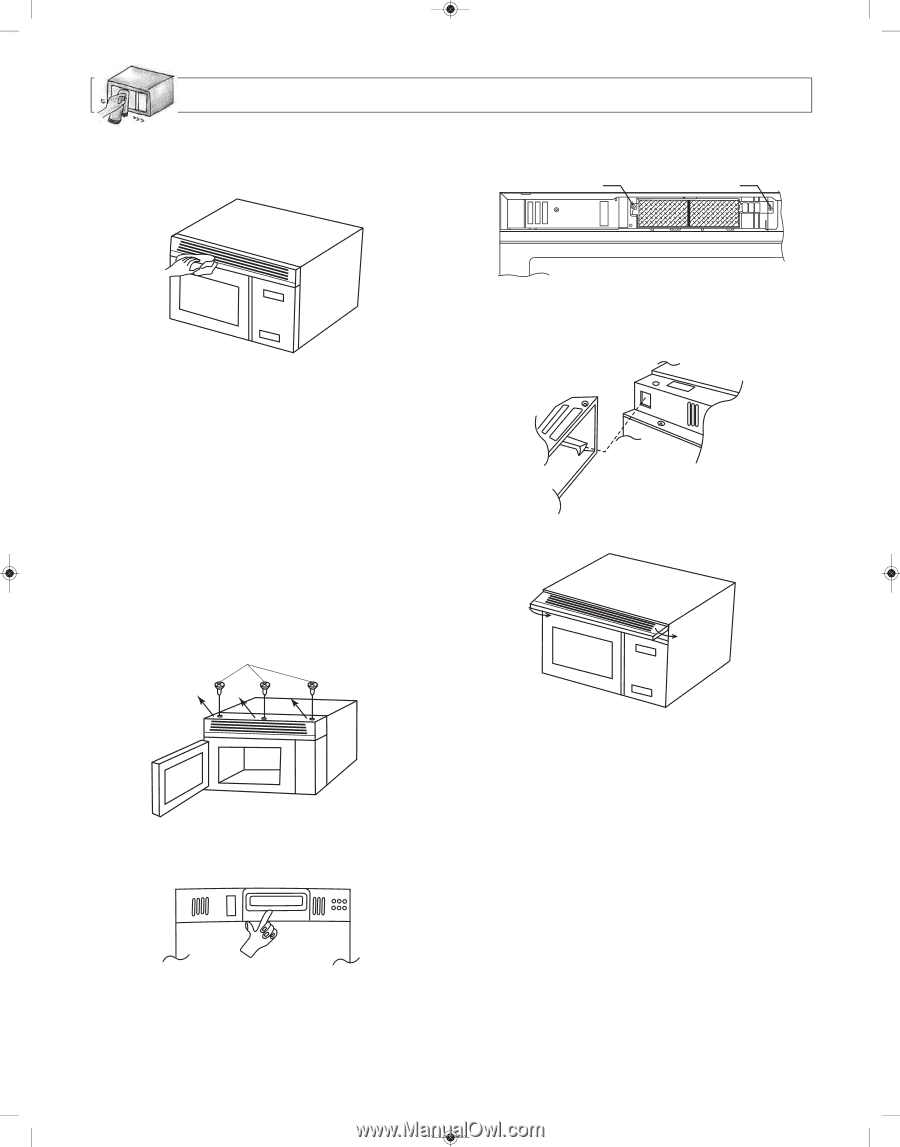
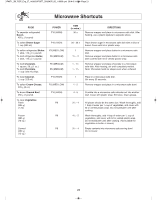
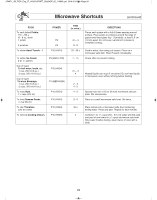
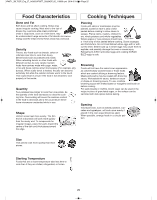
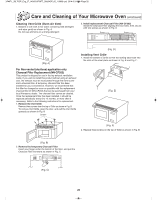
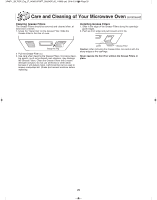
IP4871_3BL70CP_Eng_27_140603:IP3677_38Q04CP_00_110608.qxd 2014-6-3 9:44 Page 28 Care and Cleaning of your microwave Oven (continued) Cleaning vent grille (Oven Air vent) 1. Moisten a soft cloth in hot water containing mild detergent and wipe gently as shown in Fig. a. Do not use ammonia or a strong detergent. 3. Install replacement Charcoal filter (NN-Cf203) Install the Charcoal Filter aligning the two holes, then secure with two screws as shown in Fig. D. Screw Screw (Fig. A) (Fig. D) Installing vent grille 1. Install the bottom of Grille so that the locking tabs hook into the slots of the steel plate as shown in Fig. e and Fig. F. for Non-vented (ductless) application only. Charcoal filter Replacement (NN-Cf203) this product is shipped for use in the top exhaust ventilation mode. If you wish to install this product without using an exhaust duct, the exhaust must be recirculated through the front louver and a charcoal filter. a temporary charcoal filter has been installed for your convenience. however, we recommend that this filter be changed as soon as possible with the replacement charcoal filter kit (nn-CF203) that can be purchased from your local Panasonic dealer. the charcoal filter cannot be cleaned. Once the replacement filter has been installed, it should be replaced periodically every 6 to 12 months, or more often if necessary. Refer to the following instructions for replacement. 1. Remove the vent grille Remove three screws from the top of Grille as shown in Fig. B. to remove Vent Grille, open the door, and pull the Vent Grille upwards as shown in Fig. B. Screws (Fig. E) (Fig. F) 2. Replace three screws on the top of Grille as shown in Fig. B. (Fig. B) 2. Remove the temporary Charcoal filter Insert your finger under the bottom of the filter, and pull the Charcoal Filter frontward as shown in Fig. C. (Fig. C) 28
-
 1
1 -
2
-
3
-
4
-
5
-
6
-
7
-
8
-
9
-
10
-
11
-
12
-
13
-
14
-
15
-
16
-
17
-
18
-
19
-
20
-
21
-
22
-
23
-
24
-
 25
25 -
 26
26 -
 27
27 -
 28
28 -
 29
29 -
 30
30 -
 31
31 -
 32
32 -
 33
33 -
 34
34 -
 35
35 -
36
-
37
-
38
-
39
-
40
-
41
-
42
-
43
-
44
-
45
-
46
-
47
-
48
-
49
-
50
-
51
-
52
-
53
-
54
-
55
-
56
-
57
-
58
-
59
-
60
-
61
-
62
-
63
-
64
-
65
-
66
-
67
-
68
-
69
-
70
-
71
-
72
 |
 |