Panasonic NN-SE284 Installation Instructions - Page 11
Installation Of Bracket
 |
View all Panasonic NN-SE284 manuals
Add to My Manuals
Save this manual to your list of manuals |
Page 11 highlights
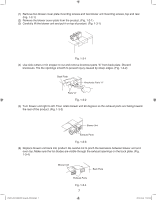
INSTALLATION OF BRACKET 1. Draw a wall stud line. 2. Centre the bracket assembly a against the wall and top cabinet. 3. Drill holes. (Fig. 3-2 or Fig. 3-3) 2 Wall Studs One Wall Stud B-1 B-3 B-4 B-2 B-1 B-3 B-4 B-2 Bracket Assembly 4 Wood Screws q Toggle Bolt w Toggle Bolt Two Wood Screws q Fig. 3-2 Fig. 3-3 3-1 Mark 2 holes on the wall stud line. 3-2 Mark other 4 holes on the other area. 3-3 Remove the bracket. 3-4 Drill two 1/8" holes on the stud line for wood screw. 3-5 Drill four 5/8" holes for toggle bolts. 4. Tighten screws and bolts. 4-1 Unscrew toggle bolts and insert through the bracket, then insert the bolts through the dry wall. (Fig. 3-4) Fig.3-4 4-2 Fasten the bracket with two 13/4" wood screws q. 4-3 Tighten four toggle bolts w. IP3297_F03138Q03CP_Eng_00_101028.indd 11 11 2010-10-28 11:51:30
-
 1
1 -
2
-
3
-
4
-
5
-
 6
6 -
 7
7 -
 8
8 -
 9
9 -
 10
10 -
 11
11 -
 12
12 -
 13
13 -
 14
14
 |
 |
