Panasonic NN-SE284 Installation Instructions - Page 7
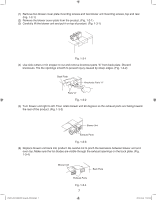
the rear of the product. Fig. 1-3-3
 |
View all Panasonic NN-SE284 manuals
Add to My Manuals
Save this manual to your list of manuals |
Page 7 highlights
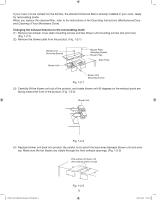
(1) Remove two blower cover plate mounting screws and two blower unit mounting screws, top and rear. (Fig. 1-2-1) (2) Remove the blower cover plate from the product. (Fig. 1-2-1) (3) Carefully lift the blower unit and put it on top of product. (Fig. 1-3-1) Fig. 1-3-1 (4) Use side cutters or tin snipper to cut and remove knockout parts "A" from back plate. Discard knockouts. File the openings smooth to prevent injury caused by sharp edges. (Fig. 1-3-2) Back Plate Knockouts Parts "A" Parts "A" Fig. 1-3-2 (5) Turn blower unit right to left. Then rotate blower unit 90 degrees so the exhaust ports are facing toward the rear of the product. (Fig. 1-3-3) Blower Unit Exhaust Parts Fig. 1-3-3 (6) Replace blower unit back into product. Be careful not to pinch the lead wires between blower unit and oven top. Make sure the fan blades are visible through the exhaust openings on the back plate. (Fig. 1-3-4) IP3297_F03138Q03CP_Eng_00_101028.indd 7 Blower Unit Back Plate Exhaust Parts Fig. 1-3-4 7 2010-10-28 11:51:30
-
 1
1 -
 2
2 -
 3
3 -
 4
4 -
 5
5 -
 6
6 -
 7
7 -
 8
8 -
 9
9 -
 10
10 -
 11
11 -
 12
12 -
13
-
14
 |
 |
