Panasonic NN-SE284 Installation Instructions - Page 12
Step 4: Installing The Microwave Oven
 |
View all Panasonic NN-SE284 manuals
Add to My Manuals
Save this manual to your list of manuals |
Page 12 highlights
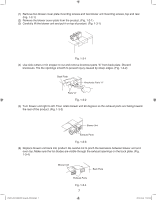
STEP 4: INSTALLING THE MICROWAVE OVEN 1. Remove contents from inside the oven including glass tray and wire rack. Be sure to close the door. Remove all contents from upper kitchen cabinet. 2. Place a piece of cardboard or blanket on the cook top, place oven on the cardboard or blanket. 3. Before sliding the oven on the bracket assembly, be sure that the power supply cord will be accessible through the cabinet. 4. Pass AC cord through kitchen cabinet hole. (No.w in Fig. 2-1) 5. Lift and install the oven onto the bracket by sliding it over the rails of the bracket. This is easily and safely accomplished with one person on each side of the oven. Push the oven all the way back until it is flush with the wall. Pull the power supply cord through out and be careful not to pinch it between the outer case of the oven and bottom of the cabinet. The oven should fit snugly underneath the lip of the bracket's upper edge. (Fig. 4-1) Power Supply Cord Fig. 4-1 Fig. 4-2 6. Insert one screw (hardware items either e-a or e-b) with flat washer (hardware item r) through the left hole drilled through the top cabinet's bottom and into the top of the oven. (Fig. 4-3) Insert another screw (hardware items either e-a or e-b) with flat washer (hardware item r) and the metal brace (hardware item o) through the right hole into the top of the oven. (Fig. 4-3) Screw (hardware e-a or e-b) Power Supply Cord Metal Brace (hardware o) Flat Washer (hardware r) Fig.4-3 7. While tightening these screws, lift the front side of the oven and push it toward the wall. This ensures a flash and level mounting. 12 IP3297_F03138Q03CP_Eng_00_101028.indd 12 2010-10-28 11:51:30
-
 1
1 -
2
-
3
-
4
-
5
-
6
-
 7
7 -
 8
8 -
 9
9 -
 10
10 -
 11
11 -
 12
12 -
 13
13 -
 14
14
 |
 |
